The HIPPARCHUS (On-Line) USER'S GUIDE
(c) 1988 - 1997, sofTouch(TM) APpLications
Version 5.2.1a, Last Document Update: 28 November 2000
HIPPARCHUS is a licensed software product of sofTouch APpLications, and is issued to the purchaser under the terms of a license agreement. This software, and the accompanying documentation, may not be copied, reproduced, adapted, or transcribed onto any magnetic or other physical medium, other than for the purchaser's personal use as specified in the license agreement.
sofTouch APpLications has thoroughly tested this software product, and the accompanying documentation and delivers them in good faith to the purchaser. sofTouch APpLications can assume no liability, or responsibility for any loss or damage resulting from the use of this software product. No warranties, either expressed or implied, with respect to this software product or its applicability or fitness for any particular purpose are made by sofTouch APpLications.
sofTouch APpLications reserves the right to change the specification, implementation and documentation for this software product without notifications.
sofTouch APpLications welcomes comments on all of its software products. These comments, technical questions, and any problems you may encounter should be sent in writing to:
sofTouch APpLications
7742 East Oakwood Circle Telephone: 520-296-5296
Tucson, Arizona 85750-2338 USA e-mail: gschneider@mac.com
This software was developed using APL.68000, a proprietary product of MicroAPL Ltd., which has given permission for a runtime version of APL.68000 to be included with the software. Copyright and all intellectual property rights in APL.68000 remain vested in MicroAPL Ltd. APL.68000 is a trademark of MicroAPL Ltd.
Applereg., Macintoshreg. and the ![]() logo are registered trademarks of Apple Computer, Inc.
logo are registered trademarks of Apple Computer, Inc.
Our Web Site URL: http://balder.prohosting.com/stouch/
Hipparchus (c. 190-120 B.C.), of the Alexandrian school, is often regarded as the father of positional astronomy. Employing his new and advanced observational methods, he embarked upon a project to create one of the first systematic star catalogs. Incorporated into Hipparchus' catalog was the stellar magnitude scale, still in use today (with minor modifications), for ranking the apparent brightnesses of the stars.
More than two millennia have come and gone since the time of Hipparchus. Astrometry, the science of positional measurements of astronomical bodies, has made great strides since that time, building upon the foundation laid by Hipparchus. Now, sofTouch(TM) APpLications is pleased to welcome you to HIPPARCHUS(c), an interactive stellar and planetary positional system.
HIPPARCHUS is a stellar database query and reporting system, an interactive star catalog, a variable format sky atlas, a star map and finder chart maker, a perpetual planetary ephemeris and much more. HIPPARCHUS has been designed to provide all of the information you need, in both graphical and textual fashion, to help find your way around the sky - from any location on the Earth, at any time.
You will find HIPPARCHUS very easy to use, as HIPPARCHUS makes use of the standard Macintoshreg. user interfaces (menus, dialogs, etc.). Despite its simplicity, HIPPARCHUS is a powerful astronomical reference and planning aide. Those of us at sofTouch APpLications would like to think that Hipparchus would have been pleased, as we trust you will be.
sofTouch APpLications welcomes comments, questions, and suggestions from current and potential users of our software. Registered users may obtain technical support for any of our products by telephone, email or snail-mail. Please visit our Web site for information on program updates and other software.
snail-mail: sofTouch APpLications
7742 East Oakwood Circle
Tucson, Arizona 85750-2338 USA
email: gschneider@mac.com
Telephone: 1-520-296-5296
WWW URL: http://balder.prohosting.com/stouch/
This section of the HIPPARCHUS USER'S GUIDE describes how to install and run HIPPARCHUS. Should you have any other questions on getting started with HIPPARCHUS please contact your sofTouch APpLications technical assistance representative.
The HIPPARCHUS Distribution Disk
![]() Before you
proceed any further, make at least one backup copy of your HIPPARCHUS
distribution disk. HIPPARCHUS is not copy protected.
Before you
proceed any further, make at least one backup copy of your HIPPARCHUS
distribution disk. HIPPARCHUS is not copy protected.
HIPPARCHUS and all of it's supporting files are distributed in compressed format in a self-extracting archive on a single 3-1/2 inch 1.4M floppy disk. Before using HIPPARCHUS (for the first time) you must extract these files from the archive. This archive contains both a PowerPC native version of HIPPARCHUS, and one for the 68K family of Macintoshes. You will need approximately 2.5MB of disk space to store all of the uncompressed files. You need not store both the PPC and 68K versions of HIPPARCHUS, only the one which is applicable to your Macintosh. To extract and decompress the HIPPARCHUS files insert the HIPPARCHUS distribution disk in your floppy disk drive and open it.
![]() Double-click
on the HIPPARCHUS 5.2.1 [[florin]].sea icon. A folder containing all of
the HIPPARCHUS files, called HIPPARCHUS [[florin]], will be placed in the
location you have specified.
Double-click
on the HIPPARCHUS 5.2.1 [[florin]].sea icon. A folder containing all of
the HIPPARCHUS files, called HIPPARCHUS [[florin]], will be placed in the
location you have specified.

Figure 1.1 - The HIPPARCHUS [[florin]] Folder
The HIPPARCHUS [[florin]] folder contains five items; two files, two folders, and a font suitcase. A complete inventory of the HIPPARCHUS [[florin]] folder is shown in Figure 1.1. Each of these items is as follows:
HIPPARCHUS 5.2.1 68K - The Hipparchus application for the 68K family of Macintoshes.
or
HIPPARCHUS 5.2.1 PPC - The Hipparchus application for the PowerPC computers.
APL_Font - This file contains the fonts which HIPPARCHUS uses for text output.
EXAMPLES - This folder contains six HIPPARCHUS Settings files discussed in Appendix C of the Users Guide, as well as a sample artificial satellite elements file (see File:GET SATELLITES) and a minor planet orbital elements file (see Setup:COMET-MINOR PLANET).
The DATA folder contains three files (also shown in Figure 1.1) as follows:
APLSFILE.AFL - This is the file in which all stellar catalog and planetary positional data used by HIPPARCHUS are stored.
YALE BS CATALOG - This is a catalog index file, referencing B1900.0 positions of stars in the Yale Bright Star catalog.
YALE 2000.0 - This is a catalog index file, referencing positions of stars in the Yale Bright Star Catalog to the equator and equinox of 2000.0, with proper motions applied for the epoch 2000.0
HIPPARCHUS is a licensed software product of sofTouch APpLications. You may freely copy the HIPPARCHUS [[florin]].sea distribution archive and/or extracted files to hard disks and make backup or working copies on 3.5-inch floppy disks. Please refer to your software license agreement for further information regarding backup copies of HIPPARCHUS.
![]() Note: HIPPARCHUS
can be run on older Macintoshes which are not equipped with a hard drive.
If you are using such a machine, sofTouch APpLications will be happy to
supply you with the HIPPARCHUS files in an uncompressed, unarchived format.
Older versions of HIPPARCHUS which will run on Macintoshes with < 1
megabyte of available RAM are available upon request. Please contact your
sofTouch technical representative if you need to obtain either of these.
We can also provide you with HIPPARCHUS on lower density floppy disks,
or arange for electronic transfer via ftp, or e-mail as a BinHex file.
Note: HIPPARCHUS
can be run on older Macintoshes which are not equipped with a hard drive.
If you are using such a machine, sofTouch APpLications will be happy to
supply you with the HIPPARCHUS files in an uncompressed, unarchived format.
Older versions of HIPPARCHUS which will run on Macintoshes with < 1
megabyte of available RAM are available upon request. Please contact your
sofTouch technical representative if you need to obtain either of these.
We can also provide you with HIPPARCHUS on lower density floppy disks,
or arange for electronic transfer via ftp, or e-mail as a BinHex file.
Installing HIPPARCHUS on a Hard Disk
The files APLSFILE.AFL, YALE BS CATALOG, YALE 2000.0 (and any other catalog index files you may later create) must all reside in the same folder in order for HIPPARCHUS to be able to locate stellar catalog data. Therefore, do not disperse these files which have been provided in the in the DATA folder.
All other files and folders may be left in the HIPPARCHUS [[florin]] folder, or moved to whatever location which best suits your needs.
The file APL_Font contains the special fonts which HIPPARCHUS uses for both text and graphical output. You may want to install these fonts in your system file. If you intend to send HIPPARCHUS output to a printer it is advisable to install these fonts. Consult your Macintoshreg. Utilities User's Guide, Reference Manual or other applicable system documents for instruction on installing new fonts in your system file.
HIPPARCUS is compatable with MacOS system S/W versions 6.0 and higher. HIPPARCHUS will run under System 6 on any Macintosh computer with 1 Megabyte or more of random access memory (RAM), and a reasonably standard system file configuration. To run HIPPARCHUS under MultiFinder (System 6), or under System 7, your Macintosh must have at least 2 Megabytes of RAM. If your system has insufficient memory for HIPPARCHUS then an advisory dialog will inform you of this immediately after you chose a catalog index file at the start of a work session. The dialog message displayed will be "WS FULL" (Workspace Full). Clicking OK, the only option for this advisory dialog, will return you to the Macintosh finder.
The minimum "Application Memory Size" required for HIPPARCHUS to run is 680K under the Macintosh System 6 Finder, or 880K under MultiFinder or System 7. The pre-allocation of memory for HIPPARCHUS is accomplished by setting the Application Memory Size, or Preferred Size for the HIPPARCHUS 5.2.1 {68K or PPC} . application. This has been set larger for the copy of HIPPARCHUS on your HIPPARCHUS distribution disk. You may adjust the HIPPARCHUS Application Memory Size, as is appropriate to your system, via the GET INFO item in the system's (desk top) FILE menu. Please refer to your Macintosh System Software User's Guide, or the Macintosh Electronic Reference for additional information on resizing memory for application software.
Even if less than recommended minimum amount of RAM is free, for example - if you have one or more other applications opened under MultiFinder or System 7, you may be permitted to attempt to launch HIPPARCHUS anyway. If so, then HIPPARCHUS might have insufficient memory for some of its possible functions. In that case you may be advised that there is "Insufficient Memory" (for a specific action, which will be described), or "Not Enough Memory to Continue" at some point during the HIPPARCHUS work session.
HIPPARCHUS is compatible with both Macintosh System 6 and System 7 software. If you are using System 7 it is suggested that you turn off "Balloon Help" when using HIPPARCHUS. HIPPARCHUS 5.2.1 68K may be run with 32-bit addressing mode (68020 + machines) and/or Processor code caching enabled (68040 processors). Both the 68K and PPC versions may be run in a virtual memory partition.
Starting Up a HIPPARCHUS Session
To start up a HIPPARCHUS just double-click on the HIPPARCHUS 5.2.1 icon (or select and open the application from the Finder's File menu). A text window containing a copyright notice and other system information will appear briefly and the HIPPARCHUS menu headers will appear in the menu area.
You will then be requested to select a catalog index file. Catalog index files point to the stellar and planetary data used by HIPPARCHUS, and two such indices have been provided in the DATA folder supplied with the HIPPARCHUS application Locate and open this folder. If you are using HIPPARCHUS for the first time, or have never created your own catalog index files, the file dialog will only contain two entries: YALE BS CATALOG (for the catalog epoch B1900.0) and YALE 2000.0. Select the desired catalog index file (if there is more than one) and click the Open button, or just double click on the desired file. Clicking on Cancel is not an acceptable action at this point.

Figure 1.2- The CATALOG INDEX FILE SELECTION Dialog
HIPPARCHUS catalog and index files are described in detail in this later sections of this User's Guide.
After selecting a catalog index file a dynamical status window, indicating the current state of some key HIPPARCHUS computational parameters, will appear. HIPPARCHUS is now ready to go to work.
This section of the HIPPARCHUS USER'S GUIDE describes how HIPPARCHUS interacts with the user through the MAcintosh graphical user interface.
The HIPPARCHUS menu area appears at the top of the screen, and remains
unchanged throughout a HIPPARCHUS work session. The ![]() menu and the names of the five HIPPARCHUS menus appear in the menu area,
as shown in Figure 2.1. Each menu contains a number of items which perform
specific tasks or functions. Many of the menu items have selectable options,
which may be specified or selected through a dialog. Each of the menus,
the menu items, and the item options are discussed in detail in later sections
of the HIPPARCHUS User's Guide.
menu and the names of the five HIPPARCHUS menus appear in the menu area,
as shown in Figure 2.1. Each menu contains a number of items which perform
specific tasks or functions. Many of the menu items have selectable options,
which may be specified or selected through a dialog. Each of the menus,
the menu items, and the item options are discussed in detail in later sections
of the HIPPARCHUS User's Guide.
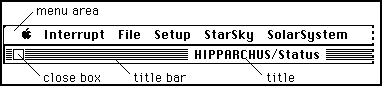
Figure 2.1 - Menu Area and Title Bar
To see a list of the items associated with a particular menu, move the mouse cursor to the menu name, click on that menu, and hold down the mouse button. To select a menu item, drag the mouse cursor down to the desired item (while continuing to hold down the mouse button) and release the button when the desired item is highlighted. Moving the cursor anywhere else on the screen and releasing the mouse button will abort the request to select an item from the selected menu.
In addition to the ![]() menu, the HIPPARCHUS menus which appear are named Interrupt, File, Setup,
StarSky, and SolarSystem. Most HIPPARCHUS menu items have keyboard equivalents
defined as the
menu, the HIPPARCHUS menus which appear are named Interrupt, File, Setup,
StarSky, and SolarSystem. Most HIPPARCHUS menu items have keyboard equivalents
defined as the ![]() key plus one character. Any of those menu items may be invoked from the
keyboard, in addition to pull down selection with the mouse, by depressing
the
key plus one character. Any of those menu items may be invoked from the
keyboard, in addition to pull down selection with the mouse, by depressing
the ![]() key and the
single character which represents that item. The keyboard equivalents for
each of the HIPPARCHUS menu items are summarized in Appendix A, and noted
in the detailed discussion of each menu item.
key and the
single character which represents that item. The keyboard equivalents for
each of the HIPPARCHUS menu items are summarized in Appendix A, and noted
in the detailed discussion of each menu item.
When a HIPPARCHUS menu item is selected either by click-releasing with
the mouse, or using a ![]() keyboard equivalent, a check mark (
keyboard equivalent, a check mark ( ![]() )
will be placed next to that menu item. The next time you display the items
in that menu, the item which was last selected in that menu will have a
)
will be placed next to that menu item. The next time you display the items
in that menu, the item which was last selected in that menu will have a
![]() next to that items
name. This will help you remember which menu item you last requested. Note
that each menu will keep track of the last item selected, independent of
items selected in other menus. No
next to that items
name. This will help you remember which menu item you last requested. Note
that each menu will keep track of the last item selected, independent of
items selected in other menus. No ![]() history is kept on items in the Interrupt menu.
history is kept on items in the Interrupt menu.
The HIPPARCHUS title bar normally appears directly below, and joined to the menu area. Whenever you select an item from any HIPPARCHUS menu, except the INTERRUPT menu, the title will change to indicate the menu and item selected. The format of the title will bar is HIPPARCHUS/MenuName:ITEM. When you have completed working with a HIPPARCHUS menu item (or dismiss the associated window, when applicable), the HIPPARCHUS/Status window, as indicated by it's title, will return.
The title bar will also provide informational messages to inform you when HIPPARCHUS is busy carrying out a computational task. For example Preparing: SolarSystem:Planetary Ephemeris. Some information which changes dynamically will also be presented in the title when appropriate.
The title bar is also used to indicate when HIPPARCHUS is waiting for your input. Most of the time the title bar will have the title flanked by six horizontal lines as shown in the top of Figure 2.2. In this example the OBSERVER item from the Setup menu was selected. When HIPPARCHUS is soliciting input from you (through a DIALOG) the title bar, except for the title itself, will be blank, as exemplified in the bottom of Figure 2.2. This indicates that HIPPARCHUS cannot proceed until you complete the dialog. See HIPPARCHUS Dialogs for details on HIPPARCHUS dialogs.
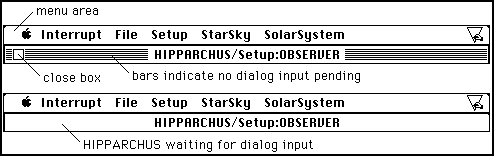
Figure 2.2 - HIPPARCHUS Title Bars
You may exit HIPPARCHUS and return to the Macintosh finder by clicking on the close box. The close box will not be available when dialog input is pending.
All graphical and textual output produced by HIPPARCHUS will appear in a HIPPARCHUS window. HIPPARCHUS windows may be detached from the menu bar to reveal a portion your Macintosh desk top as shown in Figure 2.3. To move a HIPPARCHUS window move the cursor to the title bar, click the mouse, and while holding the mouse button down drag the window to the area of the desk top where you would like it to be.
![]() Note: If a
portion of a HIPPARCHUS window containing graphical output is moved off
of the Macintosh screen, any graphics in that region will be erased from
the window.
Note: If a
portion of a HIPPARCHUS window containing graphical output is moved off
of the Macintosh screen, any graphics in that region will be erased from
the window.
![]() Note: When
the HIPPARCHUS window is detached from the menu area, output to
the window is slowed. Therefore, you normally may want to operate with
the HIPPARCHUS window attached to the menu bar.
Note: When
the HIPPARCHUS window is detached from the menu area, output to
the window is slowed. Therefore, you normally may want to operate with
the HIPPARCHUS window attached to the menu bar.

Figure 2.3 - Detached HIPPARCHUS Window
The arrow cursor ![]() will appear whenever HIPPARCHUS is in an idle state. This indicates that
HIPPARCHUS has completed its last task and is ready for you to tell it
what to do next (i.e., select a new menu item). The arrow cursor will also
appear when certain options have been chosen from specific menu items.
The use of the arrow cursor in these special conditions will be discussed
in detail later in this manual.
will appear whenever HIPPARCHUS is in an idle state. This indicates that
HIPPARCHUS has completed its last task and is ready for you to tell it
what to do next (i.e., select a new menu item). The arrow cursor will also
appear when certain options have been chosen from specific menu items.
The use of the arrow cursor in these special conditions will be discussed
in detail later in this manual.
The watch cursor ![]() will appear whenever HIPPARCHUS is busy. When HIPPARCHUS is busy you may
move the watch cursor, and select other menu items. If you select a SYSTEM
menu item, that item will be processed immediately. If you select a HIPPARCHUS
menu item, that item will not be processed until the current task which
HIPPARCHUS is working on has completed. It is possible to "stack up"
HIPPARCHUS menu item requests, while HIPPARCHUS is busy. The items selected
will all be processed in turn. This, however, is not recommended unless
you are thoroughly familiar with HIPPARCHUS - as this can be a possible
source of confusion to a new HIPPARCHUS user.
will appear whenever HIPPARCHUS is busy. When HIPPARCHUS is busy you may
move the watch cursor, and select other menu items. If you select a SYSTEM
menu item, that item will be processed immediately. If you select a HIPPARCHUS
menu item, that item will not be processed until the current task which
HIPPARCHUS is working on has completed. It is possible to "stack up"
HIPPARCHUS menu item requests, while HIPPARCHUS is busy. The items selected
will all be processed in turn. This, however, is not recommended unless
you are thoroughly familiar with HIPPARCHUS - as this can be a possible
source of confusion to a new HIPPARCHUS user.
The text input cursor ![]() will appear when a dialog resulting from a menu item selection requires
text input. The text input cursor will appear, and will be blinking, in
the currently selected text input field. The arrow cursor will also be
present whenever the text input cursor appears.
will appear when a dialog resulting from a menu item selection requires
text input. The text input cursor will appear, and will be blinking, in
the currently selected text input field. The arrow cursor will also be
present whenever the text input cursor appears.
Anytime HIPPARCHUS requires further information before it can proceed a DIALOG box will appear. All user inputs to HIPPARCHUS are entered through the standard Macintosh DIALOG interface. It is assumed here that the user is familiar with the general concepts of using dialog boxes, and is referred to the Macintosh System Software User's Guide for more details.
Most HIPPARCHUS dialogs have an OK button, and many have a CANCEL button as well. The function of these buttons vary depending upon the menu, item and option you have selected. Both OK and CANCEL offer you an exit route out of a HIPPARCHUS dialog. Unless otherwise stated, you must click on either OK or CANCEL to terminate the dialog. In HIPPARCHUS you cannot exit a dialog by hitting the return key. You must click on OK, CANCEL, or another defined exit (specific to that dialog) to terminate that dialog.
To indicate that a HIPPARCHUS dialog is waiting for input, the horizontal striping in the HIPPARCHUS title bar will blank and the close box will disappear.
The simplest dialogs contain only advisory or error messages and an OK button. To exit such a dialog, simply click on the OK button to inform HIPPARCHUS that you have digested the information which it is presenting.
Other dialogs may allow you to enter numerical or textual data, select from amongst various related options, or specify that certain types of processing should be done under certain conditions. None of the dialog entries which you provide will take effect until you click OK. If you click CANCEL the dialog will "forget" any entries you made in that dialog session and the values which were first displayed when the dialog was brought up will be retained.
Many dialogs will check your entries, after you click OK, to make sure that they are acceptable to HIPPARCHUS. If you made an entry error, the nature of that error will be explained to you in a simple error dialog. Clicking OK in the error dialog will bring you back into the dialog in which the entry error was made. You may then either correct the error, or click on CANCEL to exit the dialog. You will not be able to exit a dialog, other than by CANCELing that dialog, with an uncorrected entry error.
Error dialogs are very specific and easy to understand. Several examples of error dialogs are shown in Figure 2.4.
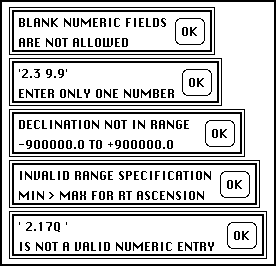
Figure 2.4 - Sample Error Dialogs
The items on the Setup menu invoke dialogs which are used to specify, set up, and control how HIPPARCHUS is to operate. The Setup items produce no tabular output or maps, but rather, will prepare the stellar catalog, or solar system ephemeris data which will later be displayed from the StarSky or SolarSystem menus. The Setup menu contains six items; OBSERVER, CATALOG, STARS, RETRIEVE, PLANETS and COMET-MINOR PLANET.
The current settings of major display and output control parameters, which are established through the Setup menu items (or interactively by other actions as described in later sections of the User's Guide), are summarized in the HIPPARCHUS Status window. This window, which is automatically updated whenever any of the reported parameters change, will remain available for quick reference while HIPPARCHUS is in use. A sample Status window is shown in Figure 3.0.

Figure 3.0- Sample HIPPARCHUS Status Window
The positions of celestial objects may be computed geocentrically, or topocentrically (for a given location on the surface of the Earth), in horizon coordinates (altitude and azimuth) for any date and time. These coordinates are used in producing sky maps, horizon views, tabular displays and when computing the apparent positions of solar system targets and Earth orbiting satellites. To specify the geographic coordinates of the observer, and the desired time and date, use the OBSERVER dialog under the Setup menu. The OBSERVER dialog box is shown in Figure 3.1.

Figure 3.1 - The Setup:OBSERVER Dialog
As indicated in the dialog, the geographic coordinates of the observer are entered in degrees, minutes, and seconds of arc. The LATITUDE and LONGITUDE are each entered as a single number as shown in Figure 3.1. In this example the latitude is +39 degrees, 40 minutes, 15.0 seconds, and the longitude is -76 degrees, 55 minutes and 10.5 seconds. In keeping with standard astronomical conventions, positive latitudes are north of the equator and positive longitudes are east of the Greenwich meridian. Latitudes may range from -90 degrees to +90 degrees, longitudes may range from -180 degrees to +180 degrees. The observer's ALTITUDE, above mean sea level, also may be entered through this dialog.
When precise coordinates are unknown or not needed approximate geographical
coordinates may be input by pointing to the observer's location on a world
map. To do this, select the MAP INPUT option . A
map of the world will be displayed, as shown in Figure 3.2. Just move the
arrow cursor to the desired location and click the mouse to indicate the
observers' geographical location.

Figure 3.2 - MAP Input Option
The observer's geographical coordinates are always used in determining the local sidereal time. Ephemerides and positional computations of the Sun, Moon, planets, minor planets, comets and artificial Earth-orbiting satellites may be reduced to either geocentric or topocentric coordinate reference frames. If the TOPOCENTRIC option is selected (rather than GEOCENTRIC) then topocentric parallax corrections for all solar system objects will be applied, and the coordinates of those objects will be referred to the observer's geographic location.
A specific observational epoch (time and date) may be entered in either of two formats; the Gregorian calendar date and Universal Time, or the Julian date and fractional day. Or, the current time and date as determined from the Macintosh system clock may be used. The input format which is desired is specified by clicking either the U.T. DATE, JULIAN DATE, or USE U.T. = SYSTEM CLOCK TIME button in the dialog box. In Figure 3.1 the U.T. DATE is selected.
The Gregorian (U.T.) date is specified in the form year, month (01-12), day of month, as shown in the example. A B.C. date should be entered a negative number. The date in the example corresponds to August 15, 1993. The Universal Time is entered in the form hour, minute, second (to the nearest tenth of a second). The example shown corresponds to 0 hours 00 minutes and 0.0 seconds U.T. If the U.T. DATE input format is selected, any entries in the JULIAN DATE section will be ignored as input. If the dialog is exited by clicking on OK, the Julian Date will be computed from the supplied U.T. date and time, and will be displayed in the JULIAN DATE section the next time the OBSERVER dialog is requested.
If the JULIAN DATE input format is selected the integral Julian day number should be entered in the JULIAN DATE box, and the fractional part of the JULIAN DATE in the box labeled FRAC. If the JULIAN DATE input format is selected, any entries in the U.T. DATE section will be ignored as input. If the dialog is exited by clicking on OK, the U.T. Date and time will be computed from the supplied Julian date, and will be displayed in the U.T. date and time section the next time the OBSERVER dialog is requested.
![]() "To
facilitate chronological reckoning, the system of Julian day (JD) numbers
maintains a continuous count of astronomical days, beginning with JD 0
on 1 January 4713 B.C., Julian proleptic calendar... the Julian day begins
at noon, whereas the calendar day begins at the preceding midnight."
"To
facilitate chronological reckoning, the system of Julian day (JD) numbers
maintains a continuous count of astronomical days, beginning with JD 0
on 1 January 4713 B.C., Julian proleptic calendar... the Julian day begins
at noon, whereas the calendar day begins at the preceding midnight."
- (Ref 4, p. L5)
The Julian proleptic calendar omits a year zero when transitioning from A.D. to B.C. dates. Standard astronomical convention, however, retains a year zero for temporal continuity in expressing Gregorian dates. HIPPARCHUS, being astronomically oriented, also includes a year zero in converting from Gregorian to Julian dates (and vice versa). Therefore, a B.C. date in the Julian proleptic calendar will have a numerical value for the year which is one less that of the "Astronomical year" kept by Hipparchus.
If you have selected the USE U.T. = SYSTEM CLOCK TIME option, then you
must also indicate what zone time your Macintosh system clock is keeping.
This is done by entering the offset between Universal Time and your Macintosh
system clock in the + ![]() HOURS numeric field qualifying the USE U.T. = SYSTEM CLOCK TIME option.
For example, if your system clock is keeping Eastern Daylight Time enter
a time zone correction of +4 hours. For time zones in the eastern hemisphere
enter a negative number of hours.
HOURS numeric field qualifying the USE U.T. = SYSTEM CLOCK TIME option.
For example, if your system clock is keeping Eastern Daylight Time enter
a time zone correction of +4 hours. For time zones in the eastern hemisphere
enter a negative number of hours.
![]() Note: The specification
of the time and date for the computation of topocentric coordinates in
the OBSERVER dialog does not alter or affect the coordinate epoch
selected in the CATALOG dialog under the Setup menu. Hence, the
topocentric coordinates of target objects will be computed based upon the
Right Ascensions and Declinations for the currently selected epoch.
Note: The specification
of the time and date for the computation of topocentric coordinates in
the OBSERVER dialog does not alter or affect the coordinate epoch
selected in the CATALOG dialog under the Setup menu. Hence, the
topocentric coordinates of target objects will be computed based upon the
Right Ascensions and Declinations for the currently selected epoch.
If the dialog is exited by clicking on CANCEL, then any entries made in the dialog will be ignored, and the coordinate and time specifications which were in place before the OBSERVER dialog was invoked will be retained.
The Setup:CATALOG dialog allows you to specify the manner in which stellar catalog entries are to be retrieved. Generally, the CATALOG item would be chosen before the STARS or RETRIEVE items. CATALOG is used to specify if the data, when retrieved, are to be merged with a previous selection (if any), or if previously selected catalog entries are to be discarded before new data are retrieved. CATALOG is also used to establish what coordinate transformations, if any, are to be applied to the selected catalog entries either before or after those entries are retrieved. The CATALOG dialog is shown in Figure 3.3.
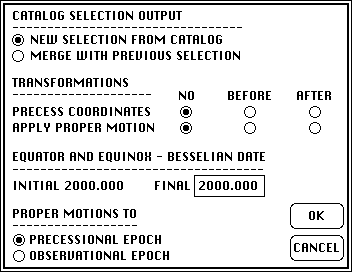
Figure 3.3 - The Setup:CATALOG Dialog.
The first section of the CATALOG dialog is headed CATALOG SELECTION OUTPUT and offers a choice of two options, one of which must be specified. The NEW SELECTION FROM CATALOG option should be chosen if catalog entries which had been previously retrieved are to be discarded before a new retrieval is done. The second option - MERGE WITH PREVIOUS SELECTION - will cause subsequent catalog retrievals to be merged with any prior retrievals. The currently specified CATALOG SELECTION OUTPUT option will remain in effect for all catalog retrievals which follow.
![]() Note: Catalog
entries are not retrieved by the CATALOG item. CATALOG
is only used to specify how the data in the catalog are to be treated when
a retrieval (see Setup:RETRIEVE) is requested.
Note: Catalog
entries are not retrieved by the CATALOG item. CATALOG
is only used to specify how the data in the catalog are to be treated when
a retrieval (see Setup:RETRIEVE) is requested.
The second section of the CATALOG dialog, headed TRANSFORMATIONS, is used to specify how the stellar coordinates of the selected catalog entries are to be transformed (if a transformation is desired) and when the transformation is to take place. Transformations, here, include both precession of the stellar coordinates from one epoch to another, and the application of proper motions. Precession and proper motion computations may be applied separately or both may be selected. Both of these transformations may be applied either before the stars are selected from the source catalog, or after the data are RETRIEVEd. Applying these transformations to the catalog data before the data are retrieved may be rather time consuming, as ALL data in the catalog are transformed. Indeed, to precess all 9096 stars in the HIPPARCHUS database from one date to another requires about 16 minutes on a standard Macintosh SE. Note that the stellar coordinates in the source catalog file itself are unaltered by these transformations. Thus, if a subsequent data retrieval is requested from the same source catalog file, the epoch of that catalog file is unchanged.
The third section of the CATALOG dialog is used to specify the Besselian date of the equator and equinox of the coordinate system to which stellar coordinates are to be precessed (if precession has been selected under TRANSFORMATIONS). The INITIAL (catalog) epoch is indicated in the dialog. The date of the FINAL (target) epoch must be entered as a decimal year, with a fractional part if desired. B.C. dates should be entered as negative numbers. If stellar coordinates are precessed BEFORE retrievals are made from the catalog then the initial epoch reported in the CATALOG dialog is updated to reflect the fact that the FINAL epoch specified has become the new INITIAL epoch. If the FINAL and INITIAL epochs have the same value then no precessional transformation will be applied, even if specified in the TRANSFORMATIONS section of the dialog.
Instantaneous stellar positions may be corrected for proper motions either for the specified precessional epoch (i.e., the date of the equator and equinox of the coordinate system), or for the observational epoch (time and date) specified in the SETUP:Observer dialog. For example, you may compute the instantaneous position of stars (correcting for proper motions) for a particular observational epoch, and then transform those positions to a coordinate systems whose equator and equinox are referenced to another date. The choice is made by selecting either PRECESSIONAL EPOCH or OBSERVATIONAL EPOCH in the PROPER MOTIONS TO section of the SETUP:CATALOG dialog.
The STARS item in the Setup menu will invoke a dialog which is used to specify range and exact match criteria which will be applied when catalog entries are retrieved. As shown in Figure 3.4, the central area of the STARS dialog (headed by ITEM) lists the names of the numerical stellar catalog fields recognized by HIPPARCHUS. These field names represent the Right Ascension (RT ASCENSION), DECLINATION, V MAGNITUDE, Proper Motion Components in Right Ascension and Declination (PROP MOT RA and PROP MOT DEC, respectively) and the Yale Bright Star Catalog Number (YALE BS NO). To the left of each ITEM name is a series of four buttons, headed MATCH ON, MATCH OFF, RANGE ON and RANGE OFF. For each item, only one of these buttons may be activated at one time. To the right of each item name are two editable text fields headed by MINIMUM and MAXIMUM.

Figure 3.4 - The Setup:STARS Dialog
When stellar catalog entries are retrieved, the RANGE and MATCH criteria specified in the STARS dialog are checked. Only those catalog entries which satisfy all of the criteria specified in the STARS dialog will be retrieved.
EXACT MATCH CRITERIA - If you wish to retrieve a catalog entry, or entries, with a specific characteristic click MATCH ON for that ITEM and enter the value of that ITEM in the editable text field headed by MINIMUM. For example, if you wish to search the catalog for all stars whose V magnitude is exactly equal to 4.0, click MATCH ON to the left of V MAGNITUDE and enter 4.0 in the editable text field headed MINIMUM to the right of V MAGNITUDE. Only those stars whose V magnitudes are exactly 4.0, in the catalog, will be selected. Note that the MATCH and RANGE criteria for the other ITEMs are still in effect. If RANGE ON was selected for RT ASCENSION then only those stars with V magnitudes of 4.0 which fell within the range of right ascensions specified would be selected. If you wish to specify a match criteria with no regard to any other ITEMs then be sure to specify MATCH OFF or RANGE OFF for those other ITEMs. If you wish to retrieve the catalog entry for the star whose Yale Bright Star number is 5896, click MATCH ON next to YALE BS NO, enter 5896 in the MINIMUM editable text area, and click MATCH OFF for all other ITEMs.
RANGE CRITERIA - You may select stellar catalog entries based upon the range of one or more ITEMs. Turn on RANGE criteria by clicking RANGE ON next to the item of interest, and specify the allowable range in the associated MINIMUM and MAXIMUM editable text fields. For example, to select stars with declinations between -10deg. and +15deg., click RANGE ON to the left of DECLINATION and enter -100000 and +150000 in the MINIMUM and MAXIMUM fields, respectively.
COMBINING RANGE AND MATCH CRITERIA - Selections from the catalog may be very generally specified using the RANGE dialog, by mixing RANGE and MATCH criteria. Consider the following examples:
1. Select all northern hemisphere stars between right ascensions of 12h and 15h 30m. Click RANGE ON for these items, enter 120000 and 153000 for the MINIMUM and MAXIMUM RT ASCENSION; and 0 and 900000 for the MINIMUM and MAXIMUM DECLINATION. Click RANGE OFF for all other ITEMs.
2. Same coordinate range as example 1, but only allow stars brighter than V magnitudes of 3.5. Same coordinate RANGE specifications as example 1, but also specify 3.5 as the MAXIMUM value for V MAGNITUDE and click RANGE ON for V MAGNITUDE.
3. Same as example 2, but allow only stars whose V magnitudes are exactly equal to 3.5. Same as example 2, but enter 3.5 in the MINIMUM field for V MAGNITUDE and click MATCH ON for this field.
With the exception of Maximum V magnitude, the default MINIMUM and MAXIMUM values in the STARS dialog correspond to the full range of values for each of the ITEMs. The maximum allowable V magnitude is +7.96.
STELLAR DUPLICITY AND VARIABILITY - The RANGE of catalog data to be retrieved may be qualified based upon the characteristics of stellar duplicity (or multiplicity), and variability. Any stars which are actually double (or multiple) systems, or are variable are so noted in the Hipparchus stellar catalog. Three check boxes, labeled SINGLE STARS, DOUBLE STARS and VARIABLE STARS may be found in the lower left corner of the STARS dialog. When checked, only stars with those characteristics will be considered in subsequent data retrievals. By default all three are checked, thereby enabling the retrieval of all stars in the HIPPARCHUS stellar catalog. If any of these check boxes are deselected, then only the appropriate subset of stars will be available for retrieval, subject of course, to the RANGE and MATCH criteria in effect.
STELLAR SPECTRA - Further qualification by stellar spectral type may also be specified via the Setup:STARS dialog. To enable qualification by spectral type, enable the check box labeled SPECTRUM, and enter the desired spectral type in the text box to the right of the SPECTRUM label. Spectral type matching, in the Hipparchus database, is done on a character by character basis. Hipparchus uses the standard astronomical nomenclature for specifying spectral type (spectral and luminosity classes, and anomalous spectral features). Thus, if the spectral type entry is K2, only stars of spectral class K2 will be enabled for retrieval. In that case K2 stars of any luminosity class will be enabled. If only K2 dwarf stars are to be considered, then K2V should be entered in the SPECTRUM text window. The spectrum window is case sensitive. Hence, to enable retrieval of only B-emission stars, the SPECTRUM text must be entered as Be, not as BE. SPECTRUM qualification is applied in addition to the MATCH and RANGE criteria and other qualifications in effect.
MERGED RANGE AND MATCH CRITERIA - Suppose you wish to select all stars in the catalog which fall between the range 12h to 15h or 18h to 20h in right ascension. Here you want multiple specifications for one ITEM. To accomplish this, first select Setup:STARS and specify 120000 and 150000 in the MINIMUM and MAXIMUM RANGE fields, respectively, for RT ASCENSION. Exit Setup:STARS by clicking OK. Select the RETRIEVE item from the Setup menu to retrieve all stars between 12h and 15h right ascension. Next, select the CATALOG item from the Setup menu, and click on MERGE WITH PREVIOUS SELECTION, and exit by clicking OK. Select the STARS item from the Setup menu again, and specify 18000 to 20000 for the range in RT ASCENSION. Exit Setup:STARS by clicking on OK, and retrieve the catalog entries for these stars from using the RETRIEVE item from the Setup menu. The two selections will be merged together. In this manner, complex selections may be made from the catalog. Using the MERGE WITH PREVIOUS SELECTION option (in the CATALOG dialog) successive retrieves from the catalog will be merged by logically oring the RANGE and MATCH criteria between two or more retrieves.
When all RANGE, MATCH and stellar qualification criteria have been entered click OK or CANCEL to exit. If you click OK, all of the numerical entries will be checked. If an entry error was made in any of the editable text fields, the STARS dialog will be erased from the HIPPARCHUS window, and an error dialog will appear. If such an error dialog appears (see Figure 2.4), click OK after you have read the error message. The STARS dialog will again appear in the HIPPARCHUS window. Correct the error and click OK. You will not be permitted to exit the Setup:STARS dialog with a pending, uncorrected entry error, unless you click CANCEL. If you exit the Setup:STARS dialog by clicking on CANCEL, match criteria which were in effect when the STARS dialog opened will be restored to their previous values.
![]() Note: Setup:STARS
does not actually retrieve entries from the stellar catalog, it only sets
up the RANGE, MATCH and qualification criteria which will be used whenever
data are retrieved.
Note: Setup:STARS
does not actually retrieve entries from the stellar catalog, it only sets
up the RANGE, MATCH and qualification criteria which will be used whenever
data are retrieved.
![]() Note: The time
required to retrieve data from the catalog (see the following section)
can be reduced by turning off RANGE or EXACT MATCH checking for those items
for which unqualified retrieval will be desired.
Note: The time
required to retrieve data from the catalog (see the following section)
can be reduced by turning off RANGE or EXACT MATCH checking for those items
for which unqualified retrieval will be desired.
![]() Note: If RANGE
and MATCH criteria are turned OFF for all ITEMs, qualification for
single, double and variable stars enabled, and spectral qualification disabled
then the entire stellar catalog will be selected.
Note: If RANGE
and MATCH criteria are turned OFF for all ITEMs, qualification for
single, double and variable stars enabled, and spectral qualification disabled
then the entire stellar catalog will be selected.
To retrieve entries from the stellar catalog, select the RETRIEVE item from the Setup menu. HIPPARCHUS will retrieve data from the currently specified stellar catalog file (see the Setup:CATALOG menu). The retrieval will be constrained by the RANGE, MATCH and qualification criteria currently in effect as specified in the Setup:STARS dialog. Setup:RETRIEVE will apply transformations (precession, and/or proper motions) to the stellar coordinates if this is specified in the Setup:CATALOG dialog. Coordinate transformations affect only the retrieved data, and will not alter the contents of the stellar catalog files.
If NEW SELECTION FROM CATALOG was specified in the Setup:CATALOG dialog, then any previously selected catalog entries will be discarded before the new retrieval takes place. If MERGE WITH PREVIOUS SELECTION was specified in Setup:CATALOG then the stellar catalog entries which are retrieved will be merged with the previous retrieval. In either case, an informational dialog will appear advising you of the number of stars which were retrieved, and if applicable, how many stars resulted from the merging of retrieves. Figure 3.5 show examples of the Setup:RETRIEVE informational dialog.

Figure 3.5 - Sample Setup:RETRIEVE dialogs
![]() Note: While
stellar coordinates will be affected by any coordinate transformations
specified in the Setup:CATALOG dialog, the minimum and maximum RT
ASCENSION and DECLINATION fields in the Setup:STARS dialog
will remain as entered. Thus, it is possible for some, or all, of the stars
RETRIEVEd to precess, or move due to their proper motions, out of
the RT ASCENSION and DECLINATION range specified via Setup:STARS.
This may happen if stellar coordinates are transformed after stellar targets
are selected. In that case fewer stars may be mapped or tabulated than
reported as retrieved by Setup:RETRIEVE.
Note: While
stellar coordinates will be affected by any coordinate transformations
specified in the Setup:CATALOG dialog, the minimum and maximum RT
ASCENSION and DECLINATION fields in the Setup:STARS dialog
will remain as entered. Thus, it is possible for some, or all, of the stars
RETRIEVEd to precess, or move due to their proper motions, out of
the RT ASCENSION and DECLINATION range specified via Setup:STARS.
This may happen if stellar coordinates are transformed after stellar targets
are selected. In that case fewer stars may be mapped or tabulated than
reported as retrieved by Setup:RETRIEVE.
The PLANETS item invokes a dialog which is used to specify which solar system objects, if any, are to be permitted for display or tabulation from items on the HIPPARCHUS StarSky and SolarSystem menus. (See the PLANETS option for the StarSky STAR CHART, SKY MAP and HORIZON items, and the PLANETARY EPHEMERIS item on the SolarSystem menu). The Setup:PLANETS dialog box is shown in Figure 3.6. Initially, all eight planets, the sun, and the moon are selected. To disable (or re-enable) the display or tabulation of one or more solar system objects, click on the check box next to that objects' name. If an X appears in the associated check box then that object is enabled. If the check box is empty then the associated object is disabled.

Figure 3.6 - The Setup:PLANETS Dialog.
When ephemerides of solar system objects, comets, and asteroids (minor planets) are computed, the equatorial coordinates of the selected solar system objects will be determined for the Universal Time and date (or Julian date) specified by the current values in the Setup:OBSERVER dialog. These coordinates will be precessed either to the time and date specified in the Setup:OBSERVER dialog, or to the epochal date (equator and equinox) of the catalog as specified in the Setup:CATALOG dialog. This choice is made by clicking on either OBSERVER DATE or CATALOG DATE in the Setup:PLANETS dialog.
To exit the Setup:PLANETS dialog click on OK or CANCEL. If you exit by clicking on CANCEL then any entries you made during the dialog session will be forgotten, and the Setup:PLANETS dialog will be restored to its prior state.
The Setup:PLANETS dialog may also be used as an entry route into the Setup:COMET-MINOR PLANET dialog. Selection of the COMET/M.P. option will terminate the Setup:PLANETS dialog.
The Setup:COMET-MINOR PLANET dialog allows you to enter or modify the Keplerian orbital elements for a comet or minor planet. These elements are used when computing positions of this solar system body by StarSky:STAR CHART, StarSky:HORIZON, SolarSystem:COMET-MP EPHEMERIS, and when centering a StarSky:SKY MAP on the instantaneous position of the comet or minor planet. The Setup:COMET-MINOR PLANET dialog will also be displayed if COMET/M.P. is selected in the Setup:PLANETS dialog.
This dialog (as exemplified in Figure 3.7) provides several options for specifying the orbital characteristics of a comet or minor planet. Each section of the dialog is discussed in detail.
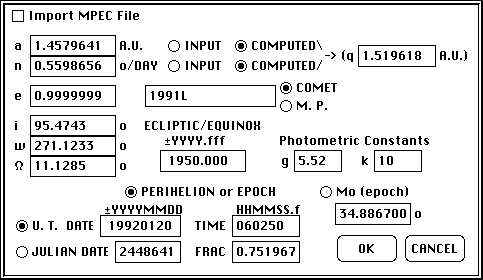
Figure 3.7 - The COMET-MINOR PLANET (Solar System) Dialog.
An orbital ephemeris (the position of an object in the sky as a function of time) for a comet or minor planet is computed from a set of parameters referred to collectively as the "orbital elements". The set of orbital elements include:
a The semi-major axis of the orbit (in Astronomical Units)
n The mean motion of the object (in Degrees per Day)
e The eccentricity of the orbital ellipse
i The inclination of the orbit to the ecliptic plane (in Degrees)
w The argument of the perihelion of the orbit (in Degrees)
[[Omega]] The heliocentric longitude of the ascending node of the orbit (in Degrees)
These elements are entered in the upper left hand side of the COMET-MINOR PLANET dialog. In circumstances where the elements a and/or n are not be known, but the object's perihelion distance, q, is then a or n can be computed. Or, if a, Mo (the mean anomaly), and the Epoch of the osculation date are known, then n can be computed. In the former case enter the value of q (in Astronomical Units) in the upper right hand side of the dialog, and select the COMPUTED rather than the INPUT option for either a, or n, or both. In the latter case enter, select COMPUTED rather than INPUT for click n, click the Mo (epoch) button, enter the associated value of the mean anomaly, and the osculation epoch in the PERIHELION or EPOCH fields.
The elements i, w, and [[Omega]] are referred to the equator and equinox of a particular date. This need not be the same reference epoch which HIPPARCHUS is currently using for it's stellar catalog data. The date of the equator and equinox for the elements i, w, and [[Omega]] are entered to the right of these elements in the COMET-MINOR PLANET dialog.
Either the time and date of the orbital perihelion, or the orbital mean anomaly (Mo), and the osculation epoch, must be entered. Select either PERIHELION or EPOCH, or the Mo (epoch) option to indicate which type of entry is to be used. The instant of perihelion may be entered as either a Gregorian Date/Universal Time or as a Julian Date and Fractional Day. (Please see Setup:OBSERVER for more information on time formats in HIPPARCHUS). Select the desired input format by choosing either the U.T. DATE or JULIAN DATE option in the lower left hand side of the dialog, then enter the instant of perihelion or the mean anomaly using the input format shown in the dialog.
The name of the object should be entered in the text field immediately to the left of the COMET/M.P. buttons. In this example, the object's name, 1991L, appears in this field. This name will appear on SKY MAPs which are centered on the instantaneous position of the object, on annotated orbital track in HORIZON views and STAR CHARTs, and on tabular orbital ephemeris reports. Specify whether the object is a comet or a minor planet by clicking either the COMET or the M.P. button to the right of the object's name. The distinction is important, and is used, when apparent visual magnitudes of the object are computed.
The photometric constants g and k are used in predicting the apparent visual magnitude of the object. g is the object's absolute magnitude. k has different meanings if the object is a comet or a minor planet. If a comet, k is a constant which varies from comet to comet, and usually will be in the range of 5 to 15. If the object is a minor planet then k is it's phase coefficient. If the phase coefficient is unknown than an appropriate value to use is 0.023.
sofTouch APpLications does not maintain, nor provide, minor planet and comet orbital elements, but includes the ability to import updated elements as provided in the Minor Planet Electronic Circulars (MPEC) . The MPECs are published on behalf of Commission 20 of the International Astronomical Union by the Minor Planet Center, Smithsonian Astrophysical Observatory, Cambridge, MA 02138, U.S.A. (e-mail contact marsden@cfa.harvard.edu or williams@cfa.harvard.edu), and are currently distributed to subscribers by e-mail as ASCII TEXT files.
To create an MPEC orbital elements file which can be used by HIPPARCHUS use an editor or text processor to extract those records of the MPEC from the Orbital elements: line to the line containing the P, H, and G data values (as shown in Figure 3.8). Save the extracted records in as plain ASCII TEXT file. A sample MPEC orbital elements file called 1993 MF may be found in the EXAMPLES folder in your HIPPARCHUS distribution disk.
Orbital elements:
1993 UC
Epoch 1993 Oct. 20.0 TT = JDT 2449280.5 Williams
M 327.98432 (2000.0) P Q
n 0.24658112 Peri. 322.72823 -0.69267061 -0.71562049
a 2.5186211  Node  169.92678 +0.72074663 -0.68209835
e 0.6787881  Incl.  30.95692 -0.02705041 +0.15042994
P 4.00 H 14.5 G 0.15
Figure 3.8 - - Format of an MPEC Orbital Element File.
To import orbital elements from an MPEC orbital elements file, check the Import MPEC file box at the upper left corner of the dialog. You will be asked to locate the MPEC file through a standard file requestor dialog. Once you have located and opened the file the orbital data in the file will be transferred to the dialog. You will then be able to examine and modify any entries you wish through the dialog.
To exit the Setup:COMET-MINOR PLANET dialog click OK or CANCEL. By exiting with OK, you are telling HIPPARCHUS to accept the input in the dialog. These data will be used to compute tabular ephemerides when requested through SolarSystem:COMET-MP EPHEMERIS, for overlaying the track of the defined object in the STAR CHART and HORIZON displays, and for determining the position of the field center for SKY MAPs which are centered on the instantaneous position of the object. Exiting with CANCEL will cause any entries you made in the dialog to be forgotten, and the values which were in place when the dialog was first displayed will be restored.
![]() Note: All
numerical fields in the Setup:COMET-MINOR PLANET dialog must be
filled in with some value - blank fields are not allowed. This is true
even for fields which are optional, or for field values which will be replaced
by computed values.
Note: All
numerical fields in the Setup:COMET-MINOR PLANET dialog must be
filled in with some value - blank fields are not allowed. This is true
even for fields which are optional, or for field values which will be replaced
by computed values.
The StarSky menu contains seven items; DISPLAY OPTIONS, STAR CHART, HORIZON, SKY MAP, TABLE, SCAN and MESSIER. These items are used to prepare and present catalog data in graphical, tabular, or dialog form. The items on the StarSky menu will generally be selected after any or all of the desired Setup dialogs have been completed, and catalog data have been retrieved.
The StarSky:DISPLAY OPTIONS item is used to establish the size and format of the StarSky:STAR CHART, StarSky:SKY MAP and StarSky:HORIZON displays. The stars and stellar annotation displayed may be shown in color on Macintosh's equipped with color display monitors. The control (enabling and disabling) of star color display is established through this dialog (see Figure 4.1) and is invoked through this menu item. To enable the color display of stars click the COLOR button under the DISPLAY heading.
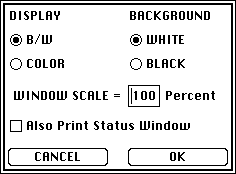
Figure 4.1 StarSky:DISPLAY OPTIONS Dialog
When color is enabled stars will be displayed such that the color of each star is representative of the peak wavelength of the star's spectral energy distribution. Thus, stars of spectral class M are displayed as red, while O stars are blue. Note that this color scheme does not portray the star as it appears to the eye - stars of spectral class A are displayed as green, since this corresponds to the effective peak color in the spectra of such stars. When COLOR is enabled, all annotation (by V-magnitude, star name, catalog number, or spectral class) will also be in color. The color used for the annotation of each star is the same as the color used to display the star itself. COLOR may be enabled for monochrome monitors, but this is not recommended as it will have no affect on the display other than taking slightly longer to complete.
Color STAR CHARTs, SKY MAPs and HORIZON views may be produced on either a white or black background, as controlled by the WHITE and BLACK buttons under the BACKGROUND heading in the StarSky:STAR COLORS dialog. Both the enabling of star colors, and the selection of the background for color star maps should be done prior to the generation of a STAR CHART, SKY MAP or HORIZON view.
![]() Note: The selection
of a BLACK background when COLOR is not enabled (B/W selected) is not generally
recommended when using a monochrome display. With some monochrome displays
and system/screen driver software stars plotted on a black background will
not be visible. Monochrome STAR CHARTs, SKY MAPs and HORIZON
views may be inverted by using the B/W option provided in their respective
option dialogs.
Note: The selection
of a BLACK background when COLOR is not enabled (B/W selected) is not generally
recommended when using a monochrome display. With some monochrome displays
and system/screen driver software stars plotted on a black background will
not be visible. Monochrome STAR CHARTs, SKY MAPs and HORIZON
views may be inverted by using the B/W option provided in their respective
option dialogs.
The physical size of the graphical display windows which are created by StarSky:STAR CHART, StarSky:SKY MAP and StarSky:HORIZON is specified through the WINDOW SCALE entry in this dialog. The default size of the STAR CHART and SKY MAP and HORIZON windows is such that they will make optimal use of the display area on a 9-inch Macintosh video monitor. When using larger display monitors, larger windows may be created by specifying the desired size as a percentage of the default. For example, on a 13-inch monitor a WINDOW SIZE of 146% would enlarge the display so a SKY MAP would fill the vertical extent of the usable area of screen.
By specifying a larger WINDOW SCALE only the scale of the STAR CHART, SKY MAP, HORIZON display is affected. The physical size of the graphical symbols used within those display (stars, planets, annotations, etc.) are unaltered. A window size which is larger than the physical size of the display monitor may be specified. If this is done than only a portion of the display will fit on the screen. When printing STAR MAPs, STAR CHARTs and HORIZON views, one may wish to specify a window size which corresponds to the physical size of the printing device. In that case, while the entire graphical display may not fit on a small Macintosh screen, the whole display (if correctly sized) would be printed at a larger scale to fill the printing area. This is somewhat different than specifying an Enlargement in the Page Setup dialog in the File menu (see System Menus). In that case the entire graphic, including symbols and annotations are resized when printed.
![]() Note: Broadside
(landscape) printing should be selected via the Orientation option in the
Page Setup dialog (under the FILE menu) when printing with
a WINDOW SCALE > 100%.
Note: Broadside
(landscape) printing should be selected via the Orientation option in the
Page Setup dialog (under the FILE menu) when printing with
a WINDOW SCALE > 100%.
The current display presented in the HIPPARCHUS Status window may be printed in concert with a STAR CHART and SKY MAP and HORIZON display. To enable the automatic printing of the Status display whenever these graphics are printed check the ALSO PRINT STATUS WINDOW box in the DISPLAY OPTIONS dialog.
SKY MAP produces a map of the sky either as it appears from a particular topocentric location at a given time and date, or centered upon a specified location in the sky. The SKY MAP is a polar projection displayed with north up and east to the left, as indicated by a "compass" in the upper left corner of the map. When the SKY MAP item is selected from the StarSky menu, the SKY MAP dialog (shown in Figure 4.2) will be displayed. This dialog is used to specify where in the sky the SKY MAP should be centered, and what area of the sky is to be displayed in the SKY MAP.

Figure 4.2- The StarSky:SKY MAP Dialog
The center of the SKY MAP is specified by selecting either STAR(BSNO), ZENITH, MESSIER, SOLAR SYSTEM or TARGET from the FIELD CENTERs. Selecting ZENITH will center the SKY MAP on the observer's zenith (as seen from the geocentric or topocentric location, at the time and date which were specified in the OBSERVER item in the Setup menu).
By selecting STAR(BSNO), the SKY MAP will be centered upon the equatorial coordinates of the star whose Bright Star catalog number is specified in the adjoining field. If precession and/or proper motion transformations have been specified by Setup:CATALOG, these transformations will be applied to the selected star used in determining the coordinates of the field center. If you had previously used the INFO option in StarSky:STAR CHART or StarSky:HORIZON, and clicked OK, the catalog number of the last star for which INFO was displayed will have been automatically entered into this adjoining field.
Selecting MESSIER will cause the SKY MAP to be centered upon the Messier object whose catalog number is specified in the adjoining field. If a precessional transformation has been specified by Setup:CATALOG, this transformation will be applied to the coordinates of the specified Messier object used in determining the coordinates of the field center.
If SOLAR SYSTEM is selected then the SKY MAP will be centered upon a computed position of a solar system target based upon the information last entered under Setup:OBSERVER. When exiting the SKY MAP dialog, by clicking OK, a list of solar system targets is displayed (see Figure 3.6). Select the desired solar system target from this list, and choose whether the target position is to be referenced to the equator and equinox of the stellar catalog or precessed to the date specified in the Setup:OBSERVER dialog. If more than one solar system target is chosen then the first one selected (in list order) will be used. If you select COMET/M.P., the SKY MAP field will be centered upon the instantaneous position of a comet or minor planet computed from orbital data previously entered through the Setup:COMET-MINOR PLANET dialog for the time and date entered in the Setup:OBSERVER dialog. Selecting COMET/M.P. will take you out of the SKY MAP dialog. Entering CANCEL from the solar system target list will terminate SKY MAP.
If TARGET is selected then the SKY MAP will be centered on the coordinates entered in the TARGET RA and DEC fields. When the SKY MAP dialog is displayed the TARGET RA and DEC fields will already be filled. HIPPARCHUS will initially fill these fields with the coordinates of the vernal equinox. Whenever stellar catalog data are RETRIEVEd, the TARGET RA and DEC will be set to the mid-point of the coordinates specified in the Setup:STARS dialog. If you use the StarSky:STAR CHART ZOOM option the TARGET RA and DEC will be reset to the center of the ZOOMed field. If you previously selected the SOLAR SYSTEM field center from the SKY MAP dialog, the TARGET RA and DEC will be set to the previously computed position. The TARGET RA and DEC fields only have meaning if the TARGET FIELD CENTER is selected.
The area of the sky to be displayed in the SKY MAP is entered in the RADIUS field, and is specified in degrees. If the RADIUS is 90deg., and the field center chosen is the ZENITH, then the SKY MAP will show the entire sky as it would appear to the observer for the time and date specified through the Setup:OBSERVER dialog. This is illustrated in Figure 4.3.
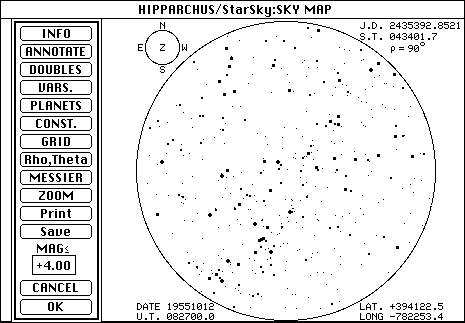
Figure 4.3 - A Sample SKY MAP
Clicking on CANCEL in the SKY MAP dialog terminate SKY MAP.
The Julian date, local sidereal time and angular radius of the SKY MAP field are indicated above the northwest quadrant of the SKY MAP. The Universal Time and date appear below the south east quadrant of the SKY MAP. The center of the compass indicates if the field is centered on the observer's zenith (Z) or on a selected target (T). If the field center is the observer's ZENITH then the observer's geographic coordinates are annotated below the south west quadrant the SKY MAP, otherwise the right ascension and declination of the selected target will appear in this position. If a solar system target, Messier object, or specific star was chosen for the field center, the name of the target will appear to the right of the compass, and the target symbol is displayed at the center of the field (eg., see Figure 4.12).
The stars which appear on the SKY MAP are selected from the last catalog RETRIEVE (see Setup:RETRIEVE). Thus, if the previous RETRIEVE was limited in Right Ascension and/or Declination (as specified in the Setup:STARS dialog), then only those stars within the previously specified RANGE will be displayed on the SKY MAP. If a small area of the sky was RETRIEVEd, it is possible that this area is out of the field of the SKY MAP. In that case SKY MAP will report that it has nothing to plot. The sample SKY MAP shown in Figure 4.6 contains only those stars which are brighter than magnitude 4.51.
The size of the symbol used to indicate the position of a star is related to the stars brightness (V magnitude). Brighter stars are plotted with larger plotting symbols. For a given limiting range of magnitudes specified in Setup:STARS, the smallest set of plotting symbols possible will be used (to avoid "crowding" in the map).
Note, when producing SKY MAPs of large angular radius (eg., 90 degrees) it is advisable to limit the range of stellar magnitudes (using Setup:STARS). While it is possible, of course, to produce an all-sky map to the limiting V-magnitude of the Yale Bright Star Catalog (7.96), the resulting SKY MAP is so dense it is virtually unreadable. Also, as the number of stars increases the time required to prepare and plot the SKY MAP also increases. Hence, generating an all-sky map to the limiting magnitude of the catalog will not only be so dense as to be nearly unreadable, but will take several minutes to produce.
![]() Note: To speed
up SKY MAP, use the RT ASCENSION and DECLINATION range check fields
in the Setup:STARS dialog to specify that only the stars in the
area of the sky of interest are to be retrieved (by Setup:RETRIEVE)
before SKY MAP is invoked, or pre-select the field by ZOOMing from
a StarSky:STAR CHART or HORIZON view.
Note: To speed
up SKY MAP, use the RT ASCENSION and DECLINATION range check fields
in the Setup:STARS dialog to specify that only the stars in the
area of the sky of interest are to be retrieved (by Setup:RETRIEVE)
before SKY MAP is invoked, or pre-select the field by ZOOMing from
a StarSky:STAR CHART or HORIZON view.
![]() SKY MAPs
may be produced and annotated in color, if a color monitor is in use. Please
see StarSky:STAR COLORS for details.
SKY MAPs
may be produced and annotated in color, if a color monitor is in use. Please
see StarSky:STAR COLORS for details.
The SKY MAP option box will be displayed along side the SKY MAP. The available options are: INFO, ANNOTATE, DOUBLES, VARS., PLANETS, CONST., GRID, (Rho, Theta), MESSIER, ZOOM, MARK, Print, Save,,MAG<=, OK, and CANCEL.
THE INFO OPTION - Click on this option to obtain information on a particular star displayed on the SKY MAP. You will be advised to "point to a desired star then click mouse, hold and release". When you do this, a small box will be drawn around the star (to indicate which star HIPPARCHUS thought you pointed to), and the INFO option box will replace the SKY MAP option box. (Hold the mouse button down until the INFO option box appears). The INFO option box will display the star's HR number, Right Ascension, Declination (and the epoch of the selected coordinate system), V-magnitude, and proper motion components in R.A. and Dec. (in arc seconds per year). Also displayed are the azimuth and zenith distance of the star, (A/Z=) for the time, date, and topocentric location last entered in the Setup:OBSERVER dialog. The last piece of information displayed is the star's spectral type. In the sample info box, shown in Figure 4.4, HR 0015 is indicated as spectral type B8, and luminosity class IV, with a peculiar spectrum exhibiting lines of both Magnesium and Mercury. Within the INFO option box you may select the ANNOTATE, CANCEL, or OK options.

Figure 4.4 - The SKY MAP INFO Box
The INFO box may be exited by clicking on ANNOTATE, OK, or CANCEL. Within the INFO box these have the following meaning:
CANCEL - return to SKY MAP option box after erasing the small identification square around the selected star.
OK - return to SKY MAP option box, leaving the small identification square around the selected star. The Right Ascension of the selected star will be copied to the CONJUNCTION IN RA= field of the SolarSystem:PLANETARY PHENOMENA dialog.
ANNOTATE - brings up an annotation dialog which will enable you to annotate the selected star with its Bayer/Flamsted designation (for bright stars), Yale Bright Star (HR) catalog number, V-magnitude or spectral type. When ANNOTATE is selected the small identification box around the star will be erased, and the ANNOTATE option box will replace the INFO option box. Catalog numbers are always annotated as four decimal digits. V-magnitudes are always annotated as three decimal digits, in hundredths of magnitudes. Thus a V-magnitude annotation of 387 indicates a V-magnitude of +3.87. In either case the first character of the annotation will appear directly above the star on the SKY MAP and the remaining characters will be extended to the right. You may choose the font size to be used for annotation. A sample INFO Annotation is shown in Figure 4.5. The default font size of 10 was overridden with an entry of 9. If COLOR had been selected in the StarSky:COLOR dialog then the annotation for the selected star will be in the same color as the star itself. Clicking on OK will cause the selected star to be annotated as indicated. Clicking on CANCEL will abort the ANNOTATE option. In either case you will be returned to the SKY MAP option box.

Figure 4.5 - The SKY MAP INFO ANNOTATE Option
![]() Note: For correct
annotation of Bayer designations, HIPPARCHUS expects the standard SYMBOL
font to be resident in your system file. If you have not configured your
system file with the SYMBOL font and intend to use this type of map annotation
please do so. Refer to the documentation on D/A Font Mover (System 6 users)
in your Macintosh System Utilities User's Guide for details.
Note: For correct
annotation of Bayer designations, HIPPARCHUS expects the standard SYMBOL
font to be resident in your system file. If you have not configured your
system file with the SYMBOL font and intend to use this type of map annotation
please do so. Refer to the documentation on D/A Font Mover (System 6 users)
in your Macintosh System Utilities User's Guide for details.
THE ANNOTATE OPTION - allows you to annotate all stars on the SKY MAP which fall within a specified range of V magnitudes. Annotation may be by Yale Bright Star Catalog Number, V-magnitude, Bayer/Flamsted designation (where applicable), or Spectral type. When the ANNOTATE option is selected from the SKY MAP option box, the SKY MAP ANNOTATE dialog box will replace the SKY MAP option box. Note that this is not quite the same as the ANNOTATE dialog box which appears when ANNOTATE is selected from within the SKY MAP INFO option. Here, the ANNOTATE dialog expects you to enter a range of V-magnitudes (minimum and maximum). All stars on the current SKY MAP within that magnitude range will be annotated.
When the ANNOTATE dialog is displayed choose map annotation by STAR NAME (i.e., Flamsted/Bayer designation), YALE BS (Bright Star) Number, V MAGnitude, or SPECtral type and specify the V-magnitude range of stars to be annotated. If you exit the ANNOTATE dialog by clicking on OK, the ANNOTATE dialog will disappear, the SKY MAP will be annotated as specified, and the SKY MAP option box will reappear. If you exit the ANNOTATE dialog by clicking on CANCEL then the SKY MAP option box will reappear with no map annotation taking place. If you CANCEL the ANNOTATE dialog the values which appeared in the dialog when it was last displayed will be retained, and will appear the next time the ANNOTATE dialog is initiated.
Figure 4.6 shows the SKY MAP ANNOTATE dialog. In this example, stars with V MAGnitudes in the range 2.0 to 2.5 have been selected for annotation by V MAGnitude. A section of the resulting annotated SKY MAP is shown to the left of the ANNOTATE dialog in Figure 4.6. See the section on the SKY MAP INFO ANNOTATE option for a description of the format of annotated values.

Figure 4.6 - SKY MAP ANNOTATE Option
![]() Note: SKY
MAP will select only those stars which are visible from the geographic
location, time and date specified. If you use StarSky:STAR CHART,
HORIZON, TABLE or re-use SKY MAP after using SKY
MAP without first invoking RETRIEVE from the function menu,
the StarSky menu items will only "know about" the stars
initially selected by SKY MAP.
Note: SKY
MAP will select only those stars which are visible from the geographic
location, time and date specified. If you use StarSky:STAR CHART,
HORIZON, TABLE or re-use SKY MAP after using SKY
MAP without first invoking RETRIEVE from the function menu,
the StarSky menu items will only "know about" the stars
initially selected by SKY MAP.
As an example of the above note, a STAR CHART generated immediately after a SKY MAP may have large areas of the sky blank, corresponding to regions which were below the horizon for the last SKY MAP. Similarly, if you generate a 90deg. radius SKY MAP centered on the zenith, then use Setup:OBSERVER to change the geographic location and generate another SKY MAP (without first using Setup:RETRIEVE ), only those stars visible from both locations will be displayed on the second SKY MAP.
If COLOR had been selected in the StarSky:COLOR dialog then the annotations for the selected stars will be in the same colors as the stars themselves.
THE DOUBLES OPTION - will mark all double (and multiple) stars within the boundary of the SKY MAP with horizontal bars. An example of this is shown in Figure 4.7. This figure shows all stars brighter than V magnitude 5.51 within 10deg. of RA 07h 30m 00s, DEC +32deg. 30' 00".

Figure 4.7 - SKY MAP DOUBLES option
THE VARS. OPTION - will mark all variable stars within the boundary of the SKY MAP with circles drawn around those stars. An example of this is shown in Figure 4.8. This is the same field as shown in Figure 4.7, but with all variable stars within the field indicated.
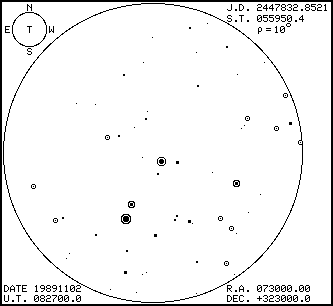
Figure 4.8 - SKY MAP VARS option
THE PLANETS OPTION - displays the locations of the solar system objects on the SKY MAP. Only those solar system objects currently selected will be displayed (see Setup:SOLAR SYSTEM). Solar system objects which are out of the field of the SKY MAP for the time, date, and geographic location specified (see Setup:OBSERVER) will not be displayed.
Figure 4.9 shows the graphic symbols which may be used to indicate the
positions of the selected solar system objects on the SKY MAP.

Figure 4.9 - Solar System Object Symbols
Alternatively, the solar system objects may be displayed as disks, whose sizes will automatically scale in proportion to the area of the sky being displayed in the SKY MAP. The choice is made via a simple selection dialog (shown in Figure 4.10) which will be made available after the PLANETS option is selected.

Fig. 4.10 - Planetary Symbols or Disks
Figure 4.11 shows a section of a SKY MAP indicating the positions of visible solar system objects.

Figure 4.11 - SKY MAP with PLANETS option
![]() Note: If a
SOLAR SYSTEM target was selected as the SKY MAP field center and
the SKY MAP PLANETS option is invoked you may see the target's
planetary symbol appearing twice on the SKY MAP. This will happen
if the field center as specified by the target planet position is defined
for one epoch (as specified in the Setup:CATALOG dialog), and the
computed planetary positions (selected by prior invocation of Setup:SOLAR
SYSTEM) is referenced to another (i.e., the date entered in the Setup:OBSERVER
dialog).
Note: If a
SOLAR SYSTEM target was selected as the SKY MAP field center and
the SKY MAP PLANETS option is invoked you may see the target's
planetary symbol appearing twice on the SKY MAP. This will happen
if the field center as specified by the target planet position is defined
for one epoch (as specified in the Setup:CATALOG dialog), and the
computed planetary positions (selected by prior invocation of Setup:SOLAR
SYSTEM) is referenced to another (i.e., the date entered in the Setup:OBSERVER
dialog).
Figure 4.12 illustrates the use of the SCALE DISKS TO MAP option. This SKY MAP shows a star field of radius 2.5deg., centered on the Sun, on July 11, 1991 at 18h 30m U.T. (There is a total solar eclipse visible from Hawaii, Mexico, Central America and northern South America on this date). Both planetary display options were used to produce this SKY MAP. Note that the disk of the moon is slightly larger than the disk of the sun (as it would be on this date). Also note that the disks are "transparent", that is any stars which are occulted will show through the disks.
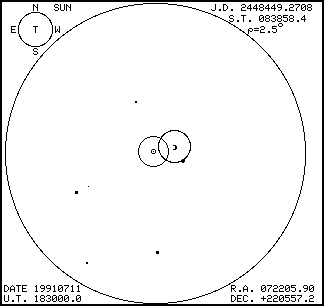
Figure 4.12 - Planetary Disks Scaled to SKY MAP
![]() Note: Planetary
(and lunar and solar) disks are always scaled to the area of the SKY
MAP. Therefore, on maps of large area planetary symbols disks may appear
as single pixel points. This option only "makes sense" if a relatively
small area of the sky is being displayed.
Note: Planetary
(and lunar and solar) disks are always scaled to the area of the SKY
MAP. Therefore, on maps of large area planetary symbols disks may appear
as single pixel points. This option only "makes sense" if a relatively
small area of the sky is being displayed.
THE CONST. (Constellations) OPTION - will overlay lines on the SKY MAP showing the outlines of the constellations which are displayed. Individual line segments will be suppressed if a star which defines the outline of the constellation is not displayed. This will occur, for example, if part of the constellation is not within the boundary of the current map, or if the magnitude range currently set is such that some of the fainter stars which define the constellation figure are not displayed. An example of this is shown in Figure 4.13 for a field containing all stars brighter than V magnitude 5.50 centered on, and within 40 degrees of the North Celestial Pole.
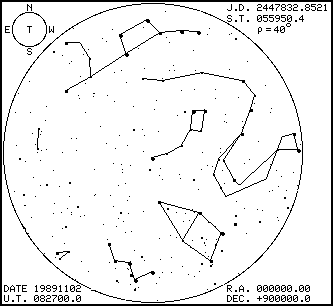
Figure 4.13 - SKY MAP with CONST. option
THE GRID OPTION - will overlay a radially symmetric and axially concentric coordinate grid on the SKY MAP. When selected, the SKY MAP GRID dialog (as shown in Figure 4.14), will be presented to allow you to specify the density of the grid to apply in the radial and axial directions. Radials, extending outward from the field center, will be drawn with an azimuthal spacing as specified in the AZIMUTH EVERY Deg. entry in the dialog. The first radial drawn will be drawn from field center to celestial north. Concentric circles will be drawn outwardly from the field center, spaced as specified in the Z. DIST. (zenith distance) EVERY Deg. field of the dialog.
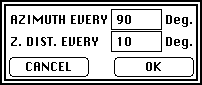
Figure 4.14 - The SKY MAP GRID dialog
Clicking OK will cause the grid to be drawn as specified. Clicking CANCEL will exit the GRID option without drawing the GRID.
A sample GRID overlay is shown in Figure 4.15. This is a SKY MAP, with a field radius of 5deg., centered on [[zeta]] Tauri (HR1910). All other stars in the field are annotated with their V-magnitudes. The Crab Nebula (Messier object 1, a planetary nebula) is also shown. Radials were drawn every 45deg. in azimuth, and concentric circles every 1deg. outward from the field center.

Figure 4.15- SAMPLE SKY MAP GRID Overlay
THE (RHO, THETA) OPTION - will cause the title bar to be to be annotated with the instantaneous polar coordinates of the tip of the arrow cursor as it moves in the StarSky:SKY MAP window. When selected, a blinking line will be drawn from the field center to the tip of the arrow cursor, and will move as the cursor is moved in the window (see Figure 4.16).

Figure 4.16 - SKY MAP with (Rho, Theta) Option
Rho is the angle measured from the field center to the tip arrow cursor. Theta is the angle, measured eastward from north, between celestial north and the line joining the field center to the arrow cursor. The Rho and Theta angles are both displayed in degrees. In general, the angles Rho and Theta correspond to the separation and position angle of points in the field measured from the field center.
To terminate the (Rho, Theta) option click and hold down the mouse button until the SKY MAP option box reappears.
![]() If the
currently displayed SKY MAP has a field radius of 90deg., and is
centered on the observer's zenith, then the Rho and Theta angles correspond
to the zenith distance and azimuth.
If the
currently displayed SKY MAP has a field radius of 90deg., and is
centered on the observer's zenith, then the Rho and Theta angles correspond
to the zenith distance and azimuth.
THE MESSIER OPTION - displays the location of all objects in the Messier catalog (with modern extensions) which fall within the spatial boundary of the currently displayed SKY MAP. The positions of the Messier Objects will be precessed to the final equator and equinox of the stellar catalog as specified in the Setup:CATALOG dialog.
The six main classes of Messier catalog objects are denoted by using the graphical symbols shown in Figure 4.17. Messier catalog objects may be annotated with their catalog numbers. When the MESSIER option is selected a simple annotation dialog, as shown in Figure 4.18, will be presented. This dialog is used to specify whether or not to annotate Messier catalog objects with their catalog numbers, and if so, what size font to employ.
Figure 4.17 - Messier Object Symbols

Figure 4.18 -Messier Object Annotation Dialog
A sample SKY MAP with Messier catalog objects indicated, and annotated, is shown in Figure 4.19.
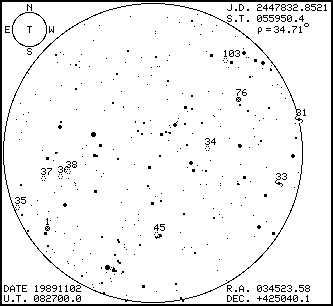
Figure 4.19 - SKY MAP M(essier Objects) Option
THE ZOOM OPTION - allows you use the mouse to "zoom in" on a region of the sky displayed on the SKY MAP. SKY MAP ZOOMs are always performed in a radially symmetric fashion about the field center.
After selecting the ZOOM option, move the ![]() cursor to the current SKY MAP display. Within the boundary of the
SKY MAP, a blinking circle will follow the cursor. The angular radius
of the ZOOM circle will be indicated in the SKY MAP title bar, and
will update as the cursor is moved. Clicking the mouse will select the
region interior to the blinking circle. That region will be redisplayed
at the full scale of the SKY MAP.
cursor to the current SKY MAP display. Within the boundary of the
SKY MAP, a blinking circle will follow the cursor. The angular radius
of the ZOOM circle will be indicated in the SKY MAP title bar, and
will update as the cursor is moved. Clicking the mouse will select the
region interior to the blinking circle. That region will be redisplayed
at the full scale of the SKY MAP.
![]() Note: ZOOM
implicitly RETRIEVEs stellar information from the catalog. Hence,
if you were to produce a stellar table (using StarSky:TABLE) or
a STAR CHART (using StarSky:STAR MAP) after ZOOMing with
SKY MAP, only those stars selected by ZOOM will appear. SKY MAP's
ZOOM does not affect any of the Setup:STARS parameters. Hence, a
ZOOMed SKY MAP may look sparse, if a small area is selected, and
the limiting magnitude of the initial SKY MAP is restricted.
Note: ZOOM
implicitly RETRIEVEs stellar information from the catalog. Hence,
if you were to produce a stellar table (using StarSky:TABLE) or
a STAR CHART (using StarSky:STAR MAP) after ZOOMing with
SKY MAP, only those stars selected by ZOOM will appear. SKY MAP's
ZOOM does not affect any of the Setup:STARS parameters. Hence, a
ZOOMed SKY MAP may look sparse, if a small area is selected, and
the limiting magnitude of the initial SKY MAP is restricted.
A sample use of the SKY MAP ZOOM option is shown in Figure 4.20.


Figure 4.20 - The SKY MAP ZOOM Option
THE MAG<= OPTION - allows you to easily redraw the SKY MAP to a different (brighter or fainter) limiting magnitude. To use the MAG<= option, enter the desired limiting magnitude in the MAG<= field and click OK. A dialog which indicates how many stars were selected, to the new limiting magnitude, will be displayed. After you acknowledge that dialog, the SKY MAP will be redrawn. Note: the limiting magnitude selected via the MAG<= option will be used to automatically update the MAXIMUM V-MAGNITUDE field in the Setup:STARS dialog.
THE MARK OPTION - MARK will allow you move the pointer-cursor to any arbitrary position on the SKY MAP and mark that position with or without annotations. After selecting MARK, HIPPARCHUS will
will ask you to "Point and Click/Hold". Move the pointer-cursor to the position you wish to mark. As you move the cursor, the field coordinate of the cursor (Rho, Theta) will be displayed in the title bar. Click the mouse (and hold for about a second) until the MARK annotation option dialog box (Figure 4.21) appears. The selected point may be annotated field coordinates or with any text string. If you select No Annotation the point will be marked but not annotated.

Figure 4.21 - The MARK Option

Figure 4.22 - Sample MARK/Coordinates Option
THE Print OPTION - At any time the content
of the StarSky:SKY MAP window may be printed on the output device
which was last selected via the ![]() CHOOSER. The page format and printer output characteristics should be established
by the File:PAGE SETUP and File:PRINT SETUP dialogs, respectively.
The specific nature of these dialogs will depend upon the type of output
device, and driver software, you have selected through the
CHOOSER. The page format and printer output characteristics should be established
by the File:PAGE SETUP and File:PRINT SETUP dialogs, respectively.
The specific nature of these dialogs will depend upon the type of output
device, and driver software, you have selected through the ![]() CHOOSER.
CHOOSER.
THE Save OPTION - At any time the content of the StarSky:SKY MAP window may be saved as a PICT file. When the Save option is selected a standard file requestor dialog will be invoked to allow you to specify the destination and name of the export PICT file. Other Macintiosh applications may then import the HIPPARCHUS graphical displays as PICT objects.
THE OK OPTION - will exit the SKY MAP menu item without erasing the SKY MAP from the HIPPARCHUS window. When exiting StarSky:SKY MAP the TARGET coordinates in the StarSky:SKY MAP dialog will be updated to reflect the final coordinates of the field center. This will be evident the next time StarSky:SKY MAP is selected. HIPPARCHUS will then be idle, waiting for your next menu item selection.
THE CANCEL OPTION - will exit the SKY MAP menu item and erase the HIPPARCHUS window. HIPPARCHUS will then be idle, waiting for your next menu item selection.
The STAR CHART item in the StarSky menu is used to produce charts of selected regions of the sky. The area to be charted (i.e., the range in Right Ascension and Declination) may be specified through the Setup:STARS dialog. The chart may also be constrained to include only those stars which satisfy other range, match or qualification criteria in the Setup:STARS dialog. The STAR CHART which is produced is a Mercator projection of the region of the sky selected, centered on the mid-RA and mid-DEC of the current coordinate range. The boundaries of the STAR CHART will automatically be scaled to make optimal use of the StarSky:STAR CHART window while containing only those stars currently selected from the catalog.
When StarSky:STAR CHART is selected, the message "PREPARING StarSky:STAR CHART" will appear in the HIPPARCHUS window. Stars which fall within the range of values, or match the Setup:STARS criteria will be selected. If you specified that the stellar coordinates transformations (precession and proper motion) should be applied after catalog data are retrieved (see the CATALOG item in the Setup menu), those transformations will take place at this time. You will see the message "PRECESSING STARS xxxx TO yyyy" appear in the HIPPARCHUS window. The precessional computations are applied in "chunks" of 1000 stars. HIPPARCHUS will report its progress by updating the xxxx and yyyy counter in this message as it proceeds. If no stellar catalog entries were retrieved (see Setup:RETRIEVE), an advisory dialog will be invoked, and StarSky:STAR CHART will terminate.
The size of the symbol used to indicate the position of a star is related to the stars brightness (V magnitude). Brighter stars are plotted with larger plotting symbols. For a given limiting range of magnitudes specified in Setup:STARS, the smallest set of plotting symbols possible will be used (to avoid "crowding" in the chart). The boundaries of the chart are annotated with the Right Ascensions and Declinations of the boundaries.
![]() STAR CHARTs
may be produced and annotated in color, if a color monitor is in use. Please
see StarSky:STAR COLORS for details
STAR CHARTs
may be produced and annotated in color, if a color monitor is in use. Please
see StarSky:STAR COLORS for details
A sample STAR CHART is shown in Figure 4.23. All stars brighter than V magnitude 4.51 are shown on this STAR CHART. The stellar coordinates specified in the Setup:STARS dialog indicated that the entire sky should be used (000000 to 240000 in R.A. and -900000 to +900000 in DEC). The axes of the STAR CHART are automatically scaled to include only those stars selected.
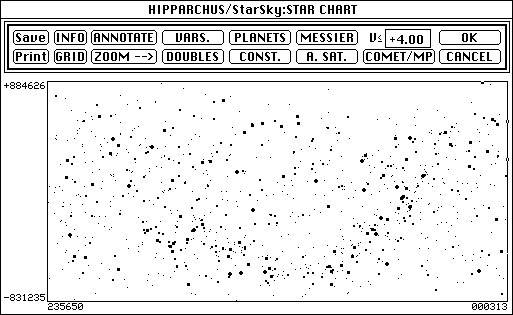
Figure 4.23 - STAR CHART of entire catalog with V magnitude <= 4.50
Note, when producing all-sky, or very large scale STAR CHARTs, it is advisable to limit the range of stellar magnitudes (using Setup:STARS). While it is possible, of course, to produce an all-sky map to the limiting V magnitude of the Yale Bright Star Catalog (7.96), the resulting STAR CHART is so dense it is virtually unreadable. Also, as the number of stars increases the time required to prepare and plot the STAR CHART also increases. Hence, and all-sky map to the limiting magnitude of the catalog will not only be so dense as to be nearly unreadable, and will take several minutes to produce.
After the STAR CHART is displayed, the STAR CHART option box will be presented. The STAR CHART options are INFO, ANNOTATE, VARS., PLANETS, B/W, GRID, ZOOM, DOUBLES, CONST., MAG<=, MESSIER, A. SAT., COMET/MP, MARK, CANCEL and OK. Most of the options available for STAR CHART are similar in function to the SKY MAP options. Only those options whose behaviors differ than those for SKY MAP are described in this section. Please see StarSky:SKY MAP for additional details.
THE INFO OPTION - The INFO option in STAR CHART works in the same manner as the INFO option for the SKY MAP, with two additional features. As you move the arrow cursor around, in the STAR CHART, the celestial coordinates (Right Ascension and Declination) of the tip of the arrow are displayed in the title bar. The format of the coordinate display is HHMMSS +/-DDMMSS, as shown in Figure 4.24. These coordinates will update continuously until you click the mouse to obtain information on the desired star. When you select a star, and click OK in the resulting INFO dialog, the catalog number of that star will be automatically copied to the STAR(BSNO) field of the StarSky:SKY MAP dialog. This provides a simple means for centering a SKY MAP on a pre-selected stellar target. The Right Ascension of the selected star will be copied to the CONJUNCTION IN RA= field of the SolarSystem:PLANETARY PHENOMENA dialog.

Figure 4.24 - INFO option coordinate display
THE ZOOM OPTION - allows you use the mouse to select a region of the sky displayed on the SKY MAP. When you select ZOOM a message telling you how to ZOOM will replace the SKY MAP dialog box. As indicated by the message, to select a region of the sky from the SKY MAP:
1. Move the arrow cursor to the north east corner of the desired area.
2. Click, and hold down the mouse button.
3. While holding down the mouse button, drag the mouse to the south west corner of the desired area.
A box will be drawn around the drag area as you move the mouse.
4. Release the mouse button.
When you have done this the SKY MAP will be erased from the HIPPARCHUS window. New Right Ascension and Declination range limits will be established based on your ZOOM selection. These limits will appear in the minimum and maximum fields of the Setup:STARS dialog the next time it is invoked. The limits chosen will always include the entire area selected with ZOOM, though one coordinate range may be somewhat larger. HIPPARCHUS will always try to make optimum use of its window area, while fulfilling the ZOOM request. The TARGET coordinates of the FIELD CENTER in the StarSky:SKY MAP dialog will be set to the center of the ZOOMed region. ZOOM will then retrieve those stars which fall within the new coordinate boundaries from the catalog. An informational dialog (the same one you see when you select RETRIEVE from the Setup menu) will inform you of the number of stars selected. The STAR CHART will then be redrawn using the new boundaries, filling as much of the HIPPARCHUS window as possible.
![]() Note:
You can cancel a ZOOM request by dragging the mouse (in step 2 above) to
the north or east of the starting point of the initial position for the
ZOOM. In that case the ZOOM box will shrink and disappear, and when the
mouse button is released the ZOOM request will be ignored.
Note:
You can cancel a ZOOM request by dragging the mouse (in step 2 above) to
the north or east of the starting point of the initial position for the
ZOOM. In that case the ZOOM box will shrink and disappear, and when the
mouse button is released the ZOOM request will be ignored.
![]() Note:
ZOOM implicitly RETRIEVEs stellar information from the catalog. Hence,
if you were to produce a stellar table (using StarSky:TABLE), SKY
MAP (using StarSky:SKY MAP) or HORIZON (using StarSky:HORIZON)
view after ZOOMing with STAR CHART, only those stars selected by
ZOOM will appear. ZOOM does not affect any of the other Setup:STARS
parameters. Hence, a ZOOMed STAR CHART may look sparse, if a small
area is selected, and the limiting magnitude of the initial STAR CHART
is restricted. Figure 4.25 shows a STAR CHART produced after ZOOMing
on a selected region of the sky (Ursae Majorous) in Figure 4.24. The limiting
magnitude of the ZOOMed STAR CHART is the same as the initial STAR
CHART.
Note:
ZOOM implicitly RETRIEVEs stellar information from the catalog. Hence,
if you were to produce a stellar table (using StarSky:TABLE), SKY
MAP (using StarSky:SKY MAP) or HORIZON (using StarSky:HORIZON)
view after ZOOMing with STAR CHART, only those stars selected by
ZOOM will appear. ZOOM does not affect any of the other Setup:STARS
parameters. Hence, a ZOOMed STAR CHART may look sparse, if a small
area is selected, and the limiting magnitude of the initial STAR CHART
is restricted. Figure 4.25 shows a STAR CHART produced after ZOOMing
on a selected region of the sky (Ursae Majorous) in Figure 4.24. The limiting
magnitude of the ZOOMed STAR CHART is the same as the initial STAR
CHART.
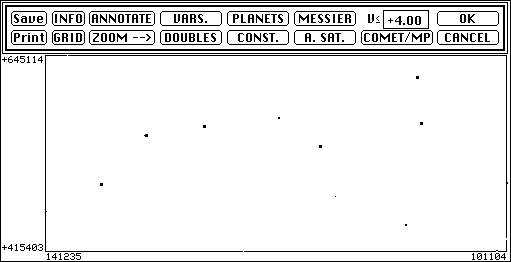
Figure 4.25 - Sample STAR CHART after ZOOMing
To produce a "deeper" STAR CHART of the same field, enter the desired limiting V-magnitude in the MAG<= field and click OK. Figure 4.26 is of the same area of the sky as Figure 4.25, but to the limiting magnitude of the Yale Bright Star Catalog. In this example stars with V-magnitudes between -1.46 and +3.31 (inclusive) were labeled with their STAR NAMEs using the ANNOTATE option. The INFO option was then used to annotate several stars with their spectral classifications.
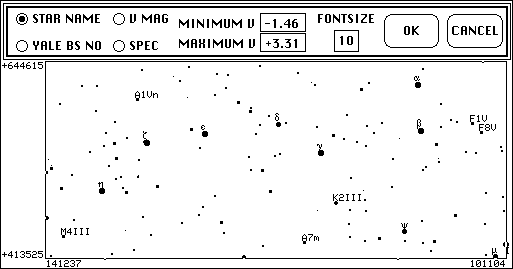
Figure 4.25 - Sample STAR CHART with ANNOTATE option
THE PLANETS OPTION (ORBITAL TRACKS ) - STAR CHART not only allows you to display the instantaneous positions of the major solar system bodies, but also gives you the option to display their motions projected on the STAR CHART. When you select the PLANETS option a dialog similar to the one discussed in Figure 4.13 will be displayed, but with the additional ORBITAL TRACKS option.
If you wish to display the orbital tracks of any solar system objects previously
selected via the Setup:PLANETS dialog select the ORBITAL TRACKS
option, as shown in Figure 4.27.

Figure 4.27 - ORBITAL TRACKS Option Selection
When ORBITAL TRACKS are selected another dialog will be brought up to allow you to specify the INCREMENT between points along the orbital tracks (in days), the NUMBER OF POINTS to be displayed along each track, and how the tracks are to be annotated. By checking SYMBOLS the planetary symbols shown in Figure 4.12 may be used to indicate the first, last, or all positions along the tracks. Positions which are not indicated by the planetary symbols are indicated by a small square. Similarly, the Universal Time and Date associated with the first, last, or all points along the tracks may be annotated as specified through this dialog. The starting date and time for the ORBITAL TRACKS are taken form the last entry specified in the Setup:OBSERVER dialog. Date/Time annotations are placed immediately above the planetary symbols and are left justified.

Figure 4.28 - Orbital Tracks Specification
As an example, the ORBITAL TRACK of the planet Mercury, illustrating it's retrograde motion, in the interval between October 10, 1992 and January 7, 1993 is shown in Figure 4.29. Here the first and last points of the track are annotated with both the planetary symbol and the Universal Time and Date.

Figure 4.29 - Sample ORBITAL TRACKS Option in SKY MAP
Note that the INCREMENT entered in the ORBITAL TRACKS specification may be fractional, or negative. Also note that more than one orbital track may be displayed simultaneously. As an example, consider Figure 4.30. Here the orbital tracks of both the Sun and the Moon are shown centered on July 11, 1991 at 190500 U.T. (This is instant of geocentric second contact for a total solar eclipse which occurs on that date). The ORBITAL TRACKS option was invoked twice, first with an increment on +0.05 days, and then again with an increment of -0.05 days. In both cases the NUMBER OF PTS chosen was 5. Following this, the planetary SCALE DISKS TO MAP option was selected to show the instantaneous position of the Sun and Moon for the selected time and date to scale.

Figure 4.30 - Sample ORBITAL TRACKS, Sun and Moon, July 11, 1991.
COMET/MINOR PLANET POSITIONS - The instantaneous positions of a comet or minor planet, whose orbital elements were previously entered through the Setup:COMET-MINOR PLANET dialog, may be overlaid on a STAR CHART using this option. A dialog similar to the one shown in Figure 4.30 will be presented to enable you to specify how the track of the comet or minor planet is to be plotted. This dialog is similar to the ORBITAL TRACKS option dialog. HIPPARCHUS will advise you as the target positions are being computed, and a track of the comet or minor planet will be displayed as specified. An example of this is shown in Figure 4.31. An orbital track for Comet 1989r is plotted, as specified by the Setup:COMET-MINOR PLANET dialog starting at the time entered through the Setup:OBSERVER dialog (as indicated in Figure 4.30), on a STAR CHART within the RA, DEC and Maximum V-Magnitude limits indicated on the STAR CHART.
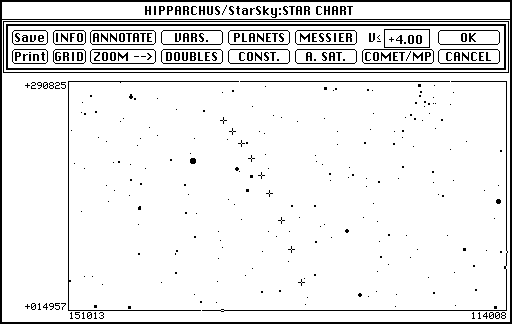
Figure 4.31 - Sample STAR CHART with Comet Track Indicated
THE GRID OPTION - will overlay an orthogonal coordinate grid, aligned in Right Ascension and Declination, on the STAR CHART. When selected, the STAR CHART GRID dialog (as shown in Figure 4.32) will be presented to allow you to specify the density of the coordinate grid. GRID lines are spaced at equal intervals, in both R.A. and DEC, and the spacing is entered in degrees the GRID LINES EVERY section of the dialog. GRID lines are positioned to overlay the STAR CHART at integral multiples of the specified spacing (i.e., in this example, a spacing of GRID lines every 15deg. will be overlaid in R.A. at 1h, 2h, 3h..., and at -75deg., -60deg., -45deg.... in Dec.). Clicking CANCEL will abort the request to overlay GRID lines, clicking OK will cause the grid lines to be drawn, as specified.
![]()
Figure 4.32 - STAR CHART GRID dialog
Figure 4.33 illustrates the use of the GRID option. Here, GRID lines spaced every 5deg. are overlaid on a portion of the sky in the region of Orion.
Figure 4.33 - Sample STAR CHART GRID
![]() Note: A maximum
of 100 grid lines may be drawn in either R.A. or Dec. If the spacing specified
for either axis would result in a grid density requiring more than 100
lines then no lines will be drawn for that coordinate.
Note: A maximum
of 100 grid lines may be drawn in either R.A. or Dec. If the spacing specified
for either axis would result in a grid density requiring more than 100
lines then no lines will be drawn for that coordinate.
THE A(rtificial) SAT(telite) OPTION - The instantaneous positions of one or more Artificial SATellites, whose orbital elements were previously selected via the File:SATELLITE dialog, may be overlaid on a STAR CHART using this option. The positions of the artificial satellite(s) are projected onto the sky as seen by an observer whose topographic position is defined in the Setup:OBSERVER dialog. When A. SAT. is selected, an option dialog similar to the one shown in Figure 4.28, will be presented to enable you to specify how the positions of the selected artificial satellites are to be displayed. This dialog is similar to the ORBITAL TRACKS option dialog, though the INCREMENT is in minutes rather than days.
An example of a STAR CHART using the A. SAT. option is shown
in Figure 4.34. The apparent positions of the Gamma Ray Observatory (GRO)
and Extreme UltraViolet Explorer (EUVE) satellites are shown for an observer
in Western Maryland on October 12, 1992 for the Universal Times shown.
The U.T. of the first point of the track of each satellite is taken from
the Setup:OBSERVER dialog. A double square box (![]() )
indicates that the satellite would be seen as illuminated by the observer.
A single square box (
)
indicates that the satellite would be seen as illuminated by the observer.
A single square box (![]() )
indicates that the satellite would not be illuminated.
)
indicates that the satellite would not be illuminated.
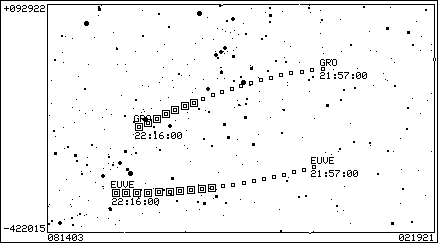 .
.
Figure 4.34 - Sample STAR CHART with Artificial Satellite Positions Indicated
Note that the STAR CHART display is referenced to the equatorial coordinate system (precessed to the equator and equinox of the Catalog or Observer date as specified in the Setup:PLANETS dialog) and is not sensitive to the observer's horizon. Thus, the positions of the satellites shown in the sky may be for times when the satellites are below the observer's horizon. The Starsky:HORIZON view should be used if times of topocentric visibility are of interest.
THE MARK OPTION - The MARK option is similar to that for the SKY MAP, but the coordinate annotation will indicate the selected location's Right Ascension and Declination.

The HORIZON item in the StarSky menu is used to produce a view of the sky as it appears from a particular topocentric location at a given time and date, centered upon a specified location in the sky relative to the observer's horizon. The HORIZON view may also be constrained to include only those stars which satisfy the range, match or qualification criteria established through the Setup:STARS dialog. The HORIZON view is a Mercator projection displayed with the direction to the observer's zenith up, and increasing azimuth to the right. When the HORIZON view is selected from the StarSky menu, the HORIZON dialog (shown in Figure 4.35) will be displayed. This dialog is used to specify where in the sky the HORIZON view should be centered.
The bottom of the HORIZON view will contain the observer's instantaneous horizon as determined by the topocentric coordinates and U.T. Time/Date previously entered via the OBSERVER item in the Setup menu. The top of the display will correspond to a maximum altitude above the horizon, in degrees, as specified in the MAX ALT= field of the HORIZON dialog. The azimuthal centering and width of the HORIZON view is entered, in degrees, in the AZIMUTH= and +/- fields in the HORIZON dialog.
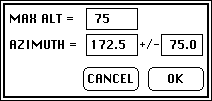
Figure 4.35 - HORIZON Dialog
Clicking OK in the HORIZON dialog will cause the HORIZON display to be produced. Clicking CANCEL will cause the request to generate a HORIZON view to be canceled.
When StarSky:HORIZON is selected, the message "PREPARING StarSky:HORIZON" will appear in the HIPPARCHUS window. Stars which fall within the range of values, or match the Setup:STARS criteria will be selected. If you specified that the stellar coordinates transformations (precession and proper motion) should be applied after catalog data are retrieved (see the CATALOG item in the Setup menu), those transformations will take place at this time. You will see the message "PRECESSING STARS xxxx TO yyyy" appear in the HIPPARCHUS window. The precessional computations are applied in "chunks" of 1000 stars. HIPPARCHUS will report its progress by updating the xxxx and yyyy counter in this message as it proceeds. If no stellar catalog entries were retrieved (see Setup:RETRIEVE), or if none of the stars retrieved fall within the specified boundaries of the horizon view, an advisory dialog will be invoked, and StarSky:HORIZON will terminate.
The size of the symbol used to indicate the position of a star is related to the stars brightness (V magnitude). Brighter stars are plotted with larger plotting symbols. For a given limiting range of magnitudes specified in Setup:STARS, the smallest set of plotting symbols possible will be used (to avoid "crowding" in the chart). The boundaries of the chart are annotated with the Right Ascensions and Declinations of the boundaries.
![]() HORIZON
views may be produced and annotated in color, if a color monitor is in
use. Please see StarSky:STAR COLORS for details
HORIZON
views may be produced and annotated in color, if a color monitor is in
use. Please see StarSky:STAR COLORS for details
A sample HORIZON view is shown in Figure 4.36. All stars brighter than V magnitude 5.01 are shown in this HORIZON view. This is the portion of the sky, bounded in altitude and azimuth as specified in the HORIZON dialog shown in figure 4.35, as seen from western Maryland at 21:58 U.T. on Oct. 12, 1992. The axes of the HORIZON view indicate the altitude and azimuth boundaries.

Figure 4.36 - Sample HORIZON View
After the HORIZON view is displayed, the HORIZON option box will be presented. The HORIZON options are INFO, ANNOTATE, VARS., PLANETS, B/W, GRID, ZOOM, DOUBLES, CONST., MAG<=, MESSIER, A. SAT., COMET/MP, CANCEL and OK. With the exception of INFO, ZOOM, and GRID, all of the HORIZON options are identical in function to the StarSky:STARCHART options. Please see StarSky:STARCHART for a description of these options.
THE INFO OPTION - The INFO option in HORIZON works in a manner similar to the INFO option for the STAR CHART. As you move the arrow cursor around, in the HORIZON view, the horizon coordinates (azimuth and altitude, respectively) of the tip of the arrow are displayed in the title bar, as shown in Figure 4.37. These coordinates will update continuously until you click the mouse to obtain information on the desired star. When you select a star, and click OK in the resulting INFO dialog, the catalog number of that star will be automatically copied to the STAR(BSNO) field of the StarSky:SKY MAP dialog. This provides a simple means for centering a SKY MAP on a pre-selected stellar target. The Right Ascension of the selected star will be copied to the CONJUNCTION IN RA= field of the SolarSystem:PLANETARY PHENOMENA dialog.

Figure 4.37 - HORIZON View, INFO (coordinate) Option
THE ZOOM OPTION - allows you use the mouse to select a region of the sky displayed on the HORIZON view. When you select ZOOM a message telling you how to ZOOM will replace the HORIZON dialog box. When ZOOMing in the HORIZON view, the selected area will always be extended to include the observer's horizon. As indicated by the message, to select a region of the sky from the HORIZON:
1. Move the arrow cursor to the upper-left portion the desired area.
2. Click, and hold down the mouse button.
3. While holding down the mouse button, drag the mouse to the right-hand boundary of the desired area. A box will be drawn around the drag area (including the horizon) as you move the mouse. The azimuth and altitude corresponding to the position of the tip of the arrow cursor will be displayed in the title bar as you move the mouse.
4. Release the mouse button.
When you have done this the HORIZON view will be erased from the HIPPARCHUS window and the HORIZON dialog (as in Figure 4.37) will be presented showing you the result of your ZOOM. Clicking OK will cause the ZOOM to be accepted and HORIZON view will be redrawn as specified. Clicking CANCEL will exit StarSky:HORIZON. New Right Ascension and Declination range limits will be established based on your ZOOM selection. These limits will appear in the minimum and maximum fields of the Setup:STARS dialog the next time it is invoked. The limits chosen will always include the entire area selected with ZOOM, though one coordinate range may be somewhat larger. HIPPARCHUS will always try to make optimum use of its window area, while fulfilling the ZOOM request. The TARGET coordinates of the FIELD CENTER in the StarSky:SKY MAP dialog will be set to the center of the ZOOMed region. ZOOM will then retrieve those stars which fall within the new coordinate boundaries from the catalog. An informational dialog (the same one you see when you select RETRIEVE from the Setup menu) will inform you of the number of stars selected. The HORIZON view will then be redrawn using the new boundaries, filling as much of the HIPPARCHUS window as possible.
![]() Note: You
can cancel a ZOOM request by dragging the mouse (in step 2 above) to upper-left
of the starting point of the initial position for the ZOOM. In that case
the ZOOM box will shrink and disappear, and when the mouse button is released
the ZOOM request will be ignored.
Note: You
can cancel a ZOOM request by dragging the mouse (in step 2 above) to upper-left
of the starting point of the initial position for the ZOOM. In that case
the ZOOM box will shrink and disappear, and when the mouse button is released
the ZOOM request will be ignored.
![]() Note: ZOOM
implicitly RETRIEVEs stellar information from the catalog. Hence, if you
were to produce a stellar table (using StarSky:TABLE), STAR CHART
(using StarSky:STAR CHART) or SKY MAP (using StarSky:SKY
MAP) after ZOOMing with HORIZON, only those stars selected by
ZOOM will appear. ZOOM does not affect any of the other Setup:STARS parameters.
Hence, a ZOOMed HORIZON view may look sparse, if a small area is
selected, and the limiting magnitude of the initial HORIZON view
is restricted.
Note: ZOOM
implicitly RETRIEVEs stellar information from the catalog. Hence, if you
were to produce a stellar table (using StarSky:TABLE), STAR CHART
(using StarSky:STAR CHART) or SKY MAP (using StarSky:SKY
MAP) after ZOOMing with HORIZON, only those stars selected by
ZOOM will appear. ZOOM does not affect any of the other Setup:STARS parameters.
Hence, a ZOOMed HORIZON view may look sparse, if a small area is
selected, and the limiting magnitude of the initial HORIZON view
is restricted.
THE GRID OPTION - is similar to the STAR CHART GRID option but will overlay an orthogonal coordinate grid, aligned in azimuth and altitude on the HORIZON view.
THE MARK OPTION - The MARK option is similar to that for the SKY MAP, but the coordinate annotation will indicate the selected location's altitude and azimuth.

Figure 4.38 - Sample MARK/Coordinate Annotation
StarSky:TABLE will produce a tabular listing of all of the currently selected catalog entries. Information about each selected star is displayed on one line in the table. The table may be displayed on number of pages in the StarSky:TABLE window, and printed if the PRINTER ON option is selected. The StarSky:TABLE dialog allow you to control how tabular output is to be formatted when stellar catalog information is displayed.
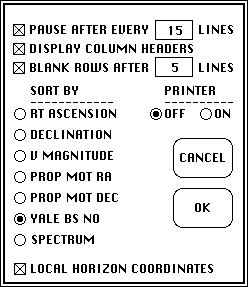
Figure 4.38- The StarSky:TABLE dialog
PAUSE AFTER EVERY ![]() LINES - determines how many lines of stellar catalog information is to
be displayed in the HIPPARCHUS window, before pausing. Enter the number
of lines of catalog data you wish to see displayed on each tabular page
in the
LINES - determines how many lines of stellar catalog information is to
be displayed in the HIPPARCHUS window, before pausing. Enter the number
of lines of catalog data you wish to see displayed on each tabular page
in the ![]() box. The
default number of lines is 15. When information is displayed, a simple
output control dialog (as shown in Figure 4.38) will appear at the bottom
right of the HIPPARCHUS window. To output the next page of tabular information
click on OK. To terminate the sequential display of tabular information,
before all pages have been output, click on CANCEL. Clicking on CANCEL
here will exit StarSky:TABLE and leave the last page displayed in
the HIPPARCHUS window.
box. The
default number of lines is 15. When information is displayed, a simple
output control dialog (as shown in Figure 4.38) will appear at the bottom
right of the HIPPARCHUS window. To output the next page of tabular information
click on OK. To terminate the sequential display of tabular information,
before all pages have been output, click on CANCEL. Clicking on CANCEL
here will exit StarSky:TABLE and leave the last page displayed in
the HIPPARCHUS window.
The tabular output may be display (and printed) without pausing between
pages. This is probably desirable if you intend to print a multi-page table.
The check box to the left of the PAUSE AFTER EVERY ![]() LINES option determines if the pause will actually take place. If the PAUSE
AFTER option is deselected, by clicking on the check box, then the output
control dialog will not appear as each page is displayed (and printed).
If you wish to prematurely terminate tabular output when the PAUSE AFTER
option has been deselected, use the BREAK item on the INTERRUPT
menu.
LINES option determines if the pause will actually take place. If the PAUSE
AFTER option is deselected, by clicking on the check box, then the output
control dialog will not appear as each page is displayed (and printed).
If you wish to prematurely terminate tabular output when the PAUSE AFTER
option has been deselected, use the BREAK item on the INTERRUPT
menu.
DISPLAY COLUMN HEADERS - should be checked if a table header is desired at the start of each new tabular page. When this option is deselected no header information will appear.
BLANK ROWS AFTER ![]() LINES - controls how many lines of stellar catalog information are to be
displayed before a blank line is inserted in the table. The default is
a blank line after every 5 lines of catalog information displayed. To turn
off the insertion of blank lines, deselect this option by clicking on the
check box to the left of the BLANK ROWS option.
LINES - controls how many lines of stellar catalog information are to be
displayed before a blank line is inserted in the table. The default is
a blank line after every 5 lines of catalog information displayed. To turn
off the insertion of blank lines, deselect this option by clicking on the
check box to the left of the BLANK ROWS option.
SORT BY - The tabular output may be sorted by Right Ascension, Declination, V magnitude, Proper Motion in RA or DEC, Yale Bright Star Catalog Number or, alphabetically, by spectral type. The selected catalog data are sorted, by the item specified in the SORT BY option, before the output table is displayed or printed.
PRINTER - toggles a printer ON/OFF. If toggled on, by clicking the ON button, the tabular output will be spooled to the current printing device as well as displayed in the HIPPARCHUS window. Use the Page Setup item in the PAGE menu to establish printing parameters for your printer driver. The printer will be active only for tabular output.
LOCAL HORIZON COORDINATES - may be computed for each selected stellar catalog entry. The computation of Local horizon coordinated depends specifically upon the observers geographic coordinates, and the time and date. This information should be entered through the dialog invoked by the OBSERVER item in the Setup menu prior to using StarSky:TABLE. Click the check box next to the LOCAL HORIZON COORDINATES option if this is desired. Horizon coordinates are displayed as azimuth and zenith distance in degrees. No atmospheric refraction, or stellar aberration corrections are applied to the computed local horizon coordinates.
OK - Clicking OK will set all of the other options specified in the StarSky:TABLE dialog, and begin the tabular output display. When you click OK the message "PREPARING StarSky:TABLE" will briefly appear in the HIPPARCHUS window. Note, if you specified that the stellar coordinates transformations (precession and proper motion) should be applied after catalog data are retrieved (see the CATALOG item in the Setup menu), those transformations will take place at this time. You will see the message "PRECESSING STARS xxxx TO yyyy" appear in the HIPPARCHUS window. The precessional computations are applied in "chunks" of 1000 stars. HIPPARCHUS will report its progress by updating the xxxx and yyyy counter in this message as it proceeds. If no stellar catalog entries were retrieved (see Setup:RETRIEVE), and advisory dialog as shown in Figure 4.39 will be displayed, and StarSky:TABLE will terminate.
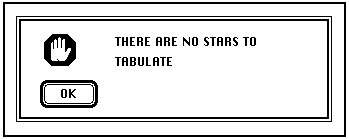
Figure 4.39 - StarSky:TABLE no stars advisory
CANCEL - Clicking CANCEL will exit StarSky:TABLE No tabular output will be displayed, and any dialog options selected will be ignored.
Figure 4.40 shows one page of a sample StarSky:TABLE. The TABLE formatting options specified in the StarSky:TABLE dialog shown in Figure 4.34 are in effect. In addition, the LOCAL HORIZON COORDINATES option was turned on. The respective columns indicate, for each star, the Bright star catalog number (BSNO), the Right Ascension (HHMMSS.F), the Declination (DDMMSS.F), V-Magnitude (VMAG), Proper Motion components in RA and Dec (PM/RA, PM/DEC) in arc-seconds per year, an indications of variability (V) and duplicity (D), the Azimuth and Zenith Distance (AZ, ZD) in degrees (if the LOCAL HORIZON COORDINATES option was enabled), and the stellar spectral type.

Figure 4.40 - Sample StarSky:TABLE page
As each page is displayed, a simple output control dialog containing
the options FILE, PRINT, CANCEL and OK will be presented. Clicking on FILE
will allow you to copy the contents of the page currently displayed to
a generic Macintosh TEXT file. If you choose this option then a standard
file requestor dialog will appear to allow you to specify the name and
destination for the file. Clicking PRINT will print a copy of the currently
displayed page on the printing device last specified through the ![]() Chooser. This option will be ignored if the PRINTER ON option was selected
in the StarSky:TABLE dialog (in which case all page displays will
be printed). To display the next page of the tabular output click OK. To
exit from StarSky:TABLE click CANCEL.
Chooser. This option will be ignored if the PRINTER ON option was selected
in the StarSky:TABLE dialog (in which case all page displays will
be printed). To display the next page of the tabular output click OK. To
exit from StarSky:TABLE click CANCEL.
![]() Note: Exiting
via FILE will allow you to save the currently displayed page (as defined
by the PAUSE AFTER EVERY
Note: Exiting
via FILE will allow you to save the currently displayed page (as defined
by the PAUSE AFTER EVERY ![]() LINES in the StarSky:TABLE dialog), as previously discussed. To
write a single large file without interactive interruption turn off the
PAUSE AFTER EVERY
LINES in the StarSky:TABLE dialog), as previously discussed. To
write a single large file without interactive interruption turn off the
PAUSE AFTER EVERY ![]() LINES option.
LINES option.
![]() Note: If a
single page of TABLE output overfills the HIPPARCHUS window then
the output will be scrolled. The scrolled output may be seen by using the
vertical scroll bar to the right of the HIPPARCHUS window after
exiting StarSky:TABLE by clicking OK.
Note: If a
single page of TABLE output overfills the HIPPARCHUS window then
the output will be scrolled. The scrolled output may be seen by using the
vertical scroll bar to the right of the HIPPARCHUS window after
exiting StarSky:TABLE by clicking OK.
StarSky:SCAN will display catalog information about each selected star, one star at a time, in a dialog box at the bottom of the HIPPARCHUS window. The catalog is always scanned in increasing order of Yale Bright Star Catalog Number. The stellar coordinates will be precessed, and proper motion components applied, as specified by the Setup:CATALOG dialog. The azimuth and zenith distance of the star (A/Z), in degrees, are for the time, date, and geographic location last entered through the Setup:OBSERVER dialog. A sample StarSky:SCAN dialog is shown in Figure 4.41.
![]()
Figure 4.41 - Sample StarSky:SCAN
Click OK to see the next star in the SCAN. Click CANCEL to terminate the scan before all selected stars have been scanned.
StarSky:MESSIER will produce a paged tabular listing of all objects in the Messier Catalog of non-stellar objects. The table is presented in three sections. Each section gives the Messier catalog number of the object, the object's Right Ascension and Declination, and the object type. The left section of the paged display presents this information sorted by Messier Catalog number. The center section is sorted by Right Ascension. The right section is sorted by Declination. The tabulated equatorial coordinates of the Messier Objects are precessed to the date of final equator and equinox of the stellar catalog as specified in the Setup:CATALOG dialog. The Type Codes (column heading TC) for the Messier objects are as follow:
EN = Emission Nebula GC = Globular Cluster GL = Galaxy
OC = Open Cluster PN = Planetary Nebula XX = Other
A sample StarSky:MESSIER display is shown in Figure 4.42.
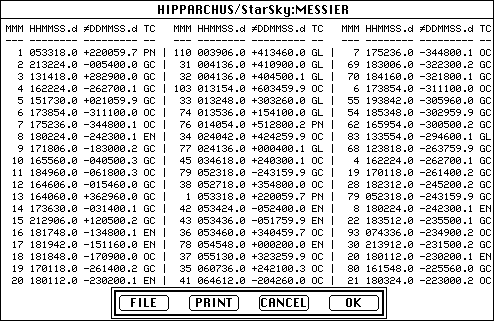
Figure 4.42 - Sample StarSky:MESSIER
As each page is displayed, a simple dialog containing the options FILE,
PRINT, CANCEL and OK will be presented. Clicking on FILE will allow you
to copy the contents of the page currently displayed to a generic Macintosh
TEXT file. If you choose this option then a standard file requestor dialog
will appear to allow you to specify the name and destination for the file.
Clicking PRINT will print a copy of the currently displayed page on the
printing device last specified through the ![]() Chooser. To display the next page of the Messier table click OK. To exit
from StarSky:MESSIER click CANCEL.
Chooser. To display the next page of the Messier table click OK. To exit
from StarSky:MESSIER click CANCEL.
The SolarSystem menu contains eight items which will provide, in graphical or tabular format, a variety of information about Solar System Objects. The items on the Solar System menu are PLANETARY EPHEMERIS, PLANETARY PHENOMENA, COMET-MP (Minor Planet) EPHEMERIS, MOON, GALILEAN MOONS, SATELLITES, ORRERY, and SUN CLOCK.
SolarSystem: PLANETARY EPHEMERIS { ![]() E}
E}
SolarSystem:PLANETARY EPHEMERIS will produce a tabular ephemeris
of the major solar system bodies (Planets, Moon and Sun) for the instantaneous
observational epoch specified in Setup:OBSERVER dialog. Only those
solar system objects which have been selected in the Setup:PLANETS
dialog will be entered in the ephemeris computations. When the computation
has finished the ephemeris will be displayed in the SolarSystem:PLANETARY
EPHEMERIS window and a simple dialog containing the options FILE, PRINT,
CANCEL and OK will be presented. Clicking on FILE will allow you to copy
the PLANETARY EPHEMERIS to a generic Macintosh TEXT file. If you
choose this option then a standard file requestor dialog will appear to
allow you to specify the name and destination for the file. Clicking PRINT
will print a copy of the PLANETARY EPHEMERIS on the printing device
last specified through the ![]() Chooser. Clicking OK will exit the PLANETARY EPHEMERIS and will
clear the tabulated ephemeris from the HIPPARCHUS window.
Chooser. Clicking OK will exit the PLANETARY EPHEMERIS and will
clear the tabulated ephemeris from the HIPPARCHUS window.
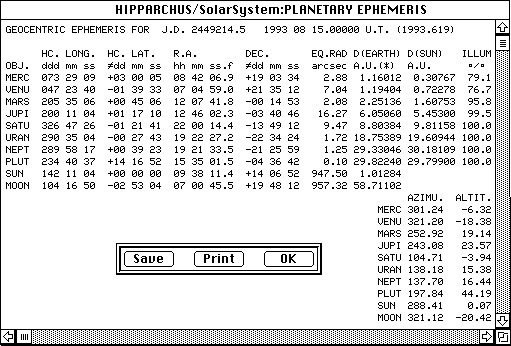
Figure 5.1 - Sample SolarSystem:PLANETARY EPHEMERIS
A sample PLANETARY EPHEMERIS tabular output is shown in Figure 5.1. The dates which appear on the first line of the tabular output are the date for which the geocentric ephemeris was computed (both in J.D. and U.T.) and the Besselian date of the coordinate epoch. The choice of a geocentric or topocentric ephemeris is made through the Setup:OBSERVER dialog. Here, the OBSERVER DATE was chosen from the Setup:PLANETS menu, as were all of the solar system objects.
Following the header, dynamical information is tabulated for all of the selected objects. The Right Ascension, Declination, Heliocentric Longitude, Heliocentric Latitude, apparent angular Equatorial Radius, Distance from the Sun, and Distance from the Earth of each selected solar system object will be displayed. The percentage of the surface illuminated by sunlight (as seen by the observer geocentrically, or topocentrically) is also tabulated. The equatorial coordinates of solar system objects will be precessed either to the time and date specified in the Setup:OBSERVER dialog, or to the epochal date (equator and equinox) of the catalog as specified in the Setup:CATALOG dialog. This choice is made by clicking on either OBSERVER DATE or CATALOG DATE in the Setup:PLANETS dialog before generating the Planetary Ephemeris. Distances, for the planets and the Sun, are expressed in Astronomical Units. The lunar distance is expressed in Earth radii. Angular radii are expressed in seconds of arc.
Below this, to the right, the instantaneous Altitude and Azimuth of each of the selected objects is displayed for an observer at a topocentric location specified in the Setup:OBSERVER dialog.
![]() Note:
On some Macintosh's the default size of the text window in which the PLANETARY
EPHEMERIS appears may not be large enough to display all of the information
in it's entirety. If this should happen, simply resize the window by dragging
the resize box at the lower-right corner of the window before generating
the ephemeris.
Note:
On some Macintosh's the default size of the text window in which the PLANETARY
EPHEMERIS appears may not be large enough to display all of the information
in it's entirety. If this should happen, simply resize the window by dragging
the resize box at the lower-right corner of the window before generating
the ephemeris.
Note: Planetary, lunar and solar ephemeris computations are performed according to procedures which are detailed in Reference 5.
SolarSystem:PLANETARY PHENOMENA will compute the instant of the planetary phenomena given in the PLANETARY PHENOMENA dialog (Figure 5.2), for applicable solar system bodies (Planets, Moon and Sun).

Figure 5.2 - SolarSystem:PLANETARY PHENOMENA dialog
After selecting the particular phenomenon of interest, a dialog similar to the Setup:PLANETS (Figure 3.6), will be presented. Chose the desired solar system body (or two bodies in the case of a 2-BODY CONJUCTION) to find the epoch of the phenomenon specified which occurs closest to the time and date previously entered in the Setup:OBSERVER dialog. Clicking CANCEL in either of these dialogs will terminate SolarSystem:PLANETARY PHENOMENA. When meaningful, phenomena may be computed relative to either a GEOCENTRIC or TOPOCENTRIC reference frame. The observer's topocentric coordinates will be taken from the Setup:OBSERVER dialog. If you click OK the instantaneous epoch of the desired phenomenon will be determined iteratively by successive approximation. The convergence criterion used by HIPPARCHUS is for the value of the parameter sought to be equal, to a precision of 1 part in 108, in two successive iterations. This convergence criterion corresponds, typically, to approximately 1 second in time.
Once the instant of the phenomenon has been found, an ephemeris for the body, or bodies, involved will be displayed. The format of the display is similar to that used by SolarSystem:PLANETARY EPHEMERIS, with an informational header prepended (Figure 5.3, for example). Options to FILE and/or PRINT this tabulation, as discussed for SolarSystem:PLANETARY EPHEMERIS, will be made available at that time.
Exiting SolarSystem:PLANETARY PHENOMENA by clicking OK will cause the computed date and time for the phenomenon to be transferred to the observer's U.T. DATE and TIME in the Setup:OBSERVER dialog. In that case, if the USE U.T. = SYSTEM CLOCK TIME option (in the Setup:OBSERVER dialog) had been selected prior to computing the epoch of the phenomenon, it will be deselected and the U.T. DATE and TIME option will be selected. In addition, the solar system body, or bodies, used in computing the specified phenomenon will be selected from the Setup:PLANETS dialog, and all others will be deselected. Exiting SolarSystem:PLANETARY PHENOMENA by clicking CANCEL will leave both the Setup:OBSERVER and Setup:PLANETS dialogs unaffected.
VENUS SUN 2-BODY CONJUNCTION Date/Time: 19930330 093253.6 delta-DEC = 8.76deg.

GEOCENTRIC EPHEMERIS FOR J.D. 2449076.898 1993 03 30.39784 U.T. (1993.242)

      HC. LONG. HC. LAT. R.A.        DEC.     EQ.RAD D(EARTH) D(SUN)   ILLUM
OBJ. ddd mm ss  dd mm ss hh mm ss.f  dd mm ss arcsec A.U.(*)  A.U.       %
---- --- -- -- --- -- -- -- -- ---- --- -- -- ------ -------- -------- -----
VENU 188 20 38 +03 09 11 00 35 38.2 +12 36 10  29.71 0.28304   0.72061   1.2
SUN  009 41 53 +00 00 00 00 35 38.2 +03 50 35 960.76 0.99881
Figure 5.3 - Sample SolarSystem:PLANETARY PHENOMENA Ephemeris
![]() Notes: A 2-BODY
CONJUNCTION of the SUN and MOON defines the instant of the new moon.
Notes: A 2-BODY
CONJUNCTION of the SUN and MOON defines the instant of the new moon.
An OPPOSITION of the MOON defines the instant of full moon.
OPPOSITION may not be computed for MERCURY, VENUS and the SUN.
NODE CROSSING may not be computed for SUN.
NODE CROSSING may be computed for the EARTH and defines an equinox.
GREATEST ELONGATION may be computed only for MERCURY and VENUS.
For the MOON, PERIGEE and APOGEE are computed with respect to the Earth,
not PERIHELION and APHELION.
When computing a CONJUNCTION IN RA of a solar system body, enter the desired
Right Ascension in HHMMSS.f format in the adjoining field. If a star was
previously selected using the INFO option in the StarSky STARCHART,
SKYMAP or HORIZON displays this field will be pre-filled
with the RA of the selected star.
In the case of a Comet or Minor Planet, an ephemeris of the form shown in Figure 5.4 will be displayed. The starting date and time of the ephemeris is the time and date last entered through the Setup:OBSERVER dialog.

Figure 5.4 - Sample SolarSystem:COMET-MP EPHEMERIS
The first line of the display gives the object's name, the coordinate epoch for the equator and equinox used in the tabulation (as specified in the Setup:PLANETS dialog), and the perihelion date both in Julian and Gregorian date formats. The principle orbital elements are displayed in the following two lines of text. In the case of a parabolic orbit (e=1.0), as in this example, the semi-major axis length (a) would be infinite and is noted simply as ********. Also, for a parabolic orbit the mean motion has no meaning (since the semi-major axis of the orbit is infinite), and is given as zero.
Eight pieces of information are presented for each date. The Universal Date and Time are given as Year, Month, Day (and fractional day) in the leftmost three columns. The object's coordinates (Right Ascension and Declination), in the usual HIPPARCHUS format follows. The next two columns, denoted [[Delta]] and r give the object's distance (in Astronomical Units) from the Earth, and the Sun, respectively. [[ordmasculine]] is the object's elongation (to the Sun), and [[beta]] is the phase angle (Sun-object-Earth angle), both measured in degrees. The last column gives the object's estimated apparent V-magnitude.
A simple output dialog will be presented below the tabular ephemeris. If you wish to obtain a printed copy of the ephemeris, click the PRINT option in the output dialog. You may write a copy of the tabular ephemeris to a generic Macintosh TEXT file (which may be used by other applications) by clicking the FILE option. A standard file requestor dialog will appear. Clicking OK will exit the COMET-MP EPHEMERIS b and will clear the tabular output from the HIPPARCHUS window.
Note: Comet and minor planet computations are derived from procedures outlined in Reference 6.
SolarSystem:SATELLITES will produce tabular ephemerides of the positions of the Artificial Satellites which were previously selected via the GET SATELLITES item in the CATALOG menu (see File:GET SATELLITES).
When SolarSystem:SATELLITES is selected a SATELLITES dialog, as shown in Figure 5.5, will be presented allowing you to specify the computational epochs for the ephemerides, and how the ephemerides are to be formatted. The initial epoch is taken from the Universal Time and Date which was previously entered in the Setup:OBSERVER dialog. The SATELLITES dialog allows you to specify both the INCREMENT (in minutes) and the NUMBER OF POINTS to be used when computing an ephemeris for each of the pre-selected artificial satellites. Note that the INCREMENT entered in the SATELLITES dialog specification may be fractional, or negative.

Figure. 5.5 - SolarSystem:SATELLITES Dialog
Ephemerides of each of the pre-selected satellites will be computed. Both the equatorial and horizon coordinates of the satellites, for an observer whose topocentric coordinates were entered via the Setup:Observer dialog, will be tabulated. The equatorial coordinates will be precessed to the equator and equinox of either the Catalog Date (as specified in the Setup:CATALOG dialog), or the epochal date of the observation as specified in the Setup:SolarSystem dialog.
Satellite positions may be eliminated from the tabular ephemerides for instances where the satellite is below the observer's horizon, or not illuminated as seen from the observer's topocentric location. To invoke either of these options check the Suppress if: Below Horizon, and/or Not Illuminated boxes. If both are checked the only positions which will be reported in the tabular ephemerides will be for instants when the satellites are both above the horizon and illuminated.
When the computation has finished each satellite ephemeris will be displayed in the SolarSystem:SATELITTES window. If the PAGINATE option was selected each satellite ephemeris will be displayed, in turn, in the window. If PAGINATE was not selected the tabular ephemerides of all pre-selected satellites will be displayed contiguously in the window.
For each satellite, a header giving the name of the satellite, the starting U.T. date of the ephemeris and the topocentric coordinates of the observer is presented. For each computed epoch the equatorial coordinates (R.A. and DEC.) and horizon coordinates (AZI. and ALT.) as seen by the observer is given. In addition, the geographical coordinates (LAT. and LONG.) of the satellite (i.e., one point on it's ground track) is tabulated. The column labeled I indicates whether or not the satellite is illuminated as seen by the observer (Yes or No).
A sample satellite ephemeris is shown in Figure 5.6.

Figure 5.6 - Sample SolarSystem:SATELLITES Display
![]() Note: Individual
instantaneous positions which satisfy suppression criteria specified in
the SATELLITES dialog will be eliminated. If all points are suppressed
then no ephemeris for that satellite will be displayed.
Note: Individual
instantaneous positions which satisfy suppression criteria specified in
the SATELLITES dialog will be eliminated. If all points are suppressed
then no ephemeris for that satellite will be displayed.
A simple dialog containing the options FILE, PRINT, CANCEL and OK will
accompany the tabular display. Clicking on FILE will allow you to copy
the ephemeris for the currently displayed satellite (or the concatenated
ephemerides if PAGINATE was not selected) to a generic Macintosh TEXT file.
If you choose this option then a standard file requester dialog will appear
to allow you to specify the name and destination for the file. Clicking
PRINT will print a copy of the SATELLITE ephemeris on the printing
device last specified through the ![]() Chooser. Clicking OK will exit SolarSystem:SATELLITES but will leave
the ephemeris displayed in the HIPPARCHUS window. Clicking CANCEL will
exit the SolarSystem:SATELLITES and will clear the tabulated ephemeris
from the HIPPARCHUS window.
Chooser. Clicking OK will exit SolarSystem:SATELLITES but will leave
the ephemeris displayed in the HIPPARCHUS window. Clicking CANCEL will
exit the SolarSystem:SATELLITES and will clear the tabulated ephemeris
from the HIPPARCHUS window.
Detailed information on the visual aspect of the moon may be obtained by using the MOON item on the SolarSystem menu. The lunar aspect may be computed geocentrically, or topocentrically, for any time and date as specified in the Setup:OBSERVER dialog. The information presented at the top of the SolarSystem:MOON window is identical in form to that given for the Moon in the SolarSystem:PLANETARY EPHEMERIS tabulation. Below this is a graphic depiction of how the moon would appear to the observer. The light and dark shaded portions of the lunar graphic represent the regions of lunar day and night as seen by the observer. The direction from the Moon's center to celestial north is indicated in the graphic.
Three additional pieces of lunar aspect information are provided as follows:
a) The lunar elongation angle (measured eastward from the Sun).
b) The position angle of the bright limb (measured eastward from celestial North to the mid-point of
the bright limb).
c) The percentage of the visible lunar surface illuminated by sunlight.
The elongation and position angles are measured in degrees. A sample SolarSystem:MOON display is shown in Figure 5.7.

Figure 5.7 - Sample SolarSystem:MOON
SolarSystem:ORRERY displays the relative positions of the Sun and planets as seen from above the plane of the solar system (i.e. looking down from the north ecliptic pole). The heliocentric positions of the Sun and planets are computed for the date currently in effect, as last entered in the Setup:OBSERVER dialog. A sample ORRERY is shown in Figure 5.8.

Figure 5.8 - Sample SolarSystem Orrery
The entire solar system is shown in the large circle in the left hand side of the SolarSystem:ORRERY window. The circle is drawn with a radius of 50 Astronomical Units, centered on the Sun. At this scale obvious crowding is seen for the inner planets. To alleviate this, the inner solar system, to a radius of 2 Astronomical Units, is shown in the smaller circle in the right hand side of the SolarSystem:ORRERY window. The ORRERY is always oriented such that heliocentric longitude 0 is up, and heliocentric longitudes increase in a counter-clockwise direction.
Clicking on R/Elon will cause the title bar to be to be annotated with the instantaneous polar coordinates of the tip of the arrow cursor as it moves in the area bounded by the 50 A.U or 2 A.U. circles.. The R coordinate is the heliocentric distance from the sun to the cursor. The Elong coordinate is the heliocentric elongation of the arrow cursor. When selected, a blinking line will be drawn from the sun to the tip of the arrow cursor, and will move as the cursor is moves in the 50 A.U or 2 A.U. Circles (see Figure 5.9). The (R,Elon) coordinate display will continue to update until the mouse is clicked.

Fig 5.9 - The R/Elon Option
Click Clicking OK will exit the ORRERY window on the desk top and will clear HIPPARCHUS window.
The GALILEAN MOONS item under the SolarSystem menu will produce a graphic timetable showing the locations of the Galilean moons of Jupiter. The display will span a period of one week, beginning with the current date last entered in the Setup:OBSERVER dialog.
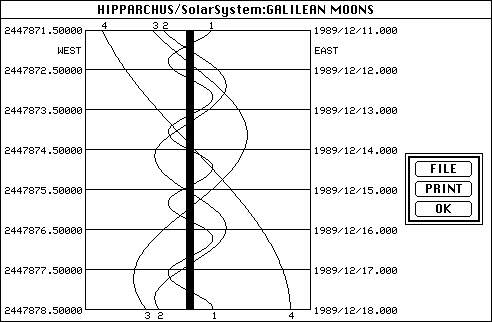
Figure 5.10 - Sample GALILEAN MOONS Graphic Timetable
A sample GALILEAN MOONS graphic timetable, for the week of December 11, 1989, is shown in Figure 5.10. Jupiter is represented by the solid black bar running down the middle of the figure. The paths of Io, Europa, Ganymede and Callisto about Jupiter are displayed as a function of time, and are labeled 1 - 4, respectively, along the top and bottom of the graphic timetable. The western (left) edge of the figure is annotated with the Julian date, and the eastern edge the Gregorian date. The horizontal lines indicate equal one day intervals from the starting time of the graphic timetable.
Clicking OK will exit the GALILEAN MOONS and will clear the HIPPARCHUS window.
The SUN CLOCK item under the SolarSystem menu produces a continually updating graphical representation of daylight and nighttime regions of the Earth projected on a map of the world (for example see Figure 5.11). SUN CLOCK runs on Universal Time. SUN CLOCK uses the time specified in the Setup:OBSERVER dialog. Thus, SUN CLOCK can derive the current time of day from your Macintosh system clock corrected for your local time zone, or use a specific Universal Time and Date.
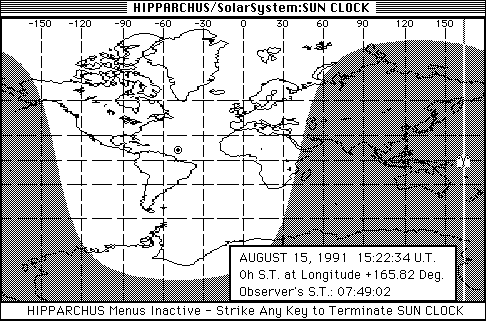
Figure 5.11 - Sample SUN CLOCK Output
In addition to the terminator and the day/night regions, the sub-solar
and sub-vernal equinoctial points are indicated by the ![]() and
and ![]() symbols,
respectively. The longitude corresponding to 0 hours sidereal time is indicated
by a gray vertical line (
symbols,
respectively. The longitude corresponding to 0 hours sidereal time is indicated
by a gray vertical line ( ![]() ).
The sidereal time for an observer located at the geographical coordinates
entered via the Setup:OBSERVER dialog is also displayed.
).
The sidereal time for an observer located at the geographical coordinates
entered via the Setup:OBSERVER dialog is also displayed.
![]() On slower
processors, SUN CLOCK may take up to 30 seconds to initialize. After
you respond to the SolarSystem:SUN CLOCK dialog, the message "INITIALIZING"
will be displayed. The first SUN CLOCK screen display will appear
approximately half a minute later.
On slower
processors, SUN CLOCK may take up to 30 seconds to initialize. After
you respond to the SolarSystem:SUN CLOCK dialog, the message "INITIALIZING"
will be displayed. The first SUN CLOCK screen display will appear
approximately half a minute later.
![]() Note:
While SUN CLOCK is running the
Note:
While SUN CLOCK is running the ![]() cursor will be displayed, indicating that HIPPARCHUS menu handling is inactive.
In order to exit SUN CLOCK strike any key on your keyboard. SUN
CLOCK will terminate within a few seconds of a key closure.
cursor will be displayed, indicating that HIPPARCHUS menu handling is inactive.
In order to exit SUN CLOCK strike any key on your keyboard. SUN
CLOCK will terminate within a few seconds of a key closure.
![]() The SUN
CLOCK may be displayed in either black and white, or color. The choice
is made through the DISPLAY OPTIONS item in the StarSky menu.
The SUN
CLOCK may be displayed in either black and white, or color. The choice
is made through the DISPLAY OPTIONS item in the StarSky menu.
The File Menu contains a variety of items concerned with accessing, saving, and updating data and information files which are used by HIPPARCHUS.
ABOUT HIPPARCHUS
The first item in the FILE menu is ABOUT HIPPARCHUS. Selecting
this item will bring up an informational dialog, similar to the one shown
in Figure 6.1. f you should ever need to contact sofTouch APpLications
about your copy of HIPPARCHUS, please refer to the mailing address, telephone
number, and e-mail address shown in the ABOUT HIPPARCHUS dialog.
This dialog will also identify the version of HIPPARCHUS which you are
using, and should be noted in any correspondence to sofTouch APpLications.

Figure 6.1 -File:ABOUT HIPPARCHUS Dialog
While using HIPPARCHUS you will encounter various input dialog requests. When you first launch HIPPARCHUS all of these inputs will be set to default values. These inputs specify such items as time, dates and locations for computations, orbital elements for minor planets and comets, format specifications for tabular or graphical output, just to name a few. At any time the HIPPARCHUS menus are active you may save the current values of all HIPPARCHUS input dialogs in a file for future use by invoking the SAVE SETTINGS item in the FILE menu. The subset of stars which have been currently selected will also be saved in the Settings file. A standard Macintosh file requestor dialog will be presented to allow you to specify the name and destination of the file.
The GET SETTINGS item in the FILE menu is used to restore a full set of HIPPARCHUS dialog inputs which previously had been saved in a settings file (see File:SAVE SETTINGS). A standard Macintosh file requestor dialog will be presented to allow you to specify the name and location of the desired HIPPARCHUS settings file. Settings which affect your global HIPPARCHUS environment will not be restored immediately upon retrieval. Rather, each of the following dialogs: Setup:OBSERVER, Setup:CATALOG, Setup:STARS, Setup:PLANETS, Setup:COMET-MINOR PLANET, and Setup:DISPLAY OPTIONS; will be invoked to show you the settings which were retrieved. You may then edit the dialog, in the standard fashion, prior to exiting - in order to alter any of the global settings which you retrieved before they take effect.
HIPPARCHUS will allow you to compute the positions and visibility of artificial Earth-orbiting satellites given their Keplerian orbital elements. sofTouch APpLications does not maintain, nor provide, satellite orbital elements, but includes the ability to compute artificial satellite ephemerides within HIPPARCHUS using those data which are publicly available. Current orbital elements from the NORAD two-line element sets are available on the Celestial BBS (513-427-0674), and are updated daily (when possible). Element sets are available via anonymous ftp from archive.afit.af.mil (129.92.1.66) in the directory pub/space and are uploaded weekly to the INTERNET newsgroups sci.space.news and rec.radio.info.
HIPPARCHUS can import those data in the posted form, if the orbital element listing (or a subset of it) is copied to a generic Macintosh ASCII TEXT file. In the INTERNET posting the orbital elements of each artificial satellite is given on three contiguous records formatted. An example of this is shown in Figure 6.2.
HST
1 20580U 90 37 B 92253.58694208 .00001320 00000-0 11338-3 0 8452
2 20580 28.4697 71.3614 0004711 345.5234 14.5203 14.91735362129563
Figure 6.2 - Format of Satellite Element File Entry
When creating an ASCII text file of satellite elements to be imported into HIPPARCHUS, be sure to include only the three lines of data for each satellite. Strip off any file header and/or trailer information which may be carried by a terminal emulation, communication or file transfer program. While you may transfer and create a file which contains the elements of all posted satellites, it is suggested that you create smaller subsets (i.e. include data only for those satellites of interest) to be used by HIPPARCHUS. HIPPARCHUS is capable of computing ephemerides for an input file containing the elements of many satellites, but may be constrained by the specific memory configuration of a given Macintosh. In addition, larger files take longer to process. A sample satellite element file called OCT92.SAT has been included in the EXAMPLES folder on the HIPPARCHUS distribution disk. Note that satellite orbital elements are subject to perturbations (notably upper atmospheric drag) which will make a set of elements for a low-Earth orbit satellite obsolete after only several weeks.
When File:GET SATELLITES is invoked, a file requester dialog will be presented asking you to SELECT THE DESIRED SATELLITE ELEMENT FILE. Locate and OPEN the file (such as the sample OCT92.SAT file, or one you have created from any of the public posting). Clicking on CANCEL will terminate the GET SATELLITES request.
After selecting the satellite element file a dialog will be presented (Figure 6.3) which will allow you to specify if all of the satellite elements should be imported from the file, or if you desire to select elements for specific satellites.

Figure 6.3 Satellite Selection Option
If you chose Use Selected Satellites, a requester dialog will be brought up which will list, by name, all of the satellites contained in the orbital element file (see Figure 6.4). To select a specific satellite, point to it's name (use the scroll or elevator bar if necessary) and click Select. Repeat this process until all desired satellites are selected - then click CANCEL to exit this dialog. CANCEL will exit the selection dialog, but will retain the orbital elements of the selected satellites. These orbital elements will be used in computing artificial satellite ephemerides (using the SATELLITES option in the SolarSystem menu), and in displaying the instantaneous positions of artificial satellites in the STAR CHART and HORIZON displays in the StarSky menu.
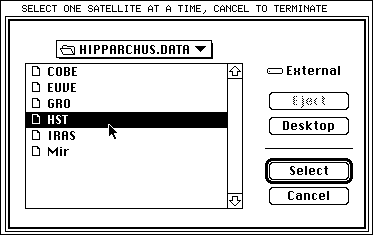
Figure 6.4 - Satellite Selection Dialog
Information about the stars in the HIPPARCHUS database are stored in the file APLSFILE.AFL provided on the HIPPARCHUS distribution disk. The source for the data in this file is the "Yale Bright Star Catalog" (Ref. 1). The HIPPARCHUS database contains information about all 9096 stars in the Yale Bright Star Catalog. The catalog numbers of these stars are the same as those used in Yale Bright Star Catalog, and in the HR catalog (Ref. 2). The HIPPARCHUS database carries the stellar coordinates (Right Ascension and Declination), proper motion components in R.A. and DEC, V-magnitudes and spectral classifications for each star.
The equatorial coordinate system changes as a function of time due to the precession of the Earth's rotational pole. The stellar coordinates stored in the HIPPARCHUS database are referred to the standard equator and equinoces of 1900.000 (B1900) and 2000.000 (B2000). The positions of the stars, expressed in either of those coordinate systems will change with time, due to the stars motion through space. The fundamental catalog positions for the stars in the HIPPARCHUS database are for the Besselian dates 1900.000 and 2000.000.
The HIPPARCHUS distribution disk contains files named YALE BS CATALOG and YALE 2000.0. These files are indices into the HIPPARCHUS database, and point to the stellar positional data referred to the 1900.0 and 2000.0 coordinate epochs, respectively. When you start a HIPPARCHUS work session, you must choose a catalog index file, such as YALE BS CATALOG, as the source index for all data retrievals from the data base.
HIPPARCHUS gives you the ability to precess the stellar coordinates to any date in the past or future, and to apply stellar proper motions to the positions of the stars. These computations may be done either after data have been retrieved (hence searches into the database will be in the stored coordinate epoch), or before data retrieval. In the latter case all the stellar coordinates are updated before data are retrieved from the catalog. Note that the database itself (APLSFILE.AFL file and catalog index files) is not altered when precession and proper motion computations are applied.
The precession of stellar coordinates from one reference epoch to another is performed in a rigorous manner (Ref. 3) and is computationally intensive, requiring some time to complete. Therefore, HIPPARCHUS will allow you to store stellar positions referenced to other coordinate epochs in the HIPPARCHUS database. Precession and proper motion computations are provided for via the CATALOG item in the Setup menu (see Setup:CATALOG for details).
To save stellar positions in a new coordinate epoch in the HIPPARCHUS data base:
1. Specify the coordinate transformation to be applied (Setup:CATALOG)
2. Use the SAVE INDEX ENTRY item in the FILE menu
After you have used SAVE INDEX ENTRY, you may use GET INDEX ENTRY to specify that all retrievals done by HIPPARCHUS will be done using the specified index file. When you use SAVE INDEX ENTRY you must supply an index file name. Thus, if you precess stellar coordinates to, say, 1855.000 and save them in the HIPPARCHUS database, you can switch between coordinate epochs by respecifying the name of the index file to be used by HIPPARCHUS (via GET INDEX ENTRY).
All stellar coordinates are saved in the APLSFILE.AFL file. A new catalog index file will be created for each set of epochal coordinates you save in the HIPPARCHUS database. Catalog index files, physically, are very small and use only "0K" as reported by the Macintosh finder. However, these files should never be deleted, except by the DELETE INDEX ENTRY option in the FILE menu. If you delete a catalog index file from the Macintosh finder, the epochal coordinate data which you saved in the HIPPARCHUS database (APLSFILE.AFL) will still be there, but HIPPARCHUS will be unable to access those data.
![]() Note: If you
are running HIPPARCHUS from a 3-1/2 inch floppy drive (rather than having
transferred the files on the distribution disk to hard disk), then you
may save only as many sets of transformed data as will fit on the floppy
disk. To allow yourself more space, if you intend to have multiple catalog
index files and sets of entries in APLSFILE.AFL, keep HIPPARCHUS and APL
Runtime STA to one floppy disk (from your distribution disk), and place
APLSFILE.AFL, "YALE BS CATALOG" and "YALE 2000.0" on
another. From then on launch HIPPARCHUS from the first disk, but chose
and store any working files from the second. The HIPPARCHUS distribution
disks are configured in this manner.
Note: If you
are running HIPPARCHUS from a 3-1/2 inch floppy drive (rather than having
transferred the files on the distribution disk to hard disk), then you
may save only as many sets of transformed data as will fit on the floppy
disk. To allow yourself more space, if you intend to have multiple catalog
index files and sets of entries in APLSFILE.AFL, keep HIPPARCHUS and APL
Runtime STA to one floppy disk (from your distribution disk), and place
APLSFILE.AFL, "YALE BS CATALOG" and "YALE 2000.0" on
another. From then on launch HIPPARCHUS from the first disk, but chose
and store any working files from the second. The HIPPARCHUS distribution
disks are configured in this manner.
![]() WARNING
- The SAVE INDEX ENTRY item will alter the structure of the HIPPARCHUS
database. DO NOT use SAVE INDEX ENTRY on your HIPPARCHUS distribution disk.
WARNING
- The SAVE INDEX ENTRY item will alter the structure of the HIPPARCHUS
database. DO NOT use SAVE INDEX ENTRY on your HIPPARCHUS distribution disk.
Use SAVE INDEX ENTRY to store stellar coordinates which have been precessed, and or updated for proper motions, in the HIPPARCHUS database. SAVE INDEX ENTRY will open a standard file dialog which will request the name of the catalog index file you wish to create. SAVE INDEX ENTRY will always place the catalog index file in the same folder as the HIPPARCHUS database (APLSFILE.AFL). SAVE INDEX ENTRY is designed to be used after coordinate transformations have been applied to all entries in the HIPPARCHUS database.
The GET INDEX ENTRY item in the FILE menu is used to specify what catalog index file HIPPARCHUS should use when retrieving data from the HIPPARCHUS database. The file to be used is specified through a standard file dialog. The DATA folder in HIPPARCHUS [[florin]] contains two catalog index files named YALE BS CATALOG and YALE 2000.0. These files point to HIPPARCHUS database entries where the stellar positions for the epochs of 1900.0 and 2000.0, and are referred to the equator and equinox of 1900.0 and 2000.0, respectively.
DELETE INDEX ENTRY will delete the specified catalog index file and remove the associated stellar coordinate entries from the HIPPARCHUS database (APLSFILE.AFL). DELETE INDEX ENTRY will bring up a standard file dialog to specify the name of the catalog index file to delete.
![]() WARNING
- DO NOT use DELETE INDEX ENTRY on the HIPPARCHUS distribution
disk. The YALE BS CATALOG, YALE 2000.0 and APLSFILE.ASF files are not write
protected.
WARNING
- DO NOT use DELETE INDEX ENTRY on the HIPPARCHUS distribution
disk. The YALE BS CATALOG, YALE 2000.0 and APLSFILE.ASF files are not write
protected.
![]() WARNING
- If you have only one catalog index file, and you delete it, you
will destroy HIPPARCHUS's ability to retrieve stellar positional data from
the HIPPARCHUS database. If you do this you will have to restore the YALE
BS CATALOG, YALE 2000.0 and APLSFILE.ASF files from your HIPPARCHUS distribution
disk.
WARNING
- If you have only one catalog index file, and you delete it, you
will destroy HIPPARCHUS's ability to retrieve stellar positional data from
the HIPPARCHUS database. If you do this you will have to restore the YALE
BS CATALOG, YALE 2000.0 and APLSFILE.ASF files from your HIPPARCHUS distribution
disk.
Use File:Page Setup to specify how any paginated ouput destined for the printing device selected through the Apple Chooser is to be formatted. Use File:Print Setup to specify device dependent printing characteristics for that selected device. The Page Setup and Print Setup dialogs which are presented will vary depending upon what type of printer and printer driver software (or layered network software) your system is accessing. If you select File:Page Setup or File:Print Setup, and no printer, or printer driver software exists on your system, the File:Page or Print Setup request will be ignored. Typical Page and Print setup dialogs for a LaserWriter printer is shown in Figure 6.5.

Figure 6.5- Typical PAGE:Page Setup Dialogs
![]() Note:
Broadside (landscape) printing should be selected via the Orientation option
in the Page Setup dialog when printing with an Enlargement > 100%.
Note:
Broadside (landscape) printing should be selected via the Orientation option
in the Page Setup dialog when printing with an Enlargement > 100%.
To terminate a HIPPARCHUS session click the QUIT item on the File menu. Alternatively, you may click the close box at the left side of the HIPPARCHUS title bar. In either case HIPPARCHUS will give you the opportunity to save all of your dialog settings and currently selected stars before exiting. If you wish to save these settings, click YES in the SAVE SETTINGS dialog (as shown in Figure 6.6). This has the same effect as invoking the File:SAVE SETTINGS item.

Figure 6.6- File:QUIT, SAVE SETTINGS Dialog
After responding to the SAVE SETTINGS dialog, a termination dialog will be presented (Figure 6.7). Click OK and HIPPARCHUS will terminate.
Figure 6.7 - The HIPPARCHUS Termination Dialog.
The INTERRUPT menu contains items which allow you to interrupt or suspend HIPPARCHUS processing and output. The three items on this menu are BREAK, PAUSE and RESUME, and may be selected while HIPPARCHUS is busy as indicated by the presence of the watch cursor.
You may abort any computational or output task which HIPPARCHUS has
started by selecting the BREAK item from the interrupt menu. Selecting
BREAK once will alert HIPPARCHUS that you have requested that its
current computational or output task be terminated. The current processing
step will complete before the interrupt takes effect. The interrupt may
happen immediately, or may take as much as a minute if HIPPARCHUS is involved
in a computationally intensive task. If you want to force an immediate
interrupt, select BREAK twice in rapid succession by clicking
on the BREAK item twice, or entering ![]() .
(depressing
.
(depressing ![]() and period) twice in a row. HIPPARCHUS will acknowledge the BREAK
with the INTERRUPT dialog shown in Figure 7.1.
and period) twice in a row. HIPPARCHUS will acknowledge the BREAK
with the INTERRUPT dialog shown in Figure 7.1.

Figure 7.1- The Interrupt:BREAK Dialog.
After you respond to the INTERRUPT dialog, by clicking on OK, HIPPARCHUS will "clean up" the aborted activity and will wait for your next menu item selection.
![]() Note: If you
select BREAK from the INTERRUPT menu while HIPPARCHUS is
executing its start up sequence (as the HIPPARCHUS application is being
launched), HIPPARCHUS will terminate and exit to the Macintosh Finder.
Note: If you
select BREAK from the INTERRUPT menu while HIPPARCHUS is
executing its start up sequence (as the HIPPARCHUS application is being
launched), HIPPARCHUS will terminate and exit to the Macintosh Finder.
You may temporarily suspend HIPPARCHUS output by selecting PAUSE
from the INTERRUPT menu, or by depressing ![]() S on the keyboard. All output will halt until you instruct HIPPARCHUS to
RESUME via the RESUME item on the INTERRUPT menu. Note that
PAUSE and RESUME are mutually exclusive. The PAUSE
item will be shaded if the RESUME item had been selected.
S on the keyboard. All output will halt until you instruct HIPPARCHUS to
RESUME via the RESUME item on the INTERRUPT menu. Note that
PAUSE and RESUME are mutually exclusive. The PAUSE
item will be shaded if the RESUME item had been selected.
The RESUME option on the INTERRUPT menu may only be selected
if the PAUSE item was in effect. Selecting RESUME on the
INTERRUPT menu (or depressing ![]() Q) will lift the temporary suspension on HIPPARCHUS generated output. Output
will continue from the point where it was paused. The RESUME item
is normally shaded on the INTERRUPT menu, and is only available
if the PAUSE item is in effect.
Q) will lift the temporary suspension on HIPPARCHUS generated output. Output
will continue from the point where it was paused. The RESUME item
is normally shaded on the INTERRUPT menu, and is only available
if the PAUSE item is in effect.
Interrupt
![]() . BREAK Abort
Current Operation (Soft, Hard Interrupts)
. BREAK Abort
Current Operation (Soft, Hard Interrupts)
RESUME EXECUTION Continue Processing after Soft Abort
PAUSE OUTPUT Suspend Output to the Current Active Window
RESUME OUTPUT Resume Output to the Current Active Window
File
ABOUT HIPPARCHUS S/W Version Number and How to Contact SofTouch APpLications
![]() 1 GET SETTINGS
Restore Previously Saved Dialog Settings File
1 GET SETTINGS
Restore Previously Saved Dialog Settings File
![]() 2 SAVE SETTINGS
Save Dialog Settings File
2 SAVE SETTINGS
Save Dialog Settings File
![]() 0 GET SATELLITES
Get Satellite Orbital Elements
0 GET SATELLITES
Get Satellite Orbital Elements
![]() G GET INDEX
ENTRY Choose Stellar Catalog
G GET INDEX
ENTRY Choose Stellar Catalog
![]() F SAVE INDEX
ENTRY Save Stellar Catalog
F SAVE INDEX
ENTRY Save Stellar Catalog
![]() D DELETE INDEX
ENTRY Delete Stellar Catalog
D DELETE INDEX
ENTRY Delete Stellar Catalog
PAGE SETUP Select /Specify Formatof Printed Pages
PRINT SETUP Specify Device Dependant Printing Attributes
QUIT Exit HIPPARCHUS (with Save Settings option)
Setup
![]() V OBSERVER
Geographic Coordinates, U.T., Julian Date
V OBSERVER
Geographic Coordinates, U.T., Julian Date
![]() L CATALOG New/Merge
Selection, Precession, Proper Motion
L CATALOG New/Merge
Selection, Precession, Proper Motion
![]() A STARS RA,
DEC, VMAG, PMRA, PMDEC, CAT#, Range & Match
A STARS RA,
DEC, VMAG, PMRA, PMDEC, CAT#, Range & Match
Spectral Class, Duplicity, Variability
![]() R RETRIEVE
Retrieve catalog entries
R RETRIEVE
Retrieve catalog entries
![]() P PLANETS Solar
System Targets and Coordinate Epoch
P PLANETS Solar
System Targets and Coordinate Epoch
![]() M COMET-MINOR
PLANET Comet/Minor Planet Orbital Elements
M COMET-MINOR
PLANET Comet/Minor Planet Orbital Elements
StarSky
![]() 4 DISPLAY OPTIONS
B/W, COLOR, Background, Window Size, Status Printing
4 DISPLAY OPTIONS
B/W, COLOR, Background, Window Size, Status Printing
![]() C STAR CHART
Star Chart (Mercator Projection) of Selected Field
C STAR CHART
Star Chart (Mercator Projection) of Selected Field
![]() X HORIZON
Horizon view (Mercator Projection) of Selected Field
X HORIZON
Horizon view (Mercator Projection) of Selected Field
![]() Y SKY MAP Sky
Map (Polar Projection) of Selected Field
Y SKY MAP Sky
Map (Polar Projection) of Selected Field
![]() T TABLE Tabular
Output of Selected Field
T TABLE Tabular
Output of Selected Field
![]() N SCAN Scan
Through Stars in Selected Field
N SCAN Scan
Through Stars in Selected Field
![]() B MESSIER Messier
Object Listing
B MESSIER Messier
Object Listing
SolarSystem
![]() E PLANETARY
EPHEMERIS Tabular Planetary Ephemeris
E PLANETARY
EPHEMERIS Tabular Planetary Ephemeris
![]() + PLANERARY
PHENOMENA Planetary Phenomena (Conjunction, Opposition...)
+ PLANERARY
PHENOMENA Planetary Phenomena (Conjunction, Opposition...)
![]() H COMET-MP
EPHEMERIS Tabular Comet or Minor Planet Ephemeris
H COMET-MP
EPHEMERIS Tabular Comet or Minor Planet Ephemeris
![]() Z MOON Lunar
Aspect
Z MOON Lunar
Aspect
![]() J GALILEAN
MOONS Graphic Timetable of Galilean Moons
J GALILEAN
MOONS Graphic Timetable of Galilean Moons
![]() I SATELLITES
Artificial Satellite Tabular Ephemerides
I SATELLITES
Artificial Satellite Tabular Ephemerides
![]() O ORRERY Display
Solar System Orrery
O ORRERY Display
Solar System Orrery
![]() K SUN CLOCK
Enter SUN CLOCK Display
K SUN CLOCK
Enter SUN CLOCK Display
HIPPARCHUS identifies error conditions, or possible causes for concern by issuing error, warning, or advisory dialogs. These dialogs are very simple and usually require you, at most, to click OK after you have read the informational message in the dialog. A few of these dialogs offer you an escape route through a Cancel button as well.
When an error occurs, HIPPARCHUS will be unable to proceed until further information is provided by the user. The information needed may be a correction to an incorrect or inconsistent entry in an input dialog, or a decision by the user on a course of action to follow. In most cases, after acknowledging the error, the user is presented with a dialog which may be used to correct the error condition.
Warnings inform the user of an abnormal or unusual condition which will be corrected autonomously by HIPPARCHUS. No action, other than acknowledging the warning is required by the user.
Advisories are informational only and are provided to alert the user that a condition, or result which may not have explicitly expected is about to arise. Like warnings, only an acknowledgment to the advisory is required.
Several errors, warnings and advisories have already been discussed in the HIPPARCHUS User's Guide. A number of others are shown here, with an explanation of what they mean, when they arise, and what actions may be appropriate after seeing one of these dialogs.

WHEN: Launching HIPPARCHUS from the Macintosh Desk top.
WHY: Insufficient memory for all possible HIPPARCHUS functions to work.
WHAT TO DO: If you get this warning, the appropriate course of action is dependent upon how your particular system is configured. Here are a few suggestions. First, just click OK, HIPPARCHUS may very well function correctly despite the warning. If so, then you can suppress this warning in the future by decreasing the Application Memory Size for APL Runtime STA in the Finder GET INFO dialog (see the Macintosh System Software User's Guide). Are you using Multi-Finder in a 1MB Macintosh? If so then restart your system with Multi-Finder turned off and re-launch HIPPARCHUS. Are you using Multifinder with a 2MB or larger Macintosh, with several other applications already open? Try closing one of the other applications and then re-launch HIPPARCHUS.

WHEN: Launching HIPPARCHUS under Multifinder
WHY: Insufficient memory for HIPPARCHUS with other applications open.
WHAT TO DO: Just what the dialog says. Quit one (or more) other applications and then re-launch HIPPARHCUS.
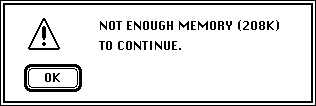
WHEN: After starting up HIPPARCHUS (during a work session).
WHY: Insufficient memory for HIPPARCHUS to perform a specific task.
WHAT TO DO: Shut down one or more concurrently running applications (under Multifinder), or restart your system without Multifinder and re-launch HIPPARCHUS.

WHEN: During the HIPPARCHUS start up sequence.
WHY: Selecting a catalog index file is required to begin a work session.
WHAT TO DO: Double click on YALE BS CATALOG, YALE 2000.0, (or an alternative catalog index file, if you have created any), when you are returned to the file selection dialog.
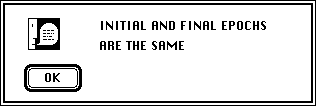
WHEN: Setup:CATALOG Dialog
WHY: Advisory only. Coordinate transformation (Precession and/or Proper Motion) was requested, but the date of the final epoch specified was the same as the initial epoch.
WHAT TO DO: Enter the desired FINAL EPOCH in that field of the Setup:CATALOG dialog, or select NONE for Precession and Proper Motion coordinate transformations.
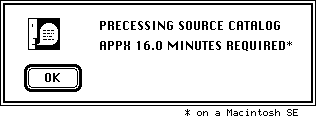
WHEN: Setup:CATALOG dialog, "Precession BEFORE" selected.
WHY: Advisory only, to alert you that this will take a while to complete.
WHAT TO DO: Take a break, get a cup of coffee, be patient.

WHEN: StarSky:STAR COLORS.
WHY: Monochrome (Black and White) display was specified with a black background. This mode of operation will not work with all monochrome displays.
WHAT TO DO: Try it, if it does not work select a white background, and use the B/W option in the STAR CHART and SKY MAP option dialogs to invert the displays.
![]()
![]()
WHEN: Setup:OBSERVER, and similar range checks elsewhere.
WHY: A latitude, longitude or Universal Time entered in the Setup:OBSERVER dialog was not in the allowable numerical range. Similar range checking is made in the numberical input fileds in many Hipparchus dialogs.
WHAT TO DO: Correct (or CANCEL) your entry in the Setup:OBSERVER dialog.

WHEN: Setup:COMET-MINOR PLANET.
WHY: A request was made to import orbital elements from a generic TEXT file which was not correctly formatted as a Minor Planet Electronic Circular data file.
WHAT TO DO: Make sure you have selected the correct file, or check the file format (see Setup:COMET-MINOR PALNET).
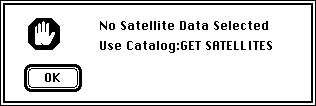
WHEN: SolarSystem:SATELLITES.
WHY: A request was made to compute an artificial satellite ephemeris, but no satellite orbital elements were previously provided.
WHAT TO DO: Use File:GET SATELLITES to import the orbital elements of the desired satellite(s), then try again.

WHEN: StarSky:SKY MAP, StarSky:STAR CHART, StarSky:SCAN, StarSky:TABLE.
WHY: A request to generate output in one of the above formats has failed because there are no data to present. Either data were never retrieved via Setup:RETRIEVE, or the specification for the last retrieval (in Setup:STARS, or a ZOOM or MAG option in StarSky:SKY MAP or StarSky:STAR CHART) resulted in a null selection.
WHAT TO DO: Check the entries in the Setup:STARS dialog, and/or use Setup:RETRIEVE to obtain data from the catalog.

WHEN: Hopefully never.
WHY: An error foreign to, or unanticipated by HIPPARCHUS has occurred.
WHAT TO DO: This advisory should rarely, if ever, be seen. If it does arise, please send a Software Problem Report to sofTouch APpLications. We will make every effort to diagnose and correct the problem. After issuing this advisory, HIPPARCHUS will automatically re-retrieve stellar data based on the current Setup:STARS and CATALOG criteria, and will ignore the request which caused the error to occur.
Should you encounter an error, warning, or informational message you do not understand please contact your sofTouch APpLications technical representative.
This appendix presents several illustrative examples of how HIPPARCHUS may be used as an astronomical planning/research tool. The examples are by no means exhaustive or complete. They are intended to introduce some of the practical concepts of using HIPPARCHUS to a new user. We strongly recommend that you try the various examples presented here, and of course, supplement them with your own experimentation. Before working through these examples you should read through the HIPPARCHUS User's Guide to familiarize yourself with the basic elements of using HIPPARCHUS.
To facilitate introducing some of the features of HIPPARCHUS, a file folder named EXAMPLES may be found in the HIPPARCHUS [[florin]] folder containing seven SETTINGS files. By restoring the pre-defined stellar selections and dialog settings saved in these files (see File:GET SETTINGS for details) you can walk through these examples in a step-by-step fashion. This folder also contains a sample Artificial Satellites Orbital Elements file called OCT92.SAT, and a Minor Planet Electronic Circular Orbital Elements file called 1993 MF.
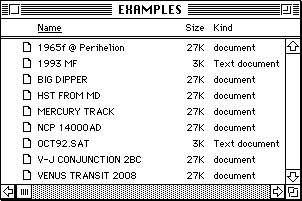
Each of the examples assumes that you have launched HIPPARCHUS and have opened the YALE 2000.0 Catalog Index file. Note that when restoring a HIPPARCHUS environment from a SETTINGS file, stellar catalog data is implicitly retrieved from the Catalog Index file (i.e., it is not necessary to invoke the RETRIEVE item from the SETUP menu). As you work through step 3 in each of the examples, take time to examine how the values and options in each of the dialogs have been set as these specifications will determine what the final results will look like.
HORIZON View, Artificial Satellite and Constellation Overlays
This example illustrates the ability of HIPPARCHUS to display the apparent positions of an artificial satellite as seen from a particular geographic location. In this example a HORIZON view will be produced for an observer in western Maryland for 21:57:00 U.T. on October 12, 1992. The view will be centered on an azimuth of 172.5deg. +/-75deg., to an elevation of 75deg., and will contain all stars of V magnitude 5.0 and brighter. The apparent positions of the Hubble Space Telescope (HST) in one minute increments will be displayed in the HORIZON frame of the starting time. Constellation overlays will be applied to the HORIZON view.
1. Select GET SETTINGS from the FILE menu.
2. Select and RESTORE the settings file named HST FROM MD.
3. Click OK in each of the 6 dialogs to restore those settings.
4. Select GET SATELLITES from the FILE menu.
5. Select and OPEN the OCT92.SAT satellite elements file (in the EXAMPLES folder).
7. Chose the Use Selected Satellites option.
8. Select HST from the list of satellites.
9. Click on Cancel to terminate satellite selection.
10. Select HORIZON from the StarSky menu.
11. Click OK in the Altitude/Azimuth specification dialog.
12. After the HORIZON view is displayed click the A. SAT. option.
13. Click OK in the A. SAT. specification dialog.
14. After the positions of HST are displayed click, the CONST. option.
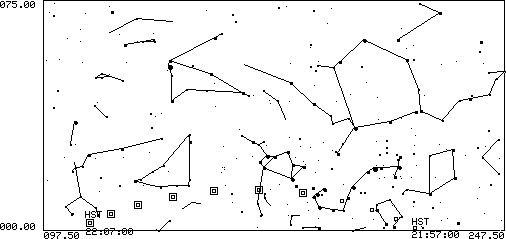
Note the nested squares indicate the positions of HST when the satellite is seen as illuminated by the observer. The single squares indicate the satellite will be dark, and hence not visible.
Select other display options if you desire, then click OK or Cancel to finish this example.
HORIZON View, Planetary Tracks, Precessional Transformations
In June of 2BC the planets Venus and Jupiter were in a close conjunction. The HORIZON view generated in this example shows the change in the relative positions of those planets as they appeared in the western sky as viewed from Babylon in the early evening at that time.
1. Select GET SETTINGS from the CATALOG menu.
2. Select and RESTORE the settings file named V-J CONJUNCTION 2BC.
3. Click OK in each of the 6 dialogs to restore those settings.
4. Select HORIZON from the StarSky menu.
5. Click OK in the Altitude/Azimuth specification dialog.
6. After the HORIZON view is displayed click the PLANETS option.
7. Click PLANETS and select the ORBITAL TRACKS option.
8. Click OK in the ORBITAL TRACKS dialog.
9. The apparent orbital tracks of Jupiter and Venus will be displayed (forward in time).
10. Click PLANETS and select the ORBITAL TRACKS option.
11. Enter -2 for the INCREMENT in DAYS.
12. Click OK in the ORBITAL TRACKS dialog.
13. The apparent orbital tracks of Jupiter and Venus will be displayed (backward in time).

(See the Setup:OBSERVER section of the HIPPARCHUS User's Guide for a discussion on the Julian proleptic calendar and the transition through the "year zero".)
Select other display options if you desire, then click OK or Cancel to finish this example.
Topocentric SKY MAP for June 8, 2004 Transit of Venus
This example illustrates the ability of HIPPARCHUS to display the apparent positions and sizes of solar system bodies, centered on a specific target, as seen from a particular geographic location. In this example a SKY MAP of 1.5deg. radius, centered on the Sun will be produced for an observer at Latitude=+39deg. 40' 55", Longitude=-76deg. 55' 10deg. for 09:00:00 U.T. on June 8, 2004. From this location, at this time, Venus will be transiting the face of the Sun.
1. Select GET SETTINGS from the FILE menu.
2. Select and RESTORE the settings file named VEBUS TRANSIT.2008
3. Click OK in each of the 6 dialogs to restore those settings.
4. Select SKY MAP from the StarSky menu.
5. Click OK in the SKY MAP dialog (1.5deg. radius, centered on a Solar System target).
6. Check SUN as the solar system target and click OK.
This SKY MAP will contain two stars and indicates the position of the center of the Sun's disk.
7. Click on PLANETS and select the SCALE DISKS TO MAP option.
The Sun and Venus (in the SE quadrant of the Sun's disk) will be shown to scale.

8. Click PLANETS and select the PLANETARY SYMBOLS option:

The symbol for the planet Venus appear at it's corresponding position.
9. Select other display options if you desire, then click OK or Cancel to finish this example.
Target centered SKY MAP, precession, proper motions.
In this example an annotated SKY MAP of a 40deg. region around the North Celestial Pole of the equator and equinox of 14,000 A.D., containing all stars of V magnitude +5.5 and brighter, will be produced. The observational epoch will be established as January 1, 14000 A.D., and stellar proper motions for that epoch will be applied. The SKY MAP will be annotated with the Bayer designations of all stars of V magnitude 3.5 and bright, and constellation overlays will be applied.
1. Select GET SETTINGS from the FILE menu.
2. Select and RESTORE the settings file named NCP 14000AD.
3. Click OK in each of the 6 dialogs to restore those settings.
Note: Proper Motion computations will be applied when you exit the CATALOG dialog.
Click OK to the "TO SAVE TRANSFORMATION Use File:SAVE INDEX Entry" advisory,
but DO NOT save this transformation at this time.
4. Select SKY MAP from the StarSky menu.
5. Enter +900000 in the DEC. field (the Declination will have been set to +223000, as determined
from the mid-point of the Declination range in the Setup:STARS dialog.
6. Click OK in the SKY MAP dialog.
7. After the SKY MAP is displayed, click the ANNOTATE option.
8. Click OK in the ANNOTATE dialog.
9. Click the CONST. option in the SKY MAP dialog.

10. Select other display options if you desire, then click OK or Cancel to finish this example.
STAR CHART, Planets, Orbital Tracks.
In this example a STAR CHART is generated showing the apparent daily path of Mercury against the background sky from October 30, 1992 to January 7, 1993. This STAR CHART appears as Figure 4.29 in the HIPPARCHUS User's Guide.
1. Select GET SETTINGS from the FILE menu.
2. Select and RESTORE the settings file named MERCURY TRACK
3. Click OK in each of the 6 dialogs to restore those settings.
4. Select STAR CHART from the StarSky menu.
5. After the STAR CHART is displayed, click PLANETS and select the ORBITAL TRACKS option.
6. Click OK in the ORBITAL TRACKS dialog.

7. Select other display options if you desire, then click OK or Cancel to finish this example.
In this example three SKY MAPs will be generated to examine the proper motions of stars in the region of Ursa Major which are of V magnitude +5.5 and brighter. Stellar positions will be computed for three observational epochs: 2000 A.D., and 250,000 A.D. For each epoch a SKY MAP centered on the star HR 4660 (the star which joins the "handle" and the "bowl" of the "Big Dipper") will be produced. The field radii of the SKY MAPs will be 40deg..
1. Select GET SETTINGS from the FILE menu.
2. Select and RESTORE the settings file named BIG DIPPER.
3. Click OK in each of the 6 dialogs to restore those settings.
4. Select SKY MAP from the StarSky menu (note the field center is specified for the star HR 4660).
5. Click OK to generate the SKY MAP for the epoch 2000 A.D.
6. After examining this SKY MAP click CANCEL to clear the SKY MAP from the window.
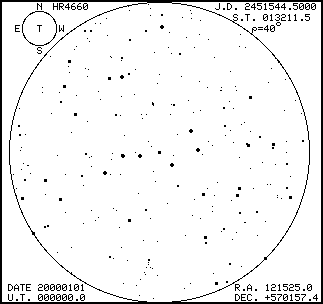
7. Select the OBSERVER item from the Setup menu.
8. Enter 2500000101 in the U.T. DATE and click OK.
9. Select the CATALOG item from the Setup menu.
10. Click the AFTER buttion for the APPLY PROPER MOTION Transformation.
11. Click the PROPER MOTIONS TO OBSERVATIONAL EPOCH button, and then click OK.
12 Select SKY MAP from the StarSky menu.
13. Click OK to generate the SKY MAP for the epoch 250,000 B.C.
14. After examining this SKY MAP click CANCEL to clear the SKY MAP from the window.

In this example a STAR CHART will be generated to examine the apparent (geocentrically viewed) path of the Sun grazing Comet 1965f at and near perihelion.
1. Select GET SETTINGS from the FILE menu.
2. Select and RESTORE the settings file named 1965f @ PERIHELION.
3. Click OK in each of the 6 dialogs to restore those settings.
4. Select STAR CHART from the StarSky menu. (
5. Click the GRID option to generate a 1/4deg. coordinate grid overlay.
7. Click the PLANETS option, and select SCALE DISKS TO MAP.
8. The disk of the Sun at the instant of perihelion for 1965f will be displayed.
9. Click the COMET/MP option, and click OK in the associated annotation dialog.
10. The path of the comet from perihelion to 1/4 day after perihelion will be displayed.
11. Click the COMET/MP option, change the increment to -0.025 days, and OK the dialog.
12. The path of the comet from perihelion to 1/4 day before perihelion will be displayed.
6. After examining this STAR CHART click CANCEL to clear the STAR CHART window.

7742 East Oakwood Drive
Tucson, Arizona 85721 USA
Tel: Tucson, Arizona 85750-2338 USA
Product Name: HIPPARCHUS
Version: 5.2.1
HIPPARCHUS is a software product belonging to sofTouch APpLications. A single copy of the HIPPARCHUS distribution disk(s) containing the HIPPARCHUS application program and data files, and documentation describing the use of HIPPARCHUS, are hereby issued to the Purchaser under this software use licence.
The HIPPARCHUS software product and the documentation describing it are copyrighted with all rights reserved to sofTouch APpLications. This software, and the accompanying documentation, may not be copied, reproduced, adapted, or transcribed onto any magnetic or other physical medium, other than for the purchaser's personal use. The purchaser is authorized to make one or more backup copies of this software. Any such backup copies must have affixed to them the same proprietary and copyright notices which were affixed to the original. Backup copies may not be distributed to third parties by the purchaser.
Under the terms of this licence agreement the purchaser may use this software on any computer which he/she owns. Additional copies of this software may not be made for this purpose.
Notice: This software was developed using APL.68000, a proprietary product of MicroAPL Ltd., which has given permission for a runtime version of APL.68000 to be included with the software. Copyright and all intellectual property rights in APL.68000 remain vested in MicroAPL Ltd. APL.68000 is a trademark of MicroAPL Ltd.
7742 East Oakwood Drive
Tucson, Arizona 85750-2338 USA
Tel: 520-296-5296
Product Name: HIPPARCHUS
Version: 5.2.1
PLEASE SUPPLY THE FOLLOWING INFORMATION:
Purchaser:
Organization:
Mail Code:
Street Address:
City/State/Country:
Zip/Postal Code:
(Optional Telephone Number):
(Optional e-mail Address):
Date:
Thank you for purchasing HIPPARCHUS by sofTouch APpLications. Please fill out and return this Software Registration form. sofTouch APpLications will keep you advised of future upgrades, enhancements, and changes to this product.
7742 East Oakwood Drive
Tucson, Arizona 85750-2338 USA
Tel: 520-296-5296
Please use this form to report any problems you encounter when using HIPPARCHUS. sofTouch APpLications welcomes your comments. Even if you do not have a problem we would appreciate hearing your ideas about how this product may be improved or enhanced.
Product Name: HIPPARCHUS
Version: 5.2.1 [ ] 68K version [ ] PPC version
Purchaser:
S/W Licence Agreement Number (see About HIPPARCHUS):
Date:
What type of computer are you using? ________________________________________ .
How much memory is installed in your computer?_______________________________ .
Please describe your system software (System Version, Finder, Multifinder, etc.),
______________________________________________________________________ .
Please describe your disk configuration (internal, hard disk, capacity, etc.),
______________________________________________________________________ .
Please describe your printer configuration (H/W and driver),
______________________________________________________________________ .
Please indicate anything special or unusual about your system or its configuration in the space provided below:
Describe the problem you encountered on the back of this form, or on a separate sheet of paper. Don't worry about elaborating too much. The more you can tell us about the problem, and the events which lead up to it, the better our chances will be of solving the problem in a timely manner. Please feel free to send any supporting documentation (printouts, screen snap shots, etc.), which will help explain the problem.
Return to sofTouch APpLications Home Page.