 |
Total
Solar Eclipse - 29 March 2006
SIDE, TURKEY (31d 22' 38.7"E, 36d 45' 15"N) Glenn Schneider Steward Observatory, University of Arizona & Joel Moskowitz All images and movies on and linked from this page © Glenn Schneider and/or Joel Moskowitz 2006 All underlined text, and most images, are links to other images and pages. For more details see the June/July 2006 issue of SEED Magazine. |
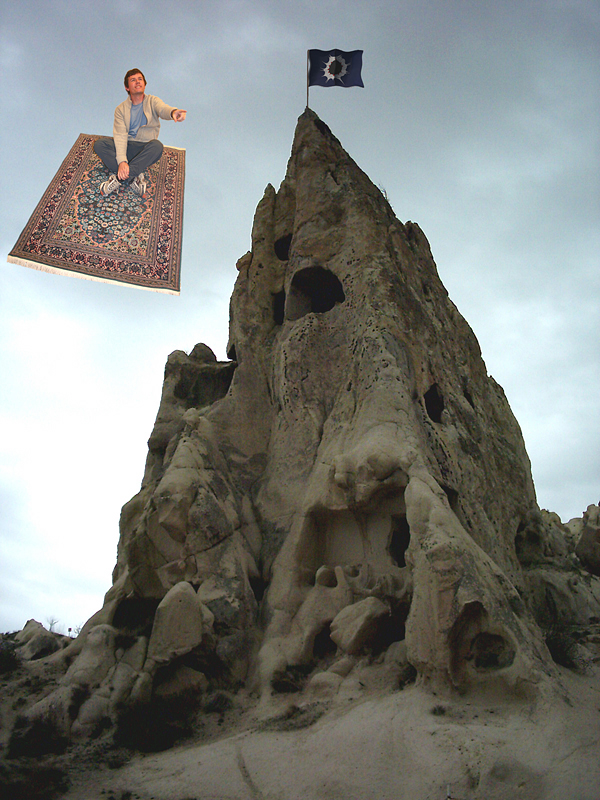 |
| For TSE 2006 good
fortune smiled upon us, and we ended up observing on the ground from
our primary observing site as planned. Alternative
planning, however, is critical to the success of any TSE
observations, as Matthew Poulton demonstrates as he scouts out one of
our alternate sites using local transportation (above right; click the
image to see at larger size). Actually, Cappadocia (which we had
opportunity to visit) is a remarkable place - geographically and
culturally. When you have finished looking at the eclipse images,
HERE
are a few stereograms taken there. |
||
Here it Comes! - Contact II Diamond Ring

Click HERE here -->
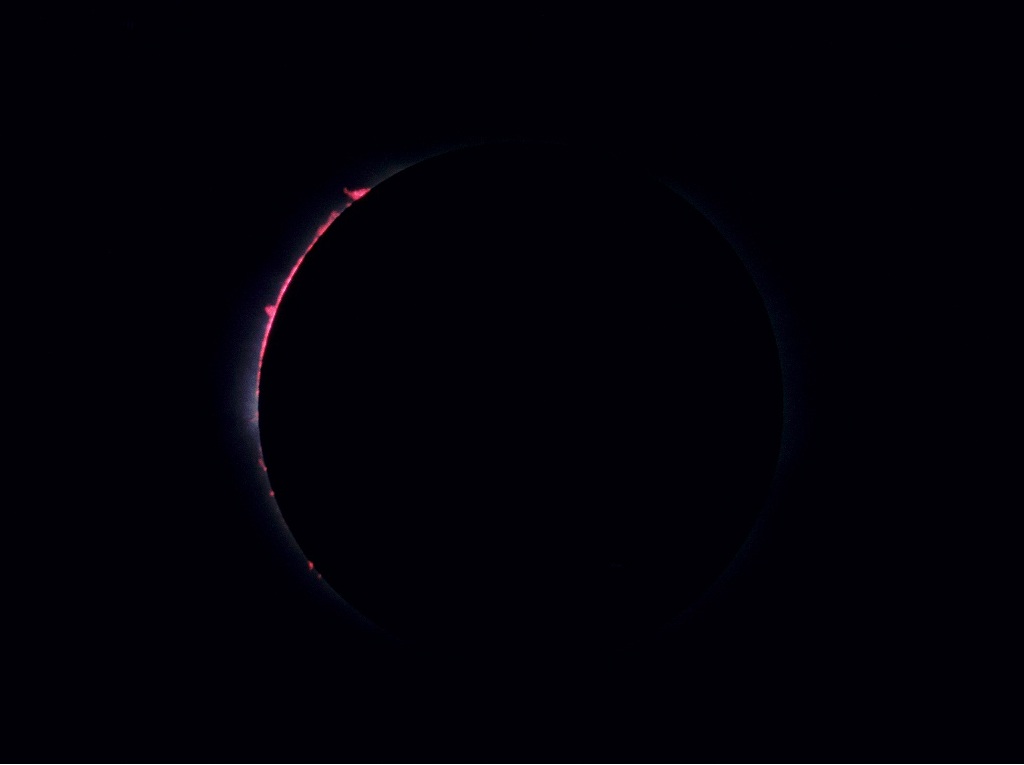
Chromosphere & Prominences (at Contact II)

The ephemeral and transitory appearance of the solar chromosphere (thin, red, horizontal layer between the photosphere and the corona), surrounded by prominences, is captured in this time-lapse image sequence along the Sun's western limb at, and shortly after, second contact -- unwrapped into a rectilinear projection. Time progresses from the bottom up: (105501.68, 105509.63, 105517.57, and 105525.52 U.T; <-- click on times to see unprojected frames). Click HERE (or on the image) to see the above image sequence at twice the image scale.
Inner Corona & Prominences

The Moon's west-to-east motion across the face of the Sun reveals prominence on the Sun's eastern limb soon after second contact (left at 10:55:17.6 U.T [<--click to see at 2x]), and on the Sun's western limb (right at 10:58:28.3 U.T. [<--click to see at 2x]) in these inner/mid coronal images. Both images are composites made from the individual high resolution (1.2 m EFL) images described below (left: images 7-19, right images 19-30). Click HERE (or on the image) to see an overlay of the two composites, showing the solar prominences seen on both limbs.
The "Moon Walk"
(Neither Michael Jackson's, nor Neil Armstrong's, but one to delight any umbraphile).
| The Moon's
apparent motion, relative to the Sun, is visually imperceptible
during totality. It's motion, however, is readily apparent when images
of the lunar disk silhouette against the corona taken at different
times are "blinked". |
See the movie which illustrates how much of the Sun was covered during the Moon's 3m 10.7s traversal of the solar disk in the time between the two images shown above. |
Spatial Filtering & Visual Perception
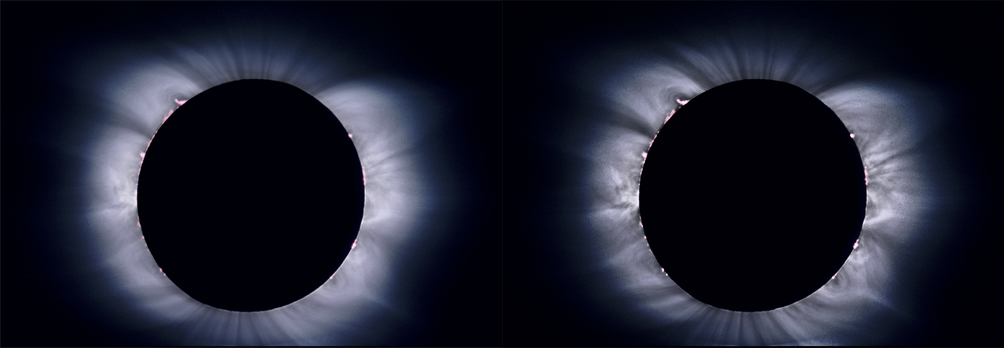
High spatial frequency structures and features in the corona are brought out with more detail and increased image contrast with appropriately apodized spatial frequency filtering. The "two limb" composite image (left), discussed above, was iteratively processed by the method described and employed to enhance the TSE 2005 inner coronal detail, to produce the image shown on the right.
The intermediate results from the progressive steps of the filtering method illustrated in THIS MOVIE (<-- click to view).
|
The "input" and "output"
images, above, are presented to be viewed as you would a
"right/left" stereogram. This was not done to present a "3D" image (as
was done HERE
in this TSE 1997 image), but
rather to "enhance" the viewing experience. What do I mean by
that? The information content in both images is slightly
different and
additional details from image pair is perceived when the images viewed
in separate eyes is combined in the visual cortex. A similar,
illustrative example, is shown in this TSE 2001
coronal image pair. Viewing R/L stereograms is difficult (if not
impossible)
for some people, but easy for other with some practice. Some tips
on viewing R/L stereograms are HERE,
but do be sure to keep your head level, and take your time for allow
the images to "fuse" with "crossed" viewing, and for your
eyes to adjust and relax into "afocal" imaging.
|
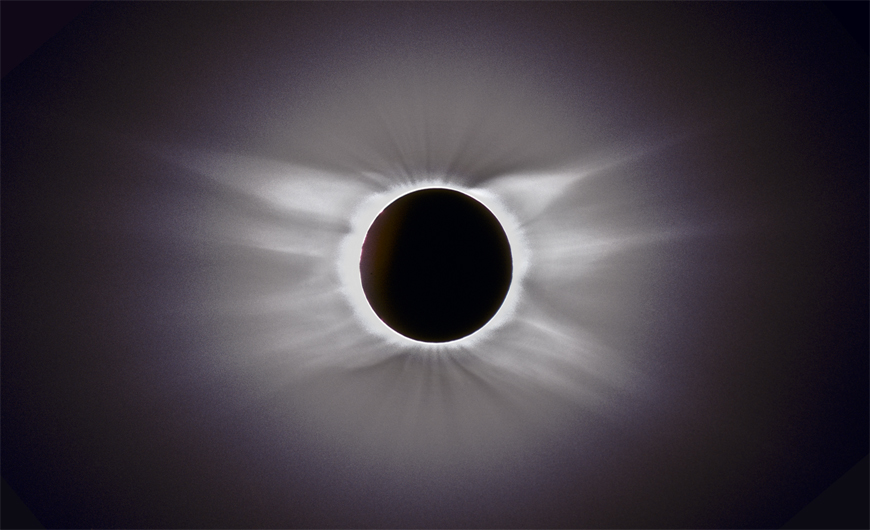
Mid-Corona & Polar Brushes

An intermediate image scale details the filamentary structures in the mid-corona, and lower surface brightness polar brushes.
Click the above image to see at 2x finer detail.
Outer Corona : Streamers & Coronal Holes
The structure of the TSE2006 corona appears roughly bi-laterally symmetric on large spatial scales. The complexity of the outer corona, and smaller angular-scale azimuthal anisotropies, are none-the-less apparent in deeply exposed imagery (here, to a distance of ~ 4.5 solar radii). Composite imagery from the 400 mm EFL "wide field" camera.
The Diamonds & Baggets of the Contact III Diamond Ring

...and then, following the re-emergence of the chromosphere, the photosphere erupted into a tight series of Baley's beads - the glinting sparkle before the diamond ring heralding the end of a glorious totality. Compare the above four images (click HERE, or on the image to see at twice the image scale), to the four, below, taken at exactly the same instants (left to right: 105844.15, 105846.15, 105848.15 and 105850.15 U.T.) with a synchronously exposed wide-field camera showing the evolution of the diamond ring against the corona enshrouded moon.
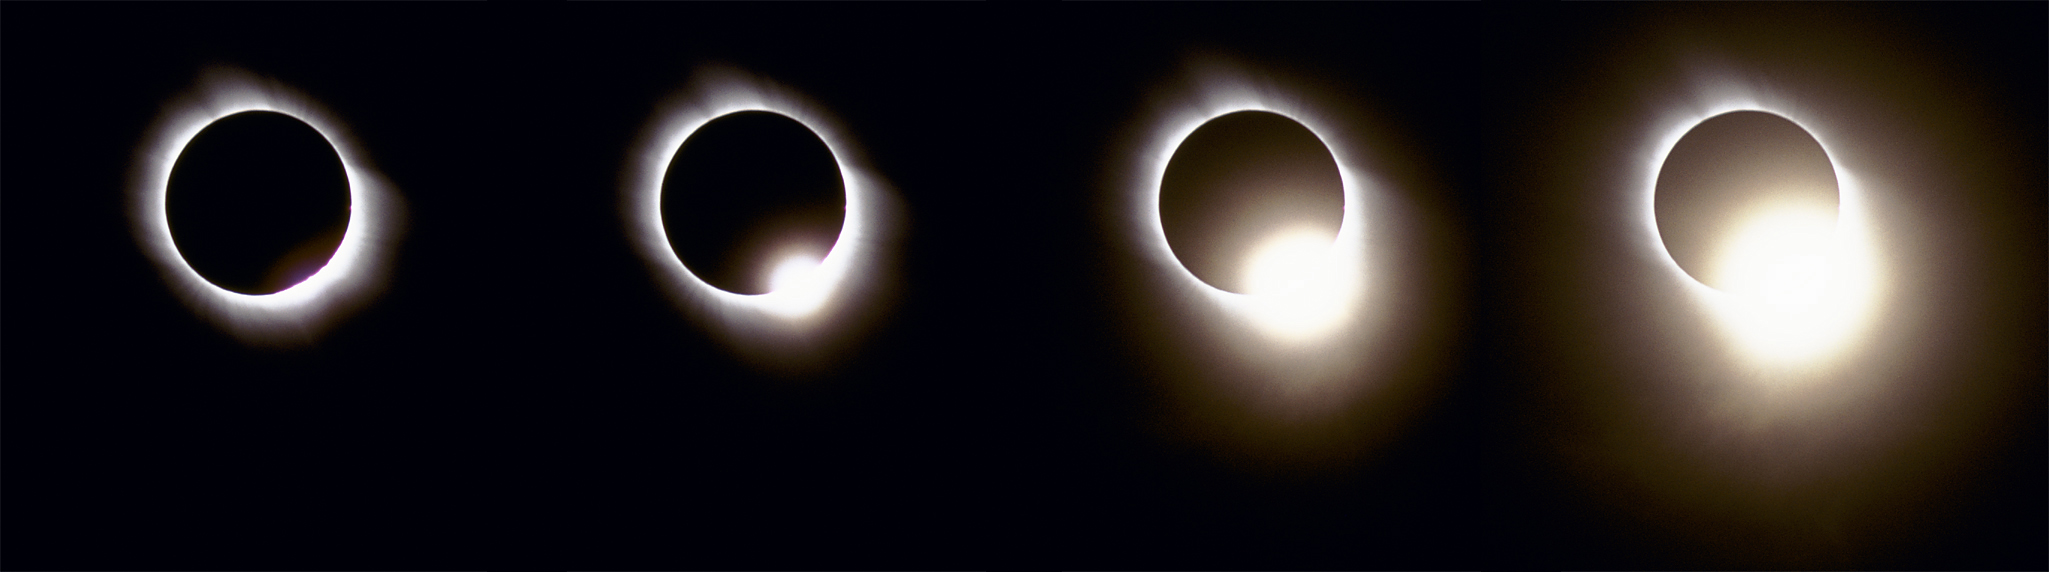
Click HERE, or on the the above image to see at twice the image scale.
INSTANT REPLAY...
A single exposure is incapable of recording the full brightness range of the corona. The images of the inner, mid, and outer corona shown above are combined from sequences of individual exposures of different exposure durations designed to capture coronal detail at different distances from the Sun as detailed below. Those exposure sequences, which also captured limb and diamond ring phenomenon, have been "time compressed" in the QuickTime movies below.
| Inner Corona |
Mid Corona |
Outer Corona |
| 6
frames per second small display format |
10
frames per second small display format |
6
frames per second small display format |
| 1
frame per second large display format |
1
frame per second small display format |
1
frame per second large display format |
How were the above images taken?
| Camera 1 & 2 - Synchronous Exposure
Sequences - see below 1. "High Resolution" Chromospheric/Inner Coronal Imagery Using "the Lug-a-scope": 1200 mm EFL ("Narrow" FOV) f/12 Achromatic Refractor 5-3/4"(clear aperture) 1/8-wave coelestat (solar tracking mirror) Kodachrome (ISO) 25 P, Pentax ZX-30 35mm film camera 400 mm EFL ("Wide" FOV) f/6.3 Camera Lens (All Refractive Optics) Fuji Superia (ISO) 200, Pentax ZX-50 35mm film camera - Unguided Image acquisition by Glenn Schneider with UMBRAPHILE camera controller |
 |
3. Mid Coronal, Intermediate Field-of-View 500mm EFL ("Intermediate" FOV) f/5.6 Takahashi Sky 90 Refractor Equatorial Tracking Mount Nikon DX2 digital camera - 1.6x pixel scale Image acquisition by Joel Moskowitz with UMBRAPHILE camera controller |
 |
Click
on the links in each of
the above descriptions for more information and images.
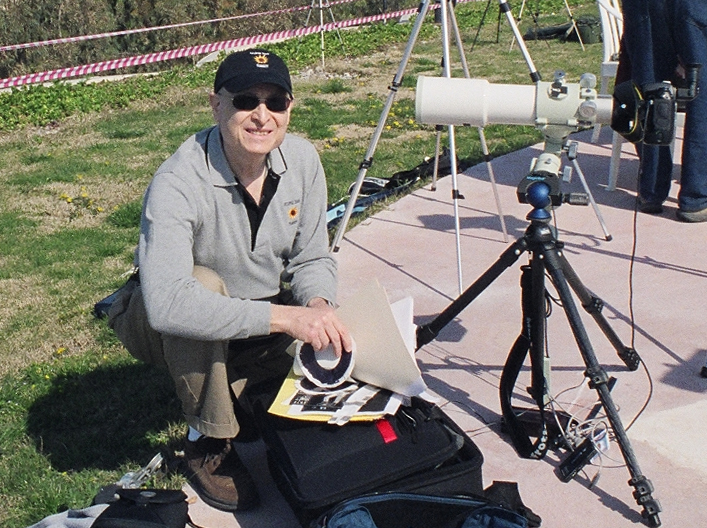
(photos: J. Friedland)
Camera 1 & 2 Synchronous Imaging
|
TSE 2006 was imaged with two
synchronously exposed 35mm film cameras.
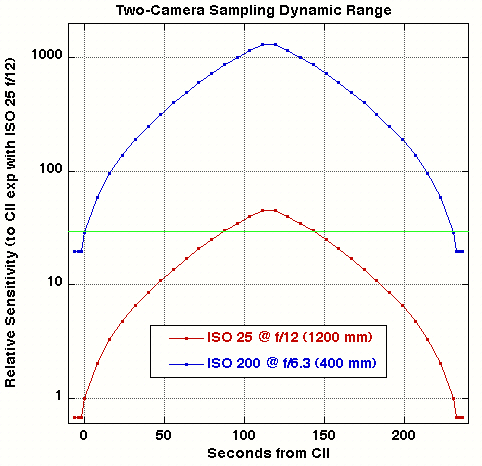
The image scales, f/ ratios, film sensitivities, and exposure durations
were selected to capture the wide dynamic range and differing spatial
scales of eclipse phenomena.
The two camera systems differed in sensitivity (for equal exposure durations) by a factor of 29. (Near) log-normal exposure ramps (15 to 1000 ms exposure durations) were identically executed in both cameras from CII to mid-eclipse (and, symmetrically from mid eclipse to CIII), providing an imaging dynamic range for the imaging sequences of ~ 2000 (11 "f" stops) in addition to the intrinsic latitude of the films used for individual exposures. 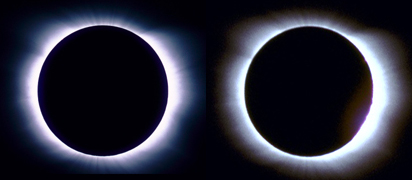 |
 Camera system sensitivities "overlapped" with exposures in Camera 2 at/near contacts and Camera 1 at/near mid-eclipse (green line). Left image pairs shows Camera 1 exp # 22 (left) and Camera 2 exposure #33 (right), (reproduced at the same image scale for comparison). |
