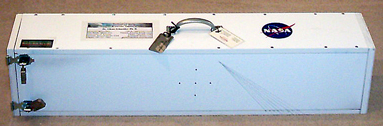
The "Lug-o-Scope"
I've always been enamored by the image quality (sharpness and lack of
chromatism) resulting from a NIKON 120 cm. diameter (3.94") clear
aperture f/10 achromatic refractor objective (EFL 1.2 meters) which I
came to through
the surplus market many years ago (long before the, now, ubiquitous
"E-bay"). I first used this lens to photograph a Total Solar
eclipse in 1988 on Banka
Island, Indonesia with a simple (alt/az) non-tracking mount.
At the time, I had constructed it's "tube" as wooden box to double as
its shipping case, and then discarded it for the return trip home
(bringing back just the optics and camera focusing mount). I next
had planned to use that lens for TSE 1990, but alas, met with one of my
three cloud-outs. For a variety of reasons, I did not use it
again for a TSE until TSE 2001, where
it was fabricated into a "folded
refractor/box camera" sitting
horizontal on the ground and fed by a coelastat. The folded
system was to reduce its size, and in principle, to make it
easier to transport when fully disassembled. That, however, still
required two over-sized, duffle-bags, and the system and all its bits
and pieces was vert heavy, and a bit more complex needing two high
quality fold flats to be aligned in the field. I used that again
for TSE 2002 WITHOUT
tracking due to the brevity and low altitude of that eclipse. The
lens and box-camera/coelastat sat on the shelf for TSE 2003
and TSE 2005 as
that was not well (to say the least) for airborne and shipboard
observations, respectively.
With TSE 2006, in this sadly post "911" world, the 1988 concept was
reincarnated as the "Lug-o-scope*" - with both a TSA (Transportation
Security Administration in the USA), and airline friendly, packaging.
* both because it is "lugged", but also a telecope which
is a piece of luggage.
Like in 1988, the telescope "tube" is the scope's own shipping box, and
the whole setup (except for the very bottom flat mounting plate and the
computer which I hand carry) with lens and camera focus mount removed,
including the alt/az mount and co-elastat fits inside. A couple
of
thin flat "panels" mount on the front and back ends of the box and the
scope
turns into a piece of airline-friendly luggage. The size is
41"x8"x8",
so its profile is well within the 63-inch 'linear semi-perimeter'
allowed by most airlines on flights as checked baggage, and the weight
- fully loaded - JUST under the, now, 50 lb limit (but noting 70lbs is
allowed with a not too terrible excess baggage fee).
The "back end" where the camera mounts of the box hinges opened (hinges
shown in the assembled above photo) and closes with hasps (see photo
immediately above ) bearing TSA-approved luggage locks on the other
side (for shipping
when in its luggage persona). With the lens, focusing mount,
and "altitude" bearings removed, the back is opened up and
everything stowed inside for shipping. The handle is, of course,
over the center of gravity as things get loaded for lugging around, and
also when assembled for use.
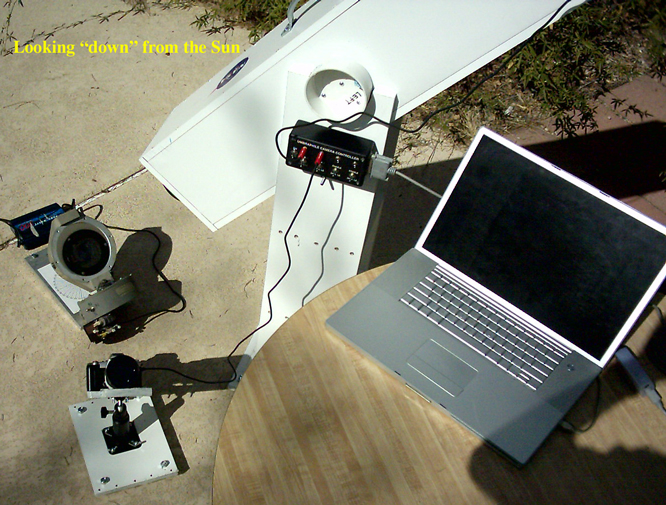
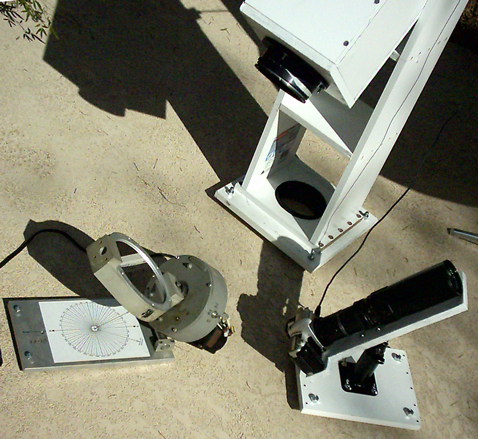
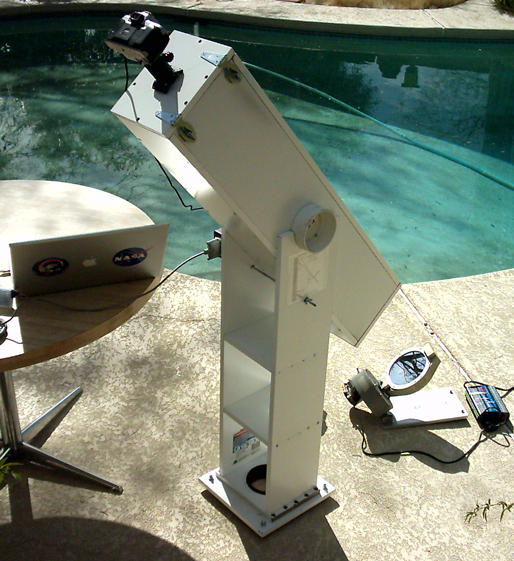
For TSE's I really do like using a tracking mirror. While maintaining
transportability, it is very easy to construct (an inexpensive) and
very
sturdy non-tracking mount (less mass to move - just a mirror, let the
telescope be "fixed)". As a detail, alignment and set-up is
actually pretty easy. (1) The co-elastat base is put flat on the
ground (adjustable corner/foot bolts with a bubble level) and aligned
to point the motor rotation axis to celestial north (or South for a
different TSE, its a reversible motor). (2) With it's "latitude"
adjustment horizontal, the mirror is rotated to point "straight up"
(i.e., toward the zenith, with the mirror leveled). (c) the
latitude wedge is then tilted "up" for the latitude of the site.
(d) using a compass rose on the co-elastat base plate as an
alignment guide, the telescope is placed along a line toward an azimuth
of 360 deg minus the azimuth of the Sun at mid-totality. (e) the
telescope is pointed "downward" with the optical axis toward the
tracking mirror at an angle deviating from "down" of 180 - [ (90
- latitude) + (90- solar declination)]. There is an angle guide
on the structure (opposite the side showing) to make that easy.
(f) a "bullseye" target is placed, centered, over the mirror's
surface. (g) With the camera removed, the target is sited
through the focuser draw tube (with the 1.2m EFL of this lens, it acts
like a low power magnifying glass for viewing a close target).
(h) The telescope is then moved radially toward or away from the
coelastat, on the appropriate azimuth line, to center the "bulls
eye". (i) a solar filter is put in place, as is the camera.
(j) the mirror is rotated reflect the solar image along the cameras
optical axis. Usually, this manual alignment is "good enough" for
the solar image to be in the appx 1.25 degree unvignetted field, and
just a few tweaks then centers it up.
Here are a few other pictures, not really aligned on the Sun here, as
it was set up as it would be for March 29 from Side, Turkey, but tested
in my backyard in Tucson earlier.
POST-FACTO
TSE2006: So??? How did it work? LOOK HERE!
Return to Glenn Schneiders: HOME PAGE, UMBRAPHILLIA
PAGE