 21 June 2001 |
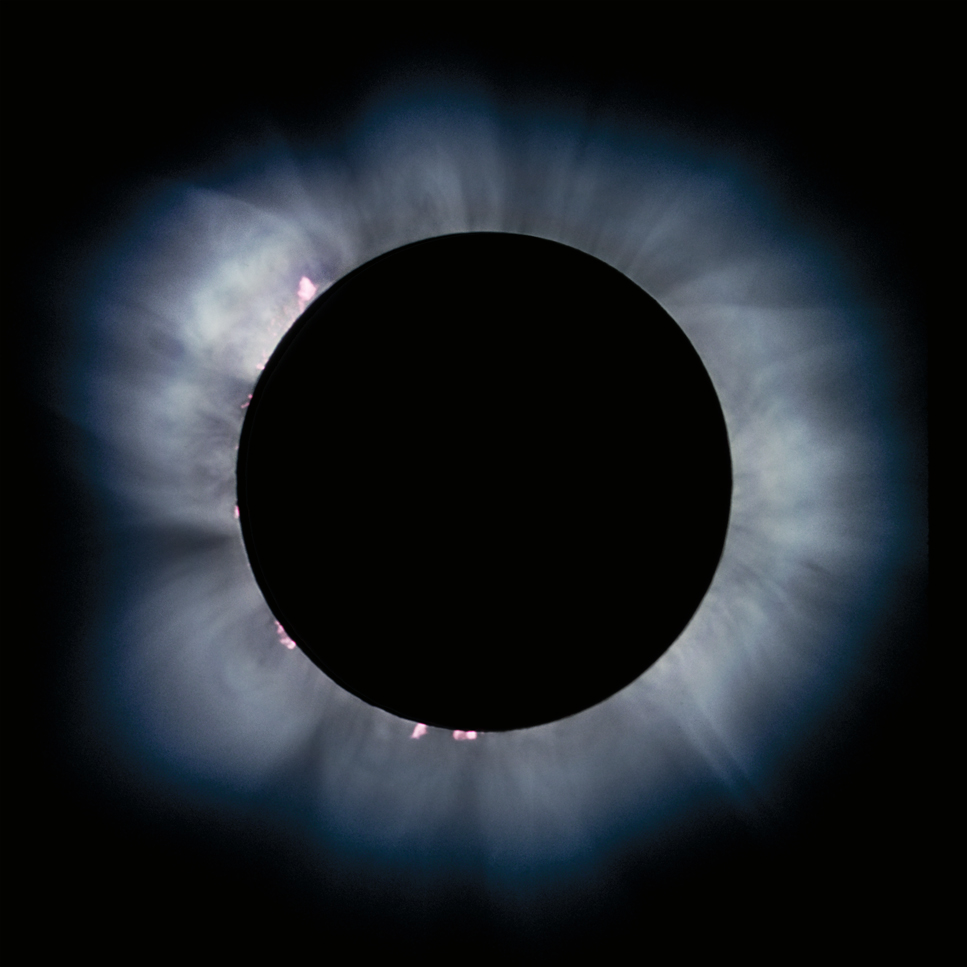 High Resolution Camera Composite. (click on picture for a large image.) |
Lower Zambezi National Park, Zambia  Eclipse over Mvuu composition with some artistic license. (click on picture for a large image. |
|
21 June 2001 |
High Resolution Camera Composite. (click on picture for a large image.) |
Lower Zambezi National Park, Zambia Eclipse over Mvuu composition with some artistic license. (click on picture for a large image. |
Glenn Schneider Steward Observatory University of
Arizona
Prelude, 15 August 2001
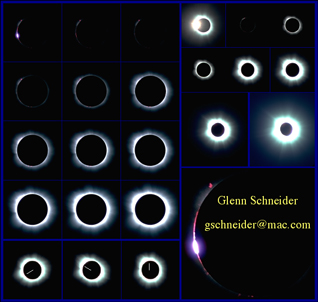
As incomprehensible as it may seem, I have for the first time seen the fruits of my photographic efforts only yesterday. You see, following my return from Zambia, I had my eclipse images (taken on Kodachrome 25P and 64P films) commercially processed and transferred to PhotoCD (by Kodak/Qualex Laboratories). I then went on travel for A MONTH(!), leaving home before the products were returned. You can bet, my first stop after returning to the Tucson airport was to my local photo distributor who arranged for the off-site processing and transport of the photo products. So, more than 5 weeks after the event here is a preliminary sampling of a subset of the "raw" (i.e., unenhanced, uncombined, un-Photoshopped) images (upper left), many taken automatically via UMBRAPHILE while I basked for the 22nd time in my life in the glory revealed by my immersion in the lunar umbral shadow.
 |
As many know, Zambia was actually my second choice for this eclipse. While this worked out extraordinarily well, plans were maturely in place to have made this an HOUR LONG TOTALITY, by observing supersonically from 60,000 feet with an Air France Concorde over the south Atlantic Ocean. Indeed, we had reached an agreement in principle with Air France, worked out many (if not most) of the technical issues with Jean Prunin, chief pilot for the Air France Concorde fleet, and had secured permission from the governor of Ascension island to base our operations from there. I was scheduled to meet with Capt. Prunin and other Air France representatives in Paris to dot the i's and cross the t's on August 9, 2000. Sadly, and tragically, fate intervened on July 25, 2000, with the horrific accidental crash of Air France Concorde Flight 4590 and the ensuing loss of all 113 persons on board. The shocking news reached me on the radio as I was driving to work to Steward Observatory that morning. As I pulled the car over to the side of the road, stunned and shaken, my first thoughts were for the families and friends of those who so quickly and unexpectedly perished. As my empathetic prayers went out to the loved ones of the Air France 4590 crew and passengers, our aspirations for a gloriously long totality were put into mortal perspective. The Concorde took wings again on November 7, 2001, as Jean has assured me it would as I sat in Manchester, England just one year earlier with his FAX in hand canceling our planned meeting. With the more recent devastation which befell us on September 11, 2001, we are all reminded that life can be even more fleeting and ephemeral than the moon's shadow. Least we forget that there are many things much more important than chasing eclipses, take a moment of remembrance for those who will never again have a chance to see the glory of Totality before reading on. Then, go hug your kids, and remind yourself of how blessed we can be in the face of tragedy and adversity. |
A few pages of pictures from our stay in Zambia
are now accessable here.
For a
retelling
of our adventures in Zambia and Zimbabwe click over to this great
commentary prepared by Dan
McGlaun who traveled
with
me to the path of totality.
ECLIPSE PHOTOGRAPHS - A FEW TECHNICAL NOTES
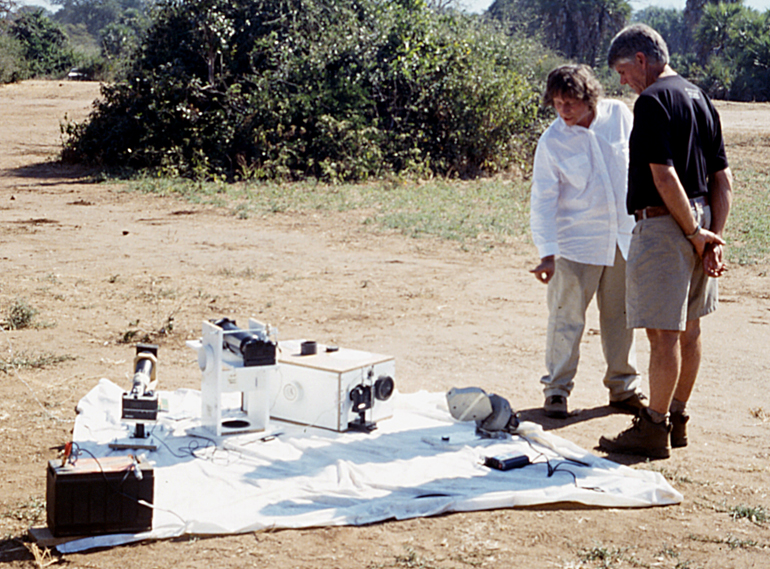
A "high resolution" camera was constructed using a co-elestat fed folded telescope with a NIKON 120cm EFL f/12 apochromatic objective lens yielding an unvignetted field-of-view of just over 1°x1° (21mm x 21mm at the focal plane) to capture details in the chromosphere, prominences, and the inner/mid coronal regions. The imaging system incorporated two 1/8-wave elliptical flats "behind" the objective to fold the optical path to the focal plane in a "U" shape permitting a very compact housing for a relatively long focal length and obviated any central obscurations. The telescope / high resolution "box camera" is shown here on a simple altaz mount, but when used in Zambia was placed directly and horizontally on the ground. The co-elestat, a separate unit co-aligned with the hi-res camera optical axis, used a 5-3/4" clear aperture 1/8-wave optical flat to track the sun, and present a stationary input beam to the camera objective lens. The optical system (including RMS wavefront errors from the three 1/8 wave flats) yields a resolution element of 0.7" FWHM at 5500 Angstroms. "Typical" daytime seeing is about a factor of two worse (1"-2", though this is highly variable) so the imaging resolution is not limited by the optical system.
Choice of Media: Images were captured on Kodachrome 25 Professional Color Reversal Film (KM25, ISO=25) which has a modulation transfer function which declines to e-1 (36.7% of peak) at a spatial frequency of 50 cycles (or "line pairs") per mm. This corresponds to 2100 half-cycles (for Nyquist limited sampling) across the 21mm image plane, or an imposed sampling resolution limit of 1.7". Thus, the spatial response of the film undersamples the optimum optical performance of the camera, but is comparable to the seeing limit.
Images were scanned to Kodak
Pro
PhotoCD Master Disks in 6 image format resolutions - the highest
being
4096x 6144 pixels. Twenty-One millimeters corresponds to 3686 pixels,
so
the highest resolution digital scans over-sample the MTF of KM 25 by a
factor
of approximately two. Thus, in the optimum case of a Gaussian noise
power
spectral distribution of the sky (seeing) of about twice the spatial
scale
of an optical resolution element, and with twice over-sampling of the
MTF
of the film in the digital scanning process, in principle the 0.7"
resolution
limit of the optical system can be recovered by the co-addition of four
registered
frames (assuming the same exposure depth). This would "naturally"
happen
for all but the outermost regions of the corona sampled when
multi-frame
composites are made from the individual frames taken to span a large
dynamic
range.
WIDE FIELD and POLARIMETRIC IMAGING
A second camera employing a 400mm f/6.3 lens with all refracting optics was used with Kodachrome 64 Professional Color Reversal Film (KPR 64, ISO=64) was used to capture the outer regions of the corona (at lower spatial resolution) outside of the FOV of the High Resolution camera. This film/f-ratio combination was 12 times "faster" than that employed in the Hi-Res camera. However, this camera did double-duty: taking both wide-field images and polarimetric images of the corona. Before second contact a polarizer was mounted on the lens (as I did NOT want to be mounting an element during totality!). A total of eighteen polarimetric images (nine 1/4-sec and nine 1-sec) were planned to be executed in the time frame from 1-3 minutes after second contact. Prior to this, additional exposures were taken - with the polarizer in place and the polarization axis oriented vertically, under control of UMBRAPHILE at the same times and durations as being taken by the high resolution camera. The 400mm lens was set to f/18, thereby yielding the same sensitivity (exposure depth) in both cameras, so that at one polarizer angle polarized and unpolarized images of about the same S/N could be compared. This can be seen by comparing the Hi-Res and Wide-Field images.
The "Wide Field" camera was also used to take polarimetric imaging sequences of the corona. UMBRAPHILE was disabled for this camera after the 10th exposure, and the polarimetric imaging sets were taken "manually". A rotatable linear polarizer with an optical polarization efficiency of 97%, and transmission efficiency of 65% was located ahead of the camera lens. Two image sets of three identical exposures at each of three polarizer angles differing by 60° were taken. The nine exposure in each of the two image-sets were identical in duration. Two integration times were used to achieve better S/N over a larger radial range (0.25s for the "short" exposures and 1.0s for the "long" exposures - both at f/8). The order of exposures in each sequence was 1-3 at 0°, 4-6 at 60°, and 7-9° at 120°.
Following the completion of the polarimetric imaging sequences, the polarizer was removed and long exposures (up to 4 seconds in duration) were taken with the remaining exposures to capture detail in the outer corona.
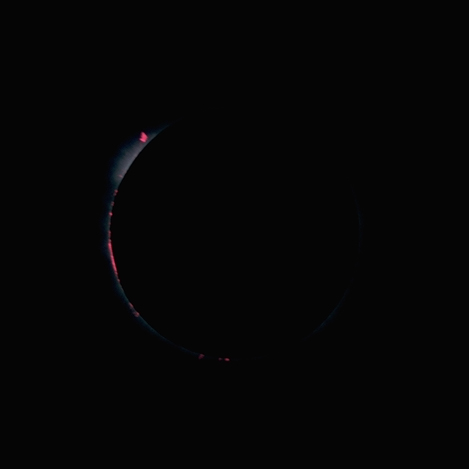
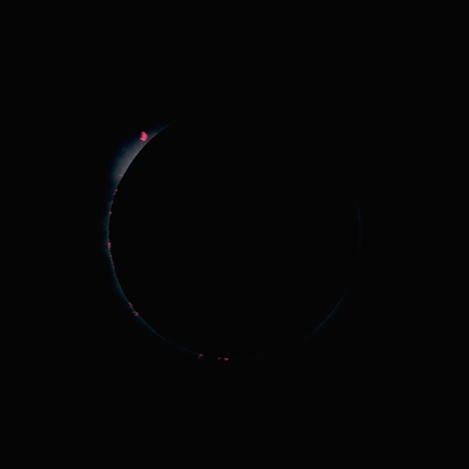
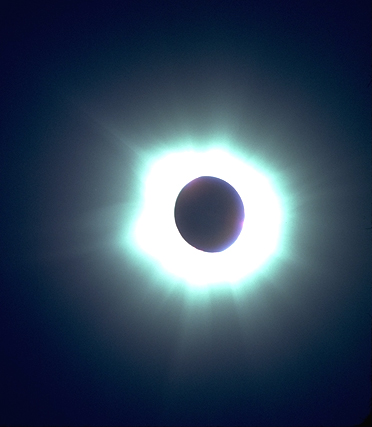
Finally (though first chronologically), a single
long second-contact diamond ring exposure was taken prior to enabling
UMBRAPHILE to capture the mid-corona with the last bit of photospheric
light. This
image, shown below on this page, was taken with the polarizer in place,
and
exhibits artifacts from instrumental scattering due to the polarizer.
A SUBSET OF "RAW" IMAGES
The viewable/downloadable images available linked to here were taken from lower-resolution (512 x 768 pixel ) scans and are designed for "web" viewing. The "postage-stamp" thumb-nails on this page are of those images, but reduced to 1/4 size for rapid downloading. All images here are .jpg files, and are of lower quality than the much larger original .tiff files. If you are using Netscape 4.7 I suggest you use an external viewer (set by your Navigator Application Preferences) - or download them and look at them with another application (like PhotoShop, or others) as they appear degraded with the internal Netscape 4.7 jpeg viewer.
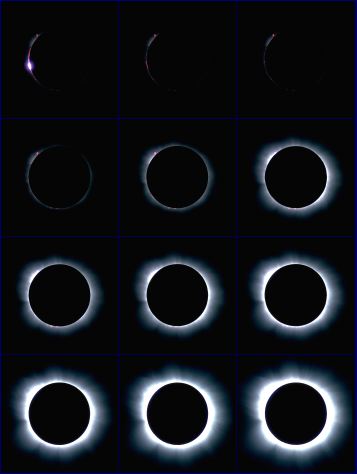 |
CLICK BELOW ON IMAGE DESCRIPTION TOP LEFT TO BOTTOM RIGHT ## Time Relative to CII Duration 01 - Contact 2 minus 1.0s (0.010s) 02 - Second Contact (0.010s) 03 - Contact 2 plus 1.0s (0.010s) 04 - Contact 2 plus 7.9s (0.015s) 05 - Contact 2 plus 15.8s (0.022s) 06 - Contact 2 plus 31.6s (0.032s) 07 - Contact 2 plus 39.5s (0.047s) 08 - Contact 2 plus 47.4s (0.101s) 09 - Contact 2 plus 55.3s (0.149s) 10 - Contact 2 plus 63.2s (0.218s) 11 - Contact 2 plus 71.0s (0.321s) 12 - Contact 2 plus 79.0s (0.472s)ALL-IN-ONE MOSAIC (Big) |
Why are there only 12 High Resolution Images?
The best-laid plans o' mice an' men
Gang aft a-gley,
An' lea'e us nought but grief an' pain
For promised joy.
- Robert Burns
An exposure sequence of 36 images was planned, with the longest (1.5s) exposures (#18 and #19) straddling mid-eclipse and of sufficient depth to almost, but not quite, saturate out to the edge of the 21mm FOV. (The logarithmically increasing exposure times, uniformly spaced in time to span the eclipse, increase to mid eclipse, then symmetrically decrease to third contact). When I opened the box, returned from Kodak, which containing my High Resolution Camera roll of film, I was elated and jumping for joy up through exposure #12. But then, DISASTER, #13 was an absurdly bright bright blur, completely over-exposed and burned in. Then the remainder of the roll dark - unexposed - no photons. AAARRRGGUUHHH!
What Happened? How could that be? During the eclipse I HEARD the solenoid firing under control of UMBRAPHILE for all exposures. I HEARD the motor winder working. I HEARD the shutter click open and close. After totality I SAW the computer screen which said all exposures had been executed. I SAW the exposure counter on the camera say 37! Why were only 12 images exposed???
THIS IS WHY:
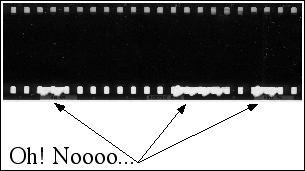
When I again looked at the film, one side of the the film-guide sprocket holes, right after where exposure #12 had been taken, were torn and damaged! See for yourself the cause for my devastation. Clearly, after the film advanced to the position for exposure #13, the bunged-up sprocket guides must have prevented a proper seating on the wider spool and the film just sat there over exposing the rest of the sequence on a single frame. I have NEVER had this happen to me before, WHY NOW? (a rhetorical cry to the comos). One might presume a mechanical failure in the camera/winder which tore the film in this way. That was my logical inference. But, to test that hypothesis I loaded in three other rolls and ran through each of them multiple times with no problems. I configured the camera identically as during the eclipse, with solenoid shutter activation and running the same exposure sequence via UMBRAPHILE - no failures! I cannot get the $*&^$# thing to fail! Was it a horribly timed, un-reproducable, transient problem? Dare I trust this camera/winder ever again? OR, could it be the unspeakable... a manufacturing defect in the film? I have no idea how many miles of 35mm film I have shot over the years and I have NEVER anything like this. (Has anyone else?)
Well, time to be prosaic (or maybe I should just take Prozac {fluoxetine hydrochloride}). No use crying over spilled milk. Kodak does say: "This product will be replaced if defective in manufacture or packaging". Gee, maybe I'll get a free roll of film. Whoppie.
The GOOD news, however is two fold. First, the 12 exposures I DID get came out phenomenally well (at least I am very happy with them). Second, another couple of shots up the dynamic range would have saturated most of those long images - before I got to exposure #18 (the corona was somewhat brighter than I anticipated) - and the outer extent was picked up by the "wide field" camera, so I did get that radial range (albeit at lower resolution) The BAD news, though, is with this camera I have no pictures at or after mid-eclipse, and indeed no third contact egress/diamond ring photos. I will, however, be stoic, and appreciative that the glass if half full - not half empty. Hence I will discuss only what I did get, and not what I didn't. And after all, NO pictures can do this event justice. It is perpetually etched in my cerebral cortex. For me that is better than on silver halides.
|
|
CLICK BELOW ON IMAGE DESCRIPTION TOP LEFT TO BOTTOM RIGHT 01 - Contact 2 minus 2.0s (0.250s) 02 - Contact 2 plus 7.9s (0.015s) 03 - Contact 2 plus 47.4s (0.101s) 04 - Contact 2 plus 63.2s (0.218s) 05 - Contact 2 plus 70.0s (0.250s) 06 - Contact 2 plus 160.0s (1.25s) 07 - Contact 2 plus 170.0s (1.50s) 08 - Contact 2 plus 180.0s (2.00s) 09 - Contact 2 plus 190.0s (4.00s)Frame 01-04 taken with polarizer (in preparation for polarimetric imaging) at f/18 for app. the same sensitivity as Hi-Res camera. UMBRAPHILE disabled after frame 04. Frame 05 is first in polarimetric sequences. Frames 06-09 without polarizer @ f/8. |
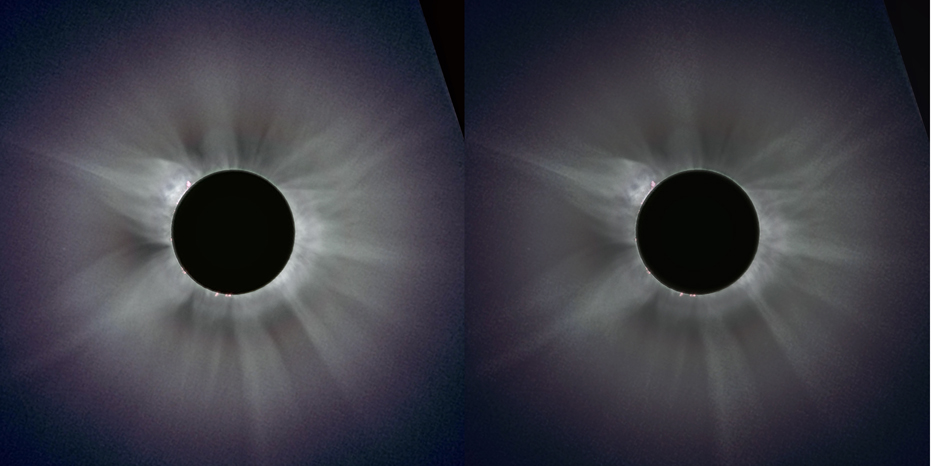
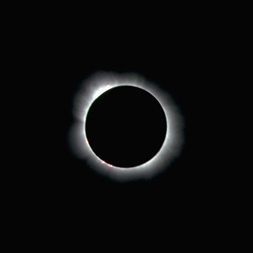
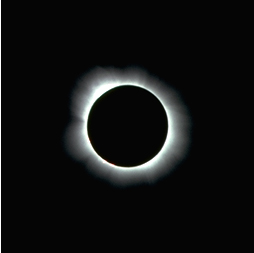
| The
above pair of images are composites made from frames 5-12 of the high
resolution camera and frames 4-9 of the wide field camera. They
have been prepared using subtly different linearity transformations and
color mappings and are presented to be viewed as you would a
"left/right" stereogram. This was not done to present a "3D" image (as
was done HERE), but
rather to "enhance" the viewing experience. What do I mean by
that? Although the information content in both images is the
same, some people have reported seeing (or at least perceiving)
additional detail from images prepared and presented in this
manner. What do you
think? Viewing R/L stereograms is difficult (if not impossible)
for some people, but easy for other with some practice. Some tips
on viewing R/L stereograms are HERE,
but do be sure to keep your head level, and take your time for your
eyes to adjust to relax into "afocal" imaging. Compare that to
viewing just the frame on the left, which is reproduced HERE at twice
the image scale. |
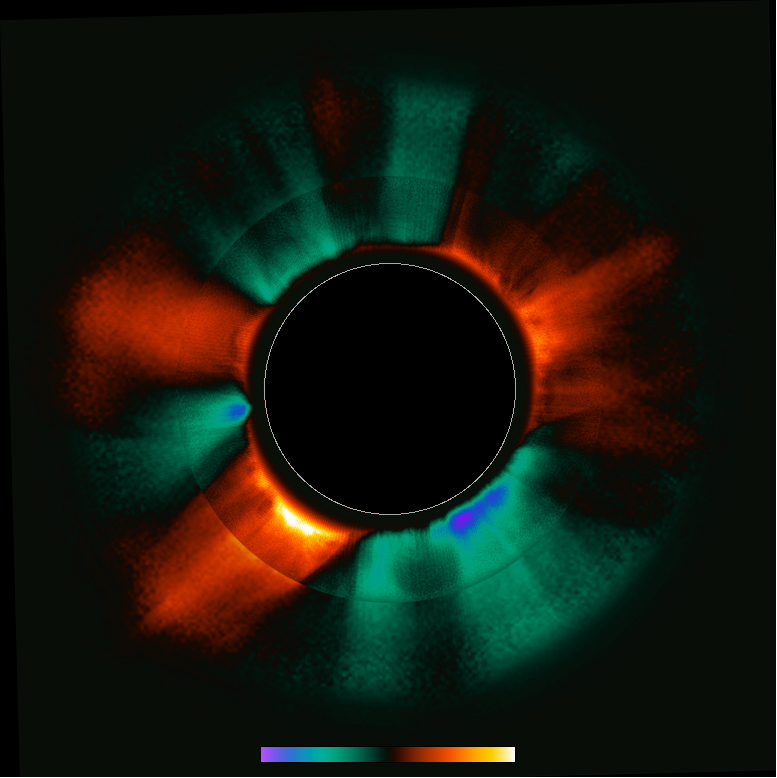
For both the 1/4-second and 1-second polarimetric images, the three exposures at each of the polarization angles were median combined to improve the S/N and the sampling. The medianed 1/4-second and 1-second exposures were then combined to improve the dynamic range at each polarization angle. The final composite color images were separated into "Red", "Green", and "Blue" component images, from which the mid-coronal differential magnetic field strength and direction (in each color band) were found using a method analogous to that described in Hines, D.C., Schmidt, G.D., and Schneider, G., 2000, "Analysis of Polarized Light with NICMOS" (Publication of the Astronomical Society of the Pacific, 112, 983). Results were very similar for each of the three wavelength regions, and were recombined to improve the S/N.
The orthogonal linear polarization components (Stokes parameters
U
and Q) are found from the three differentially analyzed images.
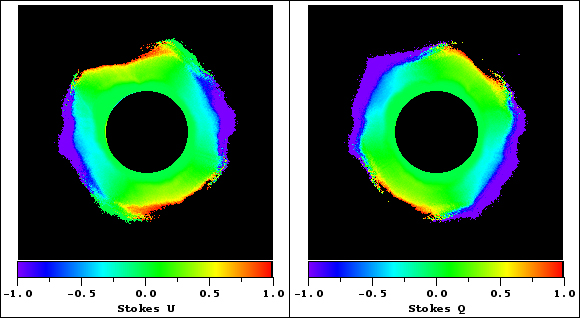
From U, Q, and the total intensity (panel below) the fraction of
light
polarized and the polarization angle, theta, is found.

In this system theta is measured counter-clockwise +30° from
the
image Y axis.
The "discontinuity" at the rotational origin is simply an artifact
of
the established fiducial angle crossing.
The total normalized intensity (I, left) of the mid-corona from
the coaddition of the three polarimetric images and the
normalized polarized intensity, P*I of the mid-corona (right).
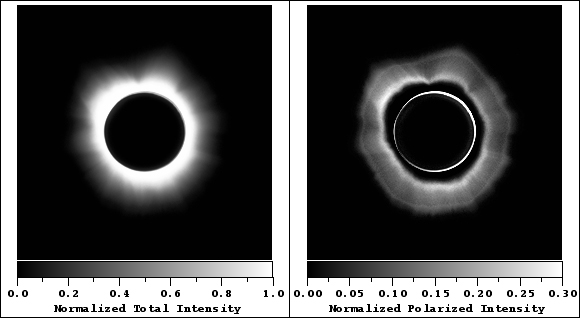
The inner most part of the corona is saturated in even the shorter
exposures.
Hence, the polarized intensity of that region cannot be determined
from
these images.
Coronal Polarimetric Field Direction (Left) and
Gradient (Right) Vector Maps
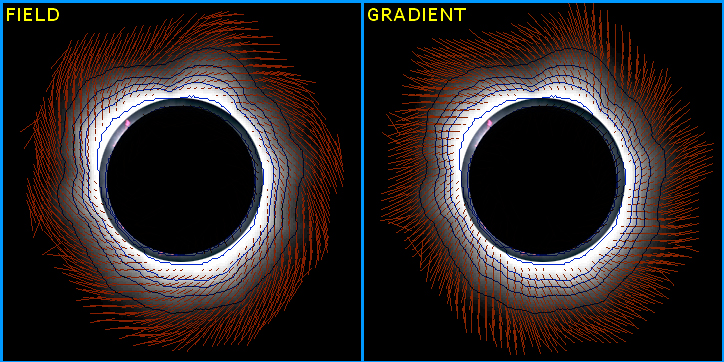
Vectors are shown in rings of increasing radius every 4° in
azimuth
around the Sun.
The length of the vectors are proportional to the polarized
intensity at that location.
Total intensity contours (blue) are shown to illustrate the
isophotal gradients.
Prominences in inner coronal region from Hi-Res unpolarized images
have
been overlaid for spatial reference.
Go to Glenn Schneider's Home Page
Go to the UMBRAPHILE Home Page

